
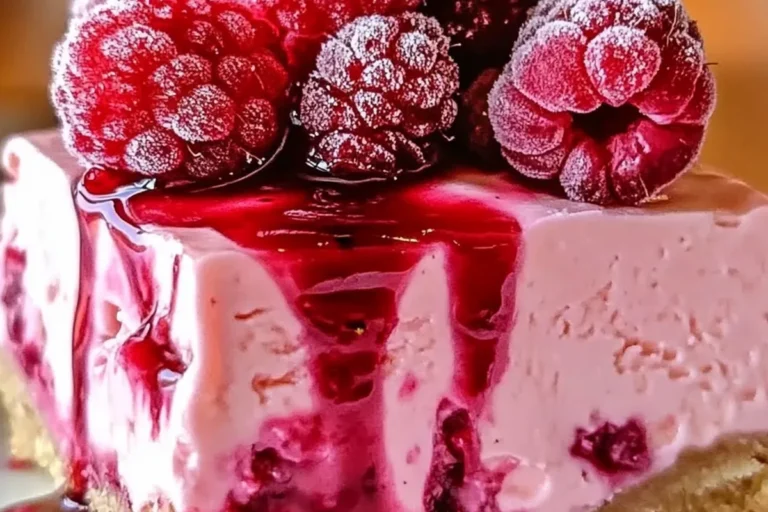
Raspberry Cheesecake
If you’re anything like me, life can often feel like a whirlwind. Between juggling work, family, and a million other tasks, it’s easy to let dessert slide. But let me tell you, this Raspberry Cheesecake is the perfect solution! It’s creamy, fruity, and oh-so-delicious, making it an ideal way to treat yourself or impress loved ones after dinner. Plus, it’s a straightforward recipe that won’t keep you in the kitchen for hours. So, grab those fresh raspberries, and let’s create a dessert that not only tastes amazing but also brings a little joy to your busy day!
Why You’ll Love This Raspberry Cheesecake
This Raspberry Cheesecake is truly a gem in the dessert world. It’s not only a feast for the eyes but also a delight for your taste buds! The best part? It’s quick and easy to whip up, making it a lifesaver for busy evenings. With its creamy texture and tangy raspberry flavor, every bite feels like a special occasion. You’ll love how it brings smiles to your loved ones’ faces without the stress of complicated steps!
Ingredients for Raspberry Cheesecake
To create this luscious Raspberry Cheesecake, you’ll need a handful of simple yet delightful ingredients. Each one plays a vital role in crafting that creamy goodness we all crave.
- Crushed biscuit crust: This forms the delicious base, giving a crunchy contrast to the creamy filling. You can use classic graham crackers or any buttery biscuit you love.
- Butter: This binds the crumbs together, creating a rich flavor. Unsalted is best, allowing you to control the saltiness of your cheesecake.
- Sugar: A touch of sweetness to balance out the tartness of the raspberries. You can opt for granulated sugar or even a sweeter alternative like coconut sugar.
- Cream cheese: The star of the show! This gives the cheesecake its rich and creamy texture. Opt for full-fat for the best results, but low-fat can work too.
- Sour cream: Adds depth and a slight tang, enhancing the creaminess. You can substitute with Greek yogurt if you’re looking for a healthier option.
- Eggs: These are essential for binding the filling, giving it structure. Room temperature eggs mix in more smoothly.
- Raspberries: Fresh or frozen, they provide that vibrant flavor and gorgeous color. If you can find organic raspberries, they’re worth it!
- Raspberry jam: This sweet topping not only adds a glossy finish but also intensifies the raspberry flavor. You can choose a seedless variety for a smoother texture.
- Fresh raspberries: For garnish, these add a fresh touch and pop of color that makes the cheesecake irresistible.
Don’t worry, I’ve included exact measurements at the bottom of the article for your convenience. Now, let’s get ready to dive into this delicious Raspberry Cheesecake adventure!
How to Make Raspberry Cheesecake
Now that we have our ingredients ready, let’s dive into the fun part—making this fabulous Raspberry Cheesecake! I promise, it’s easier than you think. Follow these simple steps, and soon you’ll have a creamy delight that not only looks stunning but also tastes heavenly.
Step 1: Prepare the Crust
Start by preheating your oven to 325°F (160°C). In a bowl, mix the crushed biscuits with melted butter and sugar until it resembles wet sand. This is where the magic begins! Press the mixture firmly into the bottom of a springform pan. It should be even and compact. Bake for 8–10 minutes until lightly golden, then let it cool. This crust is the crunchy foundation for your creamy raspberry cheesecake!
Step 2: Make the Cheesecake Filling
In a large bowl, beat the cream cheese and sugar together until smooth. Just envision the creamy texture you’re creating! Add in the sour cream, vanilla, flour, and eggs, mixing until everything is well combined. Make sure there are no lumps. This filling is what dreams are made of—rich and velvety. Don’t forget to scrape the sides of the bowl to incorporate every bit!
Step 3: Combine Raspberries
Now, it’s time to fold in the star ingredient—those gorgeous raspberries! If you’re using fresh ones, give them a gentle rinse and pat them dry. Puree half of the raspberries and fold them into the cheesecake filling. Then, gently mix in the whole raspberries for those delightful bursts of flavor. This raspberry swirl cheesecake will have everyone guessing how you made it look so beautiful!
Step 4: Bake the Cheesecake
Pour the delicious filling over the cooled crust and spread it evenly. Pop it in the oven and bake for 35–40 minutes. You’ll know it’s ready when the edges look set but the center is still slightly jiggly—it’ll firm up as it cools. Once baked, allow it to cool at room temperature for an hour before moving it to the fridge. Trust me, chilling it for at least 4 hours (or overnight) will make slicing so much easier!
Step 5: Add the Topping
Before you serve, let’s add that beautiful raspberry jam topping! Warm the jam slightly until it’s spreadable. Gently spread it over the chilled cheesecake, allowing it to ooze into every nook and cranny. Top with fresh raspberries for the finishing touch. Now, slice it up and get ready to wow your family and friends with this creamy raspberry cheesecake!
Tips for Success
- Make sure all ingredients are at room temperature for a smoother mix.
- Chill your cheesecake overnight for the best texture and easier slicing.
- Use a hot, clean knife to cut perfect slices without tearing the cheesecake.
- Don’t overmix the filling, as this can introduce unwanted air and cracks.
- Feel free to adjust the sweetness by adding more or less sugar, based on your taste.
Equipment Needed
- Springform pan: A must-have for easy removal. A regular cake pan can work, but slicing will be trickier.
- Mixing bowls: Use large bowls for mixing ingredients. You can also use a stand mixer for convenience.
- Whisk or electric mixer: For beating the cream cheese to a creamy perfection.
- Rubber spatula: Great for folding in those juicy raspberries and scraping the bowl clean.
- Measuring cups and spoons: For accurate ingredient measurements, essential for baking success.
Variations of Raspberry Cheesecake
- No Bake Raspberry Cheesecake: Skip the oven and make a chilled version! Use whipped cream and gelatin for a lighter, airy texture.
- Vegan Raspberry Cheesecake: Swap cream cheese for cashew cream or coconut cream and use a plant-based sweetener for a dairy-free delight.
- Chocolate Raspberry Cheesecake: Add melted dark chocolate to the filling for a rich, decadent twist that pairs beautifully with raspberries.
- Raspberry Swirl Cheesecake: Create a beautiful marbled effect by swirling raspberry puree into the filling before baking.
- Gluten-Free Raspberry Cheesecake: Use gluten-free biscuits for the crust and ensure all other ingredients are gluten-free for a safe treat.
Serving Suggestions for Raspberry Cheesecake
- Pair with a dollop of freshly whipped cream for added richness.
- Serve alongside a scoop of vanilla ice cream for a delightful contrast.
- Drizzle with chocolate sauce for an extra indulgent touch.
- Garnish with mint leaves to elevate presentation and freshness.
- Enjoy with a glass of sparkling rosé for a celebratory feel!
Frequently Asked Questions (FAQs)
Q: Can I make this a no bake raspberry cheesecake?
A: Absolutely! For a no bake raspberry cheesecake, simply use whipped cream and gelatin in place of the eggs and bake time. Chill until set, and you’re good to go!
Q: How do I prevent my raspberry cheesecake from cracking?
A: To avoid cracks, be careful not to overmix the batter, and always bake at a lower temperature. Chilling the cheesecake slowly will also help maintain its smooth surface.
Q: Can I use frozen raspberries for this recipe?
A: Yes, frozen raspberries work just fine! Just thaw and drain them before mixing into your cheesecake. They’ll give you that lovely fruity flavor.
Q: What can I serve with my raspberry cheesecake?
A: A dollop of whipped cream, a scoop of vanilla ice cream, or even a drizzle of warm raspberry sauce cheesecake on top make for delightful additions!
Q: How do I store leftover raspberry cheesecake?
A: Store any leftovers in an airtight container in the fridge. It’ll stay fresh for up to 4 days. Just remember to slice it with a hot knife for neat portions!
Final Thoughts
Making this Raspberry Cheesecake is more than just baking; it’s about creating a moment of joy. As you blend the ingredients and watch the cheesecake rise, you’ll find a sense of accomplishment that’s hard to beat. Each slice offers a creamy, tangy burst of flavor that brings smiles to everyone at the table. Whether it’s for a special occasion or a simple family dinner, this cheesecake has a way of turning ordinary moments into sweet memories. So, roll up your sleeves and indulge in this delightful treat—you deserve it!
PrintRaspberry Cheesecake: Indulge in a Creamy Delight!
A creamy, fruity, and velvety raspberry cheesecake that is absolutely irresistible!
- Prep Time: 20 minutes
- Cook Time: 40 minutes
- Total Time: 5 hours
- Yield: 8 servings
- Category: Dessert
- Method: Baked
- Cuisine: American
- Diet: Vegetarian
Ingredients
- Crushed biscuit crust (biscuits + butter + sugar)
- Raspberry cheesecake filling (cream cheese + sour cream + eggs + raspberries)
- Raspberry jam topping
- Fresh raspberries
Instructions
- Mix crust ingredients, press into pan, and bake 8–10 minutes at 325°F (160°C). Cool.
- Beat cream cheese + sugar, add sour cream, vanilla, flour, and eggs.
- Fold in raspberry purée and whole raspberries. Pour over crust.
- Bake 35–40 minutes until set. Cool, then chill 4 hours or overnight.
- Warm raspberry jam, spread on top, and finish with frosted raspberries. Slice and serve.
Notes
- Add lemon juice for brightness.
- Chill overnight for perfect slicing.
- Use a hot clean knife for sharp edges.
Nutrition
- Serving Size: 1 slice
- Calories: 320 kcal
- Sugar: 24g
- Sodium: 160mg
- Fat: 19g
- Carbohydrates: 32g
- Protein: 5g