
Christmas Tree Brownies
There’s something magical about the holiday season, isn’t there? As I think about all the festive gatherings and cozy family nights, I can’t help but feel excited about making Christmas Tree Brownies. These fudgy, chocolatey delights are not just treats; they bring joy and laughter into the kitchen. They’re a quick solution for busy days, perfect for impressing your loved ones, or just for indulging in some sweet nostalgia. Trust me, nothing says “Merry Christmas” quite like a plate of adorable brownie Christmas trees, ready to spread cheer and deliciousness!
Why You’ll Love This Christmas Tree Brownies
These Christmas Tree Brownies are a delightful blend of simplicity and taste. They’re incredibly easy to whip up, making them the perfect holiday recipe for busy moms like me. In just over an hour, you’ll have a batch of festive brownies that not only look stunning but also taste rich and chocolaty. Plus, the decorating part is a fun activity for the whole family, creating sweet memories together!
Ingredients for Christmas Tree Brownies
To create these delightful Christmas Tree Brownies, you’ll need a few simple ingredients that are likely already in your pantry. Here’s what you’ll gather:
- Unsalted butter: This adds richness and moisture to your brownies, making them fudgy.
- Granulated sugar: Sweetness is key! This ingredient balances the cocoa’s bitterness.
- Eggs: They bind everything together, giving the brownies their lovely texture.
- Vanilla extract: A splash of this classic flavor enhances the overall taste.
- Cocoa powder: The star of the show! This gives the brownies that deep chocolaty flavor.
- All-purpose flour: It provides structure, allowing your brownies to hold their shape.
- Salt: Just a pinch enhances the sweetness and balances flavors.
- Baking powder: This helps the brownies rise slightly, creating a soft texture.
- Green buttercream frosting: This festive topping transforms your brownies into charming Christmas trees.
- Red sprinkles and mini candy canes: These add a pop of color and a whimsical touch to your decorations.
- Optional: Consider adding edible glitter or a white chocolate drizzle for extra sparkle!
For exact measurements of each ingredient, check the bottom of the article where you can find them available for printing. Happy baking!
How to Make Christmas Tree Brownies
Step 1: Preheat and Mix
First things first, let’s preheat that oven to 350°F (175°C). While it warms up, grab a mixing bowl and combine the melted unsalted butter and granulated sugar. Stir them together until the mixture is smooth and glossy. Then, add in those two large eggs and a teaspoon of vanilla extract. Mix until everything is well-blended and you can almost taste the holiday spirit! This base is where the magic begins for your holiday brownies.
Step 2: Combine Dry Ingredients
Now it’s time to bring the dry ingredients into the party! In another bowl, sift together the cocoa powder, all-purpose flour, salt, and baking powder. This not only mixes them well but also adds some air, ensuring your brownies are light yet fudgy. Gradually whisk this dry mix into your wet ingredients. Fold gently until just combined. You want to see a few streaks of flour, as overmixing can lead to dense brownies. Trust me, no one wants that!
Step 3: Bake the Brownies
Spread the thick brownie batter into an 8×8 pan, ensuring it’s evenly distributed. Slide it into the preheated oven and let those beauties bake for 20 to 25 minutes. You’ll know they’re done when a toothpick inserted comes out with a few moist crumbs—this is key for that fudgy texture! Once baked, allow the brownies to cool completely in the pan. Patience is a virtue, especially when you want perfectly cut brownie Christmas trees!
Step 4: Prepare the Green Frosting
While the brownies cool, let’s whip up some festive green buttercream frosting. In a mixing bowl, beat together softened butter, powdered sugar, a splash of milk, vanilla extract, and green food coloring. Keep mixing until the frosting is fluffy and vibrant. If it’s too thick, add a little more milk. This green frosting will not only look charming on your brownie Christmas trees but also taste heavenly!
Step 5: Cut and Decorate
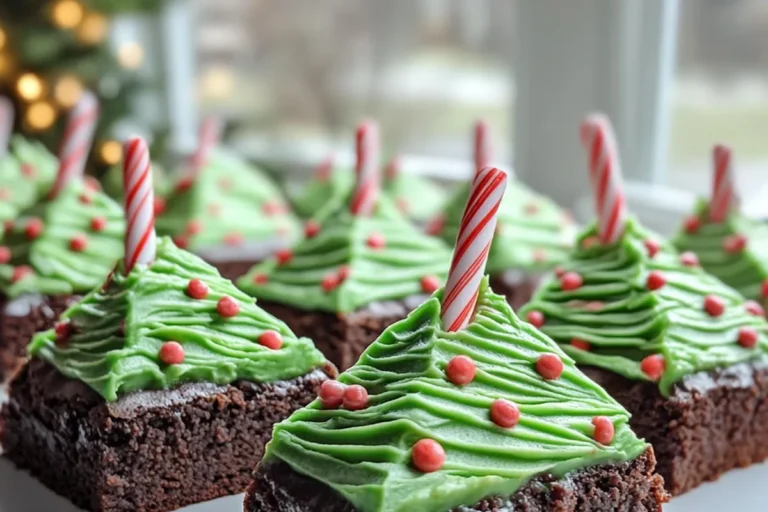
Once your brownies are cool, it’s time for the fun part! Use a sharp knife to cut them into triangles, resembling Christmas trees. Now, grab your piping bag filled with the green frosting and pipe zig-zag lines on top of each brownie. Sprinkle red sprinkles for some festive flair and insert mini candy canes as trunks. If you’re feeling extra creative, drizzle with white chocolate or sprinkle some edible glitter. These decorated brownies for Christmas will be a hit!
Tips for Success
- Chill the brownies before cutting for neat tree shapes.
- Use a small star tip for piping frosting to mimic leaves.
- Don’t skip the optional edible glitter—it adds magic!
- For a fun twist, mix cinnamon or peppermint into the batter.
- Let the frosting set in the fridge for firmer details.
Equipment Needed
- 8×8 baking pan: A square pan works best, but you can use any similar size.
- Mixing bowls: Have at least two on hand for wet and dry ingredients.
- Whisk and spatula: Perfect for mixing and folding ingredients smoothly.
- Piping bag: Use a zip-top bag if you don’t have one.
- Sharp knife: Essential for cutting those adorable brownie trees.
Variations for Christmas Tree Brownies
- Gluten-Free: Substitute the all-purpose flour with a gluten-free baking blend for a delicious gluten-free treat.
- Vegan Version: Replace eggs with flax eggs (1 tablespoon of flaxseed meal mixed with 2.5 tablespoons of water per egg) and use dairy-free butter.
- Minty Delight: Add peppermint extract to the brownie batter for a refreshing holiday twist that pairs beautifully with the frosting.
- Nutty Surprise: Fold in chopped walnuts or pecans into the brownie batter for added texture and flavor.
- Chocolate Chunk Brownies: Mix in chocolate chips or chunks for an extra dose of chocolate goodness in every bite!
Serving Suggestions
- Serve with a scoop of vanilla ice cream for a delightful contrast.
- Pair with hot cocoa or spiced apple cider for a cozy drink.
- Arrange brownies on a platter surrounded by festive decorations.
- Use coconut flakes as “snow” for a charming presentation.
- Include extra sprinkles on the side for a fun touch!
Frequently Asked Questions (FAQs)
Q: Can I make these Christmas Tree Brownies ahead of time?
A: Absolutely! You can bake the brownies a day or two in advance. Just wait to frost and decorate them until you’re ready to serve. This keeps the frosting looking fresh and festive!
Q: How should I store leftover brownie Christmas trees?
A: Store your decorated brownies for Christmas in an airtight container at room temperature for up to three days. If you need to keep them longer, refrigerate them for up to a week.
Q: Can I use different colors for the frosting?
A: Yes! Feel free to get creative with your festive brownies recipe. You can use red or white frosting or even mix colors for a fun, vibrant look that matches your holiday theme.
Q: What can I serve with my holiday brownies?
A: These brownies pair wonderfully with hot cocoa, coffee, or even a scoop of ice cream. You can also place them on a platter with other holiday treats for a delightful dessert spread!
Q: Are these brownies suitable for kids to help decorate?
A: Definitely! Decorating brownie Christmas trees is a fun activity for kids. They can add sprinkles and candy canes, making it a memorable experience for the whole family!
Final Thoughts
Making Christmas Tree Brownies is more than just a baking endeavor; it’s an experience filled with laughter, creativity, and warmth. As you gather around the kitchen, frosting those adorable brownie Christmas trees, you’ll create cherished memories with loved ones. The delightful aroma of chocolate wafting through your home will evoke that holiday spirit. Plus, these festive brownies are sure to bring smiles to everyone’s faces! So, whether it’s a family gathering or a cozy night in, let these delicious treats be a part of your holiday celebrations. Happy baking, and may your holidays be sweet and bright!
PrintChristmas Tree Brownies: Delight in Fudgy Festivity!
Fudgy, festive, chocolatey, and unbelievably cute Christmas Tree Brownies that are perfect for holiday celebrations.
- Prep Time: 15 minutes
- Cook Time: 25 minutes
- Total Time: 1 hour 10 minutes
- Yield: 8–10 servings 1x
- Category: Dessert
- Method: Baking
- Cuisine: American
- Diet: Vegetarian
Ingredients
- 1/2 cup unsalted butter, melted
- 1 cup granulated sugar
- 2 large eggs
- 1 teaspoon vanilla extract
- 1/3 cup cocoa powder
- 1/2 cup all-purpose flour
- 1/4 teaspoon salt
- 1/4 teaspoon baking powder
- Green buttercream frosting
- Red sprinkles + mini candy canes
- Optional: edible glitter or white chocolate drizzle
Instructions
- Preheat oven to 350°F (175°C). Mix melted butter and sugar, then add eggs and vanilla.
- Add cocoa, flour, salt, and baking powder. Spread mixture into an 8×8 pan and bake for 20–25 minutes. Cool completely.
- Make frosting by whipping butter, powdered sugar, milk, vanilla, and green coloring.
- Cut brownies into triangles. Pipe zig-zag green frosting on top, add red sprinkles, and insert mini candy cane trunks.
- Optional: dust with glitter or drizzle white chocolate. Chill before serving.
Notes
- Arrange brownies on coconut “snow” for presentation.
- Add extra sprinkles for kid-friendly fun.
- Serve chilled for firmer frosting details.
- Add cinnamon or peppermint to the batter for a holiday twist.
- Chill brownies before cutting for clean tree shapes.
- Pipe frosting with a small star tip for a leafy look.
Nutrition
- Serving Size: 1 brownie tree
- Calories: 240 kcal
- Sugar: 24g
- Sodium: 85mg
- Fat: 11g
- Carbohydrates: 33g
- Protein: 2g