
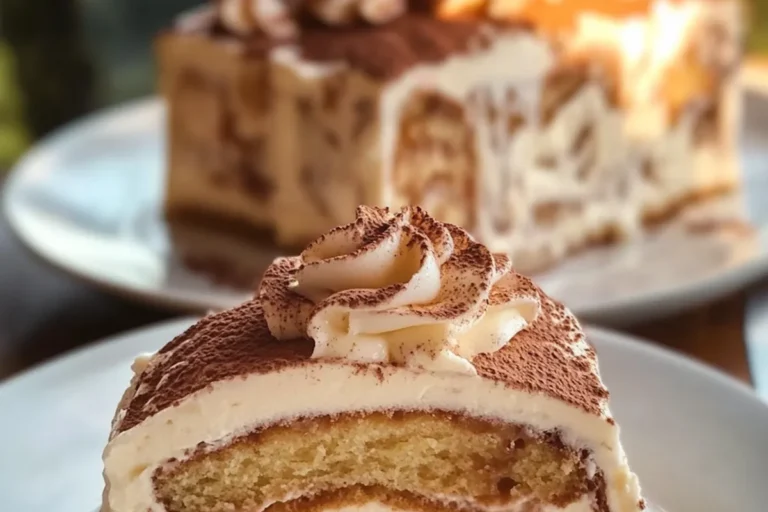
CREAMY TIRAMISU CAKE
There’s something magical about a dessert that feels both indulgent and comforting, and that’s exactly what this creamy tiramisu cake offers. Imagine sinking your fork into soft layers, each bite whispering sweet promises of coffee and cream. As a busy mom, I know how hectic life can get, and this recipe is my secret weapon for impressing loved ones without spending hours in the kitchen. Whether it’s a birthday celebration, a family gathering, or simply a Tuesday that needs a sprinkle of joy, this creamy tiramisu cake is a delightful way to add a touch of sweetness to your day.
Why You’ll Love This CREAMY TIRAMISU CAKE
This creamy tiramisu cake is a delightful combination of ease and flavor. With simple ingredients and straightforward steps, it’s perfect for busy days when you want to whip up something special. The rich layers of coffee and mascarpone create a taste sensation that will leave your family and friends begging for more. Plus, it’s a dessert that looks impressive yet requires minimal effort—what’s not to love?
Ingredients for CREAMY TIRAMISU CAKE
Gathering the right ingredients is key to creating this dreamy tiramisu cake. Here’s what you’ll need:
- All-purpose flour: The backbone of the cake layers, providing structure and a tender crumb.
- Baking powder: This little leavening agent helps the cake rise, ensuring it’s light and fluffy.
- Eggs: A vital ingredient for richness and moisture, they also help bind everything together.
- Granulated sugar: Sweetens the cake and adds to the delightful texture.
- Milk: Adds moisture and tenderness to the cake layers for that melt-in-your-mouth experience.
- Vegetable oil: Keeps the cake moist and contributes to its soft texture.
- Vanilla extract: A dash of warmth and flavor that elevates the overall taste.
- Strong brewed coffee: The star of our tiramisu! It infuses the cake with rich, bold flavor.
- Instant coffee granules: Enhances the coffee flavor in the syrup, making it extra delicious.
- Sugar (for the syrup): Helps balance the bitterness of the coffee, creating a perfect soaking solution.
- Heavy cream: Used for whipping to create a luscious and airy frosting that melts in your mouth.
- Powdered sugar: Sweetens the whipped cream without weighing it down, keeping it light and fluffy.
- Mascarpone cheese: This rich, creamy cheese is essential for that authentic tiramisu flavor.
- Cocoa powder: A dusting on top adds a beautiful finish and a hint of chocolatey goodness.
- Whipped cream swirls (optional): For an extra touch of elegance and creaminess on top.
If you want to customize this cake, you can find exact measurements at the bottom of the article, available for printing.
How to Make CREAMY TIRAMISU CAKE
Creating this creamy tiramisu cake is a delightful adventure. Each step brings you closer to that dreamy dessert you’ve been craving. Let’s dive in and break it down so you can impress your family with minimal fuss!
Step 1: Prepare the Cake Layers
First, let’s whip up those luscious cake layers! Start by preheating your oven to 350°F (175°C). In a mixing bowl, beat the eggs and granulated sugar together until the mixture becomes pale and fluffy. This step is essential for a light texture.
Next, add in the milk, vegetable oil, and vanilla extract. Mix until well combined. Now, it’s time to fold in the all-purpose flour and baking powder. Be gentle; we want to keep that airiness!
Pour the batter into a greased cake pan and bake for 20 to 22 minutes. The aroma of this espresso tiramisu cake will fill your kitchen, and trust me, it’s worth the wait! Once baked, allow the cake to cool completely before slicing it into two layers.
Step 2: Make the Coffee Syrup
Now, let’s create the star of our tiramisu cake—the coffee syrup! In a bowl, combine your cooled brewed coffee, sugar, and instant coffee granules. Stir until everything is dissolved. This syrup is what makes our layers moist and flavorful.
Feel free to adjust the sweetness to your liking; after all, this is your cake! A little extra sweetness can go a long way in enhancing that coffee flavor.
Step 3: Whip the Cream and Mascarpone
Time to make the magic happen! In a large mixing bowl, whip the heavy cream, powdered sugar, and vanilla extract until soft peaks form. It’s like creating a fluffy cloud of happiness!
Next, gently fold in the chilled mascarpone cheese. This creamy addition is what transforms our simple whipped cream into a luscious filling. Make sure everything is combined smoothly; we want that perfect creamy tiramisu texture.
Step 4: Assemble the CREAMY TIRAMISU CAKE
Now comes the fun part—assembling your tiramisu layer cake! Take the first layer of cake and place it on a serving plate. Brush generously with the coffee syrup, allowing it to soak in.
Spread a generous layer of the creamy mascarpone mixture over the soaked cake. Then, add the second cake layer on top, repeating the syrup and cream steps. Finish by frosting the top with any remaining cream.
Step 5: Chill and Serve
Your creamy tiramisu cake is almost ready! Cover it with plastic wrap and pop it in the refrigerator for at least four hours. For the best results, let it chill overnight. This allows all those amazing flavors to meld together.
When you’re ready to serve, dust the top with cocoa powder for that classic finish. If you want to go the extra mile, add some whipped cream swirls on top for a touch of elegance. Enjoy every bite of this delectable coffee cream cake!
Tips for Success
- Make sure your ingredients are at room temperature for better mixing.
- Don’t rush the cooling process; a fully cooled cake layers are crucial for easy assembly.
- Use high-quality coffee for the syrup; it enhances the flavor of your creamy tiramisu.
- For a gluten-free option, substitute all-purpose flour with almond flour.
- Chill the cake overnight for the best flavor and texture.
Equipment Needed
- Mixing bowls: A set of various sizes for mixing ingredients.
- Electric mixer: A hand mixer or stand mixer works wonders for whipping cream and batter.
- Measuring cups and spoons: Essential for precise ingredient measurements.
- 9-inch round cake pans: Alternatively, use any cake pan you have on hand.
- Spatula: A flexible spatula is great for folding and spreading.
Variations of CREAMY TIRAMISU CAKE
- Decaf Coffee: For a kid-friendly version, simply use decaffeinated coffee in the syrup.
- Gluten-Free Delight: Swap out all-purpose flour for almond flour or a gluten-free blend to create a gluten-free creamy tiramisu cake.
- Fruit-Infused: Add layers of fresh berries or sliced bananas between the cake layers for a fruity twist.
- Chocolate Lovers: Incorporate chocolate chips into the cream filling or use cocoa powder in the batter for an extra chocolatey taste.
- Layered Variations: Experiment with different flavor extracts, such as hazelnut or almond, to personalize your creamy tiramisu.
Serving Suggestions for CREAMY TIRAMISU CAKE
- Pair with a rich espresso or cappuccino to complement the coffee flavors.
- Add a side of fresh berries for a burst of color and freshness.
- Serve with a scoop of vanilla ice cream for a delightful contrast.
- Garnish with chocolate shavings or mint leaves for an elegant touch.
- Present on a beautiful cake stand for added visual appeal.
Frequently Asked Questions (FAQs)
Q: Can I make this CREAMY TIRAMISU CAKE ahead of time?
A: Absolutely! This tiramisu layer cake tastes even better after chilling overnight. It gives all those flavors time to meld beautifully.
Q: What if I don’t have mascarpone cheese?
A: No worries! You can replace mascarpone with Greek yogurt for a lighter version. It won’t have the same creamy richness, but it will still taste delicious!
Q: Is there a way to make this cake gluten-free?
A: Yes! Substitute all-purpose flour with almond flour or a gluten-free flour blend. Just make sure to adjust the measurements as needed!
Q: Can I use decaf coffee in my espresso tiramisu cake?
A: Of course! Using decaffeinated coffee is a great way to make this cake suitable for kids or those sensitive to caffeine.
Q: How should I store any leftovers?
A: Store any leftover creamy tiramisu cake in the refrigerator, covered tightly with plastic wrap or in an airtight container. It will stay fresh for about 3–4 days.
Final Thoughts
As you take that first bite of this creamy tiramisu cake, a wave of joy will wash over you. This dessert isn’t just about the layers of coffee and mascarpone; it’s a celebration of the moments we share with family and friends. I love how this recipe transforms a busy day into a delightful occasion, making it feel special. Whether it’s a birthday or a simple get-together, this cake brings smiles and sweet memories. So, gather your loved ones, slice into this dreamy delight, and savor the happiness it brings. You deserve this little slice of joy!
PrintCREAMY TIRAMISU CAKE: Indulge in This Dreamy Delight!

Indulge in this creamy tiramisu cake, a soft and dreamy dessert perfect for any occasion.
- Prep Time: 25 minutes
- Cook Time: 20 minutes
- Total Time: 4 hours 45 minutes
- Yield: 8–10 slices 1x
- Category: Dessert
- Method: Baking and Chilling
- Cuisine: Italian
- Diet: Vegetarian
Ingredients
- 1 cup all-purpose flour
- 1 teaspoon baking powder
- 4 large eggs
- 1/2 cup granulated sugar
- 1/4 cup milk
- 1/4 cup vegetable oil
- 1 teaspoon vanilla extract
- 1 cup strong brewed coffee, cooled
- 1 tablespoon instant coffee granules
- 2 tablespoons sugar
- 1 1/2 cups heavy cream
- 1/2 cup powdered sugar
- 1 teaspoon vanilla extract
- 250g mascarpone cheese, chilled
- Cocoa powder (for garnish)
- Whipped cream swirls (optional)
Instructions
- Whip eggs and sugar until pale and fluffy. Add milk, oil, and vanilla. Fold in sifted flour and baking powder. Bake for 20–22 min at 350°F (175°C). Cool and slice into two layers.
- Mix coffee, sugar, and instant granules until dissolved to make the syrup.
- Whip cream, sugar, and vanilla to soft peaks. Add mascarpone and beat until smooth to make the cream filling.
- Brush the first cake layer with syrup, spread cream, add the second layer, soak again, and frost the top with the remaining cream.
- Chill in the refrigerator for a minimum of 4 hours (overnight is best). Dust with cocoa before serving.
Notes
- Use decaf coffee for kids.
- This cake can be made gluten-free with almond flour.
- Replace mascarpone with Greek yogurt for a lighter version.
Nutrition
- Serving Size: 1 slice
- Calories: 320 kcal
- Sugar: 21g
- Sodium: 95mg
- Fat: 18g
- Carbohydrates: 34g
- Fiber: 0.5g
- Protein: 5g