
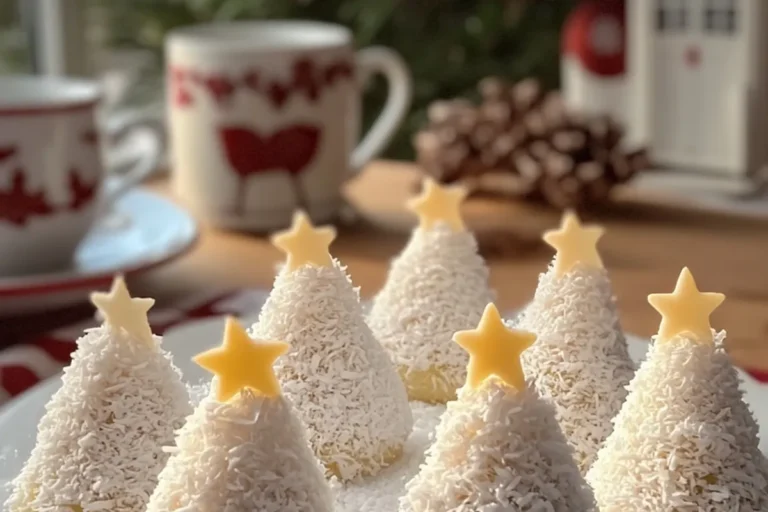
COCONUT SNOWBALL CHRISTMAS TREES
As the holiday season rolls around, I find myself searching for delightful treats that capture the magic of Christmas. That’s where these Coconut Snowball Christmas Trees come in! They’re light, creamy, and oh-so-simple to whip up. If you’re a busy mom or professional, these festive coconut desserts are a quick solution for those days when time is tight. Plus, they’ll impress your loved ones with their charming tree shape. Picture a snowy landscape on your dessert table, and trust me, these will be the stars of your holiday spread!
Why You’ll Love This COCONUT SNOWBALL CHRISTMAS TREES
These Coconut Snowball Christmas Trees are not just adorable; they’re a breeze to make! With minimal effort, you can create a festive treat that tastes heavenly. They’re perfect for busy schedules, requiring only 20 minutes of prep time. Plus, the creamy coconut flavor and snowy appearance will delight both kids and adults alike. Trust me, once you taste these holiday coconut balls, you’ll be hooked!
Ingredients COCONUT SNOWBALL CHRISTMAS TREES
Creating these delightful Coconut Snowball Christmas Trees is simple, especially when you have everything ready to go! Here’s what you’ll need:
- Desiccated coconut: This is the star ingredient! It gives the trees their snowy appearance and a lovely chewy texture.
- Sweetened condensed milk: This creamy goodness binds everything together and adds a touch of sweetness, making your coconut snowballs irresistible.
- Powdered milk: It enhances the creaminess and helps achieve the perfect consistency for shaping your trees.
- Vanilla extract: A splash of this aromatic essence adds depth to the flavor, making each bite even more delightful.
- White chocolate or candy melts: Use this to attach your edible stars on top, adding a sweet finishing touch to your trees.
- Small edible star toppers or mini fondant stars: These make your trees truly festive and fun! You can find them at most baking supply stores.
Feel free to get creative! You can tint the desiccated coconut green for a classic tree look or swap the vanilla extract for almond extract for a unique twist. If you’re cooking with kids, they’ll love decorating, so gather them around! For precise measurements, just scroll to the bottom of the article where you can find the recipe available for printing.
How to Make COCONUT SNOWBALL CHRISTMAS TREES
Making these Coconut Snowball Christmas Trees is a delightful experience! Follow these simple steps, and soon you’ll have a stunning dessert that will charm your holiday gatherings. Let’s dive into the fun!
Step 1: Mix the Base
Start by combining the desiccated coconut, powdered milk, sweetened condensed milk, and vanilla extract in a mixing bowl. Use a sturdy spoon to stir until everything is thick and sticky. This mixture should hold together well, so don’t be shy about getting in there! The sweet aroma of coconut will fill your kitchen, making it hard to resist sampling a little. Trust me; it’s the foundation of these coconut snowballs!
Step 2: Shape the Trees
Next, take about a tablespoon of the mixture and roll it into a small cone shape. Think of a tiny Christmas tree! To keep your trees uniform, use a small cookie scoop or your hands to measure out each portion. This ensures each tree is the same size, giving your dessert table a polished look. As you shape them, imagine the smiles on your loved ones’ faces when they see these charming treats!
Step 3: Coat for Snow Effect
Once your trees are shaped, it’s time to roll each cone in some extra desiccated coconut. This creates a fluffy, snow-like effect that looks absolutely magical. If you’re feeling festive, you can tint some coconut green with food coloring for a classic holiday look. Just mix a few drops of green dye with the coconut until you achieve your desired shade. These little details will make your coconut Christmas treats even more special!
Step 4: Top with Stars
Now for the fun part! Melt a bit of white chocolate or candy melts in the microwave. Once melted, dip the base of each small edible star topper into the chocolate, then press it onto the tip of your tree. This is where you can get creative! Consider using mini fondant stars or even edible glitter to add a touch of sparkle. Your Coconut Snowball Christmas Trees will look like they belong on a holiday card!
Step 5: Chill
The final step is to chill your creations in the refrigerator for about 30 minutes. This is crucial for achieving the right texture. Chilling helps firm up the coconut snowballs, making them easier to handle and giving them a delightful chewiness. While they chill, you can enjoy a warm cup of cocoa, dreaming about the joy these treats will bring to your festive celebrations!
Tips for Success
- Make sure to use fresh desiccated coconut for the best flavor and texture.
- Wet your hands slightly while shaping the trees to prevent sticking.
- For a fun twist, try adding mini chocolate chips or chopped nuts to the mixture.
- Involve the kids in the decoration process; it’s a great way to bond!
- Keep your coconut snowballs in an airtight container to maintain freshness.
Equipment Needed
- Mixing bowl: A medium-sized bowl works best; you can use a large one if you prefer.
- Sturdy spoon: A wooden spoon or spatula is perfect for mixing.
- Cookie scoop: This helps shape uniform trees; a tablespoon works as a great alternative.
- Microwave-safe bowl: For melting chocolate; any bowl will do as long as it’s microwave-safe.
- Refrigerator: Essential for chilling your coconut snowballs!
Variations
- Add a splash of coconut extract for an intense coconut flavor that will make your taste buds dance!
- For a healthier twist, use unsweetened coconut and reduce the amount of sweetened condensed milk.
- Try rolling the trees in crushed nuts or sprinkles for extra texture and flavor.
- Make them gluten-free by ensuring all ingredients are certified gluten-free.
- For a chocolate lover’s delight, mix in cocoa powder for a chocolate coconut snowball treat!
Serving Suggestions
- Pair your Coconut Snowball Christmas Trees with a warm cup of hot cocoa or spiced cider for a cozy treat.
- Present them on a festive platter, surrounded by peppermint candies for a pop of color.
- Consider using a decorative cake stand for an elegant touch during holiday gatherings.
Frequently Asked Questions (FAQs)
Q: Can I make COCONUT SNOWBALL CHRISTMAS TREES ahead of time?
Absolutely! These festive coconut desserts can be made up to two days in advance. Just shape and decorate them, then store them in an airtight container in the refrigerator. This way, you’ll have more time to enjoy the holiday hustle and bustle while still impressing your guests with these charming treats!
Q: How do I store leftover COCONUT SNOWBALL CHRISTMAS TREES?
To keep your leftover Coconut Snowball Christmas Trees fresh, place them in an airtight container in the fridge. They’ll stay delicious for about a week. If you want to enjoy them longer, you can also freeze them. Just ensure they’re well-wrapped to avoid freezer burn!
Q: Can I use unsweetened coconut for this recipe?
Yes, you can use unsweetened coconut! However, keep in mind that your Coconut Snowball Christmas Trees will be less sweet. To balance this out, you might want to add a bit more sweetened condensed milk or a sprinkle of sugar. It’s a great option if you’re looking for a less sugary treat!
Final Thoughts
Making Coconut Snowball Christmas Trees is more than just following a recipe; it’s about creating joyful memories that will last long after the holidays. The smiles on your family’s faces as they bite into these snowy delights are priceless. Plus, with their easy preparation, they’re perfect for busy days when you still want to spread a little festive cheer. These delightful coconut Christmas treats will undoubtedly become a cherished tradition in your home. So, gather your loved ones, roll up your sleeves, and let’s make this holiday season sweeter together!
PrintCoconut Snowball Christmas Trees: Irresistibly Easy Recipe!
Coconut Snowball Christmas Trees are light, creamy, and snowy treats that are irresistibly easy to make, perfect for the holiday season!
- Prep Time: 20 min
- Total Time: 50 min
- Yield: 12 mini snowball trees 1x
- Category: Dessert
- Method: No Bake
- Cuisine: American
- Diet: Vegetarian
Ingredients
- 2 1/2 cups desiccated coconut (plus extra for rolling)
- 1 can (14 oz) sweetened condensed milk
- 1/2 cup powdered milk
- 1 teaspoon vanilla extract
- White chocolate or candy melts (to attach stars)
- Small edible star toppers or mini fondant stars
Instructions
- Mix the base — Combine coconut, powdered milk, condensed milk, and vanilla until thick and sticky.
- Shape — Roll a tablespoonful into small cone-shaped trees.
- Coat — Roll each cone in extra coconut for a snow effect.
- Top with stars — Melt a bit of white chocolate, dip the base of each star, and press onto the tip.
- Chill — Refrigerate for 30 minutes until firm.
Notes
- Tint coconut green for classic tree color.
- Switch vanilla to almond extract for marzipan aroma.
- Kid-friendly: perfect for decorating together.
Nutrition
- Serving Size: 1 mini snowball tree
- Calories: 155 kcal
- Sugar: 16g
- Sodium: 35mg
- Fat: 8g
- Saturated Fat: 6g
- Carbohydrates: 18g
- Fiber: 1g
- Protein: 2g