
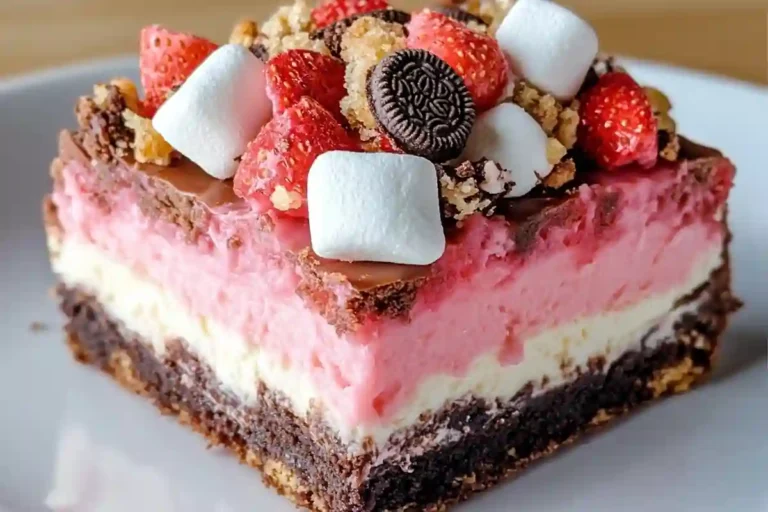
Hey there, fellow dessert lovers! If you’re anything like me, you know that life can get pretty hectic. Between juggling work, family, and everything in between, finding time to whip up something special can feel impossible. That’s where these Strawberry Crunch Brownie Bars come in! They’re the perfect blend of fudgy brownie, creamy cheesecake, and a delightful strawberry crunch that will make your taste buds dance. Whether you need a quick solution for a busy day or a show-stopping treat to impress your loved ones, these bars are sure to bring smiles all around!
Why You’ll Love This Strawberry Crunch Brownie Bars
These Strawberry Crunch Brownie Bars are a dream come true for busy moms and professionals alike! They’re incredibly easy to make, requiring just a few simple steps. Plus, the combination of rich brownie and creamy cheesecake is simply irresistible. You’ll love how quickly they come together, making them an ideal dessert for any occasion. Trust me, once you try them, they’ll become a go-to treat in your kitchen!
Ingredients for Strawberry Crunch Brownie Bars
Let’s gather our ingredients for these delightful Strawberry Crunch Brownie Bars. Each component plays a crucial role in creating that perfect balance of flavors and textures. Here’s what you’ll need:
- Brownie mix: A box mix makes this recipe super easy. You’ll also need the ingredients listed on the box, usually eggs, oil, and water.
- Cream cheese: Softened cream cheese adds a rich, creamy layer that pairs beautifully with the brownie base.
- Granulated sugar: This sweetens the cream cheese layer, balancing the flavors perfectly.
- Large eggs: Eggs help bind the cheesecake layer, giving it that smooth texture we all love.
- Vanilla extract: A splash of vanilla enhances the overall flavor, making it even more delicious.
- Freeze-dried strawberries: These little gems add a burst of strawberry flavor and a lovely crunch to the topping.
- Golden Oreos: Crushed Oreos create a delightful crunch that complements the creamy cheesecake layer.
- Melted butter: This binds the crushed Oreos and strawberries together, creating a cohesive topping.
- Optional toppings: Feel free to get creative! Whipped cream, fresh strawberry slices, mini marshmallows, or white chocolate chips can elevate your bars even further.
For exact measurements, check the bottom of the article where you can find everything listed for easy printing. Now, let’s get ready to bake these scrumptious bars!
How to Make Strawberry Crunch Brownie Bars
Now that we have our ingredients ready, let’s dive into the fun part—making these Strawberry Crunch Brownie Bars! Follow these simple steps, and you’ll have a delicious dessert that’s sure to impress.
Step 1: Prepare the Brownie Base
Start by preheating your oven according to the instructions on the brownie mix box. Grease a 9×9-inch pan to ensure easy removal later. Prepare the brownie mix as directed, usually mixing it with eggs, oil, and water. Pour the batter into the pan and spread it evenly. Bake until a toothpick inserted in the center comes out clean. Once baked, let it cool completely in the pan. This cooling time is crucial, as it sets the stage for our creamy cheesecake layer.
Step 2: Make the Cream Cheese Layer
While the brownie base cools, let’s whip up the cream cheese layer. In a mixing bowl, beat the softened cream cheese until it’s smooth and creamy. Add in the granulated sugar, eggs, and vanilla extract. Mix until everything is well combined and fluffy. Once your brownie base is cool, pour this luscious cream cheese mixture over it, spreading it evenly. This layer is what makes these bars a true fudgy brownie cheesecake bar delight!
Step 3: Bake the Cheesecake Layer
Now it’s time to bake the cheesecake layer! Place the pan in a preheated oven at 325°F (160°C). Bake for about 30 to 35 minutes, or until the cheesecake is set and slightly jiggles in the center. Once done, remove it from the oven and let it cool at room temperature. After cooling, pop it in the fridge for at least 2 hours. This chilling time helps the flavors meld beautifully.
Step 4: Create the Strawberry Crunch Topping
While the cheesecake layer chills, let’s prepare the strawberry crunch topping. In a food processor, pulse the freeze-dried strawberries and Golden Oreos until they resemble fine crumbs. Transfer this mixture to a bowl and mix in the melted butter until everything is well combined. This crunchy topping adds a delightful texture to our layered strawberry chocolate bars.
Step 5: Assemble and Serve
Once the cheesecake layer is fully chilled, it’s time to assemble! Sprinkle the strawberry crunch mixture evenly over the cheesecake layer, pressing it down gently to ensure it sticks. Now, cut the bars into squares or rectangles, depending on your preference. Serve them chilled, and watch as everyone enjoys this easy no-fail brownie treat!
Tips for Success
- Make sure your cream cheese is softened for easy mixing.
- Let the brownie base cool completely before adding the cheesecake layer to prevent melting.
- Use a sharp knife to cut the bars for clean edges.
- Chill the bars for at least 2 hours for the best texture.
- Feel free to customize the toppings based on your family’s preferences!
Equipment Needed
- 9×9-inch baking pan: A square pan is ideal, but an 8×8-inch pan works too.
- Mixing bowls: Use medium and large bowls for mixing ingredients.
- Electric mixer: A hand mixer makes it easy, but a whisk will do in a pinch.
- Food processor: Essential for crushing Oreos and strawberries, but a zip-top bag and rolling pin can work as alternatives.
- Spatula: A rubber spatula helps in spreading the cream cheese layer evenly.
Variations
- Gluten-Free: Substitute the brownie mix with a gluten-free version to make these bars suitable for gluten-sensitive friends and family.
- Chocolate Lovers: Add chocolate chips to the cream cheese layer for an extra chocolatey twist!
- Fruit Fusion: Swap out freeze-dried strawberries for other freeze-dried fruits like raspberries or blueberries for a different flavor profile.
- Nutty Crunch: Mix in chopped nuts, like almonds or walnuts, into the strawberry crunch topping for added texture and flavor.
- Vegan Option: Use a vegan brownie mix and substitute cream cheese with a plant-based cream cheese alternative for a vegan-friendly treat.
Serving Suggestions
- Pair these Strawberry Crunch Brownie Bars with a scoop of vanilla ice cream for a delightful contrast.
- Serve with a drizzle of chocolate or strawberry sauce for an extra touch of sweetness.
- For a refreshing drink, offer iced tea or sparkling lemonade alongside.
- Garnish with fresh mint leaves for a pop of color and flavor.
- Present on a beautiful platter, and watch your guests’ eyes light up!
Frequently Asked Questions (FAQs)
Q: Can I make these Strawberry Crunch Brownie Bars ahead of time?
A: Absolutely! These bars can be made a day in advance. Just store them in the refrigerator, and they’ll be even more delicious the next day!
Q: What’s the best way to store leftover bars?
A: Keep any leftover fudgy brownie cheesecake bars in an airtight container in the fridge. They’ll stay fresh for up to a week!
Q: Can I use a different type of cookie for the topping?
A: Yes! While Golden Oreos are fantastic, feel free to experiment with other cookies like chocolate sandwich cookies or even graham crackers for a unique twist.
Q: How can I make these bars more festive for a party?
A: You can dress up your strawberry Oreo dessert bars with colorful sprinkles, fresh fruit, or even a drizzle of melted chocolate for a fun and festive touch!
Q: Are these bars suitable for a gluten-free diet?
A: Yes! Just swap the brownie mix for a gluten-free version, and you’ll have a delicious treat that everyone can enjoy!
Final Thoughts
Making Strawberry Crunch Brownie Bars is more than just baking; it’s about creating sweet memories with loved ones. Each bite is a delightful journey through layers of fudgy brownie, creamy cheesecake, and a crunchy strawberry topping that brings smiles all around. Whether you’re celebrating a special occasion or simply treating yourself after a long day, these bars are sure to brighten your mood. I hope you enjoy making and sharing them as much as I do. Trust me, once you take that first bite, you’ll be hooked on this easy no-fail brownie treat!
PrintStrawberry Crunch Brownie Bars: Delight in Every Bite!
Strawberry Crunch Brownie Bars are a delightful dessert featuring layers of fudgy brownie, creamy cheesecake, and a crunchy strawberry topping, perfect for satisfying your sweet tooth.
- Prep Time: 20 minutes
- Cook Time: 35 minutes
- Total Time: ~3 hours
- Yield: 9 bars 1x
- Category: Dessert
- Method: Baking
- Cuisine: American
- Diet: Vegetarian
Ingredients
- 1 box brownie mix (plus ingredients listed on box)
- 16 oz cream cheese, softened
- ½ cup granulated sugar
- 2 large eggs
- 1 tsp vanilla extract
- 1 cup freeze-dried strawberries
- 20 golden Oreos
- ¼ cup melted butter
- Optional toppings: Whipped cream, Fresh strawberry slices, Mini marshmallows or white chocolate chips
Instructions
- Prepare and bake brownie mix in a 9×9-inch pan. Let cool completely.
- Beat softened cream cheese, sugar, eggs, and vanilla until smooth. Pour over cooled brownie layer.
- Bake at 325°F (160°C) for 30–35 minutes or until cheesecake is set. Let cool, then chill for 2 hours.
- Pulse freeze-dried strawberries and Oreos until crumbly. Mix with melted butter.
- Sprinkle strawberry crunch over chilled cheesecake layer, pressing gently. Cut into bars and serve.
Notes
- For a thicker brownie base, use a homemade brownie recipe.
- Ensure the cheesecake layer is completely set before chilling.
- Feel free to customize toppings based on preference.
Nutrition
- Serving Size: 1 bar
- Calories: ~370
- Protein: ~4g