
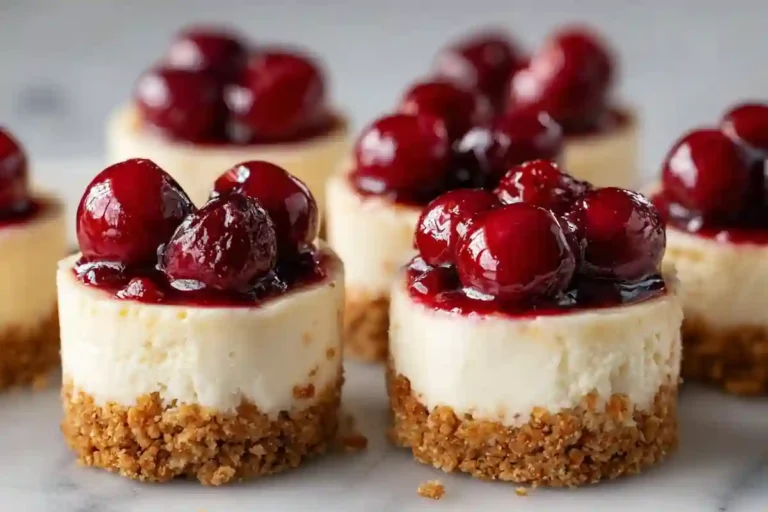
As a busy mom, I know how precious time can be, especially when it comes to whipping up something sweet. That’s why I adore these Mini Cherry Cheesecakes! They’re not just a treat; they’re a delightful bite-sized cheesecake dessert that brings joy to any gathering. Imagine creamy, dreamy cheesecakes topped with luscious cherries, all nestled in a buttery graham cracker crust. Perfect for parties or a cozy family night, these little gems are sure to impress your loved ones without taking hours in the kitchen. Let’s dive into this easy party cheesecake recipe that’s as fun to make as it is to eat!
Why You’ll Love This Mini Cherry Cheesecake
These Mini Cherry Cheesecakes are a lifesaver for busy days! They come together quickly, making them an easy party cheesecake recipe that won’t stress you out. The creamy filling paired with the sweet cherry topping creates a flavor explosion in every bite. Plus, they’re make-ahead cheesecake treats, so you can prepare them in advance and enjoy the compliments later. Who doesn’t love a no-fuss mini dessert recipe that tastes like a million bucks?
Ingredients for Mini Cherry Cheesecakes
Gathering the right ingredients is the first step to creating these delightful Mini Cherry Cheesecakes. Here’s what you’ll need:
- Graham cracker crumbs: These form the base of your crust, providing that classic crunch and flavor.
- Granulated sugar: A touch of sweetness for both the crust and the filling, balancing the flavors perfectly.
- Unsalted butter: This adds richness to the crust, helping it hold together while baking.
- Cream cheese: The star of the show! It gives the cheesecake its creamy texture and tangy flavor.
- Eggs: Essential for binding the filling together, ensuring it sets beautifully.
- Vanilla extract: A splash of this adds warmth and depth to the cheesecake filling.
- Lemon juice: Just a hint brightens the flavors and cuts through the richness of the cream cheese.
- Cherry pie filling: This is the crowning glory! It adds a burst of fruity sweetness on top of each mini cheesecake.
- Optional garnishes: Crushed graham crackers or shaved chocolate can elevate your presentation and add extra texture.
For exact measurements, check the bottom of the article where you can find everything listed for easy printing. Feel free to get creative with your toppings or even swap out the cherry filling for your favorite fruit! The possibilities are endless, and that’s what makes this recipe so fun.
How to Make Mini Cherry Cheesecakes
Now that you have your ingredients ready, let’s get to the fun part—making these Mini Cherry Cheesecakes! Follow these simple steps, and you’ll have a delicious bite-sized cheesecake dessert that everyone will love.
Step 1: Prepare the Graham Cracker Crust
Start by mixing the graham cracker crumbs, sugar, and melted butter in a bowl. Use a fork or your hands to combine everything until it resembles wet sand. This sandy texture is key to a perfect crust. It should hold together when you squeeze it in your hand. If it crumbles, just add a bit more melted butter!
Step 2: Bake the Crust
Next, line a muffin tin with cupcake liners. This makes for easy removal later. Now, take about a tablespoon of your crust mixture and press it firmly into the bottom of each liner. You want it compact, so it holds its shape. Bake at 325°F for 5–6 minutes. The crust should be lightly golden and fragrant. Let it cool while you prepare the filling.
Step 3: Make the Cheesecake Filling
In a mixing bowl, beat the softened cream cheese and sugar together until smooth and creamy. This is where the magic happens! Once it’s silky, add the eggs, vanilla extract, and lemon juice. Mix until everything is well combined. The filling should be thick and luscious, ready to be spooned onto your crusts.
Step 4: Bake the Cheesecakes
Now, it’s time to fill those crusts! Spoon the cheesecake filling onto each crust, filling them about three-quarters full. Bake for 18–20 minutes, or until the centers are set but still slightly jiggly. Once done, let them cool in the pan for about 10 minutes. Then, transfer them to the fridge to chill for at least 2 hours. This step is crucial for that perfect creamy texture!
Step 5: Add Cherry Topping
Finally, it’s time for the cherry topping! Once your mini cheesecakes are chilled, spoon a generous dollop of cherry pie filling on top of each one. Feel free to get creative with garnishes like crushed graham crackers or shaved chocolate for an extra touch. Your mini cheesecakes are now ready to impress!
Tips for Success
- Make sure your cream cheese is softened for a smooth filling.
- Don’t overmix the filling; just blend until smooth to avoid cracks.
- Chill the cheesecakes for at least 2 hours for the best texture.
- Use a cookie scoop for even filling portions.
- Experiment with different toppings like blueberries or chocolate sauce!
Equipment Needed
- Muffin tin: A standard muffin tin works perfectly, but you can use a mini muffin tin for smaller bites.
- Cupcake liners: These make for easy cleanup; silicone liners are a great reusable alternative.
- Mixing bowls: A medium bowl for the crust and a larger one for the filling.
- Electric mixer: A hand mixer is ideal, but a whisk will do if you’re feeling strong!
- Measuring cups and spoons: Essential for accurate ingredient portions.
Variations of Mini Cherry Cheesecakes
- Chocolate Cherry Cheesecakes: Add melted chocolate to the cheesecake filling for a rich, decadent twist.
- Berry Bliss: Swap the cherry pie filling for mixed berries or a blueberry compote for a fresh flavor.
- Gluten-Free Option: Use gluten-free graham cracker crumbs or almond flour for the crust to accommodate dietary needs.
- Vegan Version: Substitute cream cheese with a vegan cream cheese alternative and use flax eggs instead of regular eggs.
- Nutty Delight: Incorporate crushed nuts like pecans or walnuts into the crust for added texture and flavor.
Serving Suggestions for Mini Cherry Cheesecakes
- Pair with a dollop of whipped cream for an extra creamy touch.
- Serve alongside fresh fruit like strawberries or raspberries for a pop of color.
- Complement with a cup of coffee or tea for a delightful afternoon treat.
- Arrange on a decorative platter for an eye-catching presentation.
- Drizzle with chocolate sauce for a decadent finish!
Frequently Asked Questions (FAQs)
Q: Can I make these Mini Cherry Cheesecakes ahead of time?
A: Absolutely! These make-ahead cheesecake treats can be prepared a day in advance. Just store them in the refrigerator until you’re ready to serve. They taste even better after chilling!
Q: What can I use instead of cherry pie filling?
A: You can get creative! Try using fresh berries, chocolate sauce, or even caramel for a different flavor. The versatility of these bite-sized cheesecake desserts is one of their best features!
Q: How do I prevent my cheesecakes from cracking?
A: To avoid cracks, make sure not to overmix the filling. Also, bake them at a lower temperature and let them cool gradually in the oven. This no-fuss mini dessert recipe is all about gentle handling!
Q: Can I freeze Mini Cherry Cheesecakes?
A: Yes, you can! Just wrap them tightly in plastic wrap and store them in an airtight container. When you’re ready to enjoy, let them thaw in the fridge overnight.
Q: How many mini cheesecakes does this recipe yield?
A: This recipe makes 12 delightful mini cheesecakes, perfect for sharing at parties or enjoying as a sweet treat at home!
Final Thoughts
Making Mini Cherry Cheesecakes is more than just baking; it’s about creating sweet memories with loved ones. These little bites of joy are perfect for any occasion, from family gatherings to casual get-togethers with friends. The creamy filling and cherry topping bring smiles and compliments, making you feel like a culinary superstar. Plus, the ease of preparation means you can whip them up even on the busiest days. So, roll up your sleeves, gather your ingredients, and let the delightful aroma fill your kitchen. Trust me, these mini cheesecakes will become a cherished favorite in your home!
PrintMini Cherry Cheesecakes: Perfect Bite-Sized Delight!
Mini Cherry Cheesecakes are creamy, dreamy, and bursting with sweet cherry bliss, making them the perfect bite-sized treat for any party.
- Prep Time: 15 minutes
- Cook Time: 25 minutes
- Total Time: ~2 hrs 40 mins
- Yield: 12 mini cheesecakes 1x
- Category: Dessert
- Method: Baking
- Cuisine: American
- Diet: Vegetarian
Ingredients
- 1 cup graham cracker crumbs
- 3 tbsp granulated sugar
- 4 tbsp unsalted butter, melted
- 16 oz (2 packages) cream cheese, softened
- ½ cup granulated sugar
- 2 large eggs
- 1 tsp vanilla extract
- 1 tbsp lemon juice
- 1 can (21 oz) cherry pie filling
- Optional: crushed graham crackers or shaved chocolate for garnish
Instructions
- Mix graham cracker crumbs, sugar, and melted butter until it forms a sandy texture.
- Line a muffin tin with cupcake liners, add about 1 tbsp of crust mix per liner, press firmly, and bake at 325°F (160°C) for 5–6 minutes.
- Beat cream cheese and sugar until smooth. Add eggs, vanilla, and lemon juice – mix until silky.
- Spoon filling onto crusts, bake for 18–20 minutes or until centers are set. Cool in the pan for 10 minutes, then chill for at least 2 hours.
- Add cherry pie filling on top of each mini cheesecake. Garnish if desired.
Notes
- These mini cheesecakes can be made ahead of time and stored in the refrigerator.
- Feel free to customize the topping with other fruits or chocolate.
Nutrition
- Serving Size: 1 mini cheesecake
- Calories: ~220
- Sugar: ~15g
- Sodium: ~150mg
- Fat: ~12g
- Saturated Fat: ~7g
- Unsaturated Fat: ~3g
- Trans Fat: 0g
- Carbohydrates: ~25g
- Fiber: <1g
- Protein: ~3g
- Cholesterol: ~50mg