
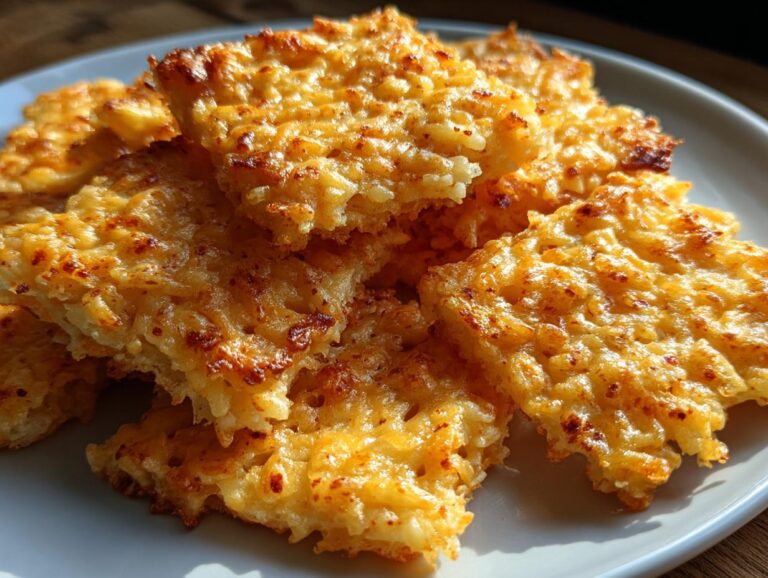
Oh my gosh, you have to try these Rice Krispie Cheese Crackers – they’re my new obsession! That first bite with the incredible crunch and that sharp cheddar punch? Absolute perfection. I stumbled upon this recipe when I needed a last-minute party snack and oh boy, did they steal the show. Now my friends beg me to make them for every gathering. The best part? Just 5 simple ingredients and 30 minutes from bowl to snack time. Whether you’re hosting game night or need an after-school treat, these crispy little bites never disappoint. Trust me, once you pop one in your mouth, you won’t stop at just a few!
Why You’ll Love These Rice Krispie Cheese Crackers
Listen, I know a good snack when I taste one, and these crackers? They’re downright addictive. Here’s why they’ll become your new go-to:
- Crazy quick – From pantry to table in under 30 minutes (perfect for last-minute cravings!)
- That magical crunch – The Rice Krispies give the most satisfying snap you’ve ever tasted
- Cheese explosion – Sharp cheddar flavor in every single bite (I always sneak extra cheese in)
- Party superhero – Disappears faster than you can say “cheese crackers” at gatherings
- Kid-approved – My picky niece thinks they’re “better than store-bought” (high praise!)
Seriously, they’re the snack that does it all – easy enough for weeknights but fancy enough to impress guests. You’re gonna flip for these!
Ingredients for Rice Krispie Cheese Crackers
Okay, let’s talk ingredients – because using the right stuff makes all the difference here! I’ve learned through trial and error (and many cheesy messes) that quality matters with these simple components:
- 1 ½ cups Rice Krispies cereal – That classic snap is non-negotiable! (Pro tip: measure after crushing them slightly in your hands for better texture)
- 1 ½ cups shredded sharp cheddar cheese – Please shred it yourself – the pre-shredded stuff just doesn’t melt right (I learned this the hard way)
- 4 tablespoons unsalted butter, melted – Let it cool just a minute so it doesn’t make the Rice Krispies soggy
- ½ teaspoon garlic powder – Our secret flavor booster (sometimes I sneak in an extra pinch)
- ½ teaspoon smoked paprika – Optional but oh-so-good for that smoky depth
- Salt to taste – I usually do about ¼ teaspoon since the cheese is already salty
See? Nothing fancy – just pantry staples transformed into something magical. Now let’s get mixing!
Equipment You’ll Need
Don’t worry – you don’t need any fancy gadgets for these crackers! Just grab:
- A big mixing bowl (I use my favorite yellow one that’s seen many batches)
- Baking sheet – standard size works perfectly
- Parchment paper (trust me, skip the greasing and use this for easy cleanup)
- Measuring cups and spoons
- A sturdy spoon for mixing (wooden works great)
That’s it! Now let’s make some cheesy magic.
How to Make Rice Krispie Cheese Crackers
Alright, let’s get to the fun part – making these irresistible crackers! I promise it’s easier than you think, but there are a few key steps that make all the difference between good and oh-my-goodness amazing crackers.
Mixing the Ingredients
First things first – preheat that oven to 350°F and line your baking sheet with parchment paper. Now, in your big mixing bowl, combine the Rice Krispies, shredded cheddar, garlic powder, smoked paprika (if using), and salt. Here’s my secret: use your hands to gently toss everything together like you’re making a salad – this helps distribute the spices evenly without crushing the cereal too much.
Next, drizzle in that melted butter (make sure it’s not piping hot!) and mix with a wooden spoon until every single piece is coated. You’ll know it’s ready when the mixture holds together slightly when pressed. Don’t overmix though – we want to keep some of that lovely crisp texture!
Pressing and Baking
Now, dump your cheesy mixture onto the prepared baking sheet. This is where the magic happens! Use your hands (lightly oiled if needed) to press the mixture into an even layer about ¼ inch thick. I like to press firmly but gently – you want it compact enough to hold together but not so tight it becomes dense.
Pop it in the oven and bake for 15-18 minutes. Keep an eye out around the 15-minute mark – you’re looking for golden edges and that amazing cheddar aroma filling your kitchen. The center might still look slightly soft, but it’ll firm up as it cools. (I may or may not have burned a batch by getting distracted by my phone – don’t be like me!)
Cooling and Cutting
Here’s the hardest part – patience! Let the crackers cool completely on the baking sheet, about 20 minutes. I know it’s tempting to cut them warm (trust me, I’ve been there), but waiting gives you those perfect clean edges. Once cooled, use a sharp knife or pizza cutter to slice them into squares or rectangles. If some pieces crumble? Bonus snack for the chef!
And there you have it – homemade Rice Krispie Cheese Crackers that’ll make you wonder why you ever bought the store-bought kind. Now try not to eat them all in one sitting (no promises though).
Tips for Perfect Rice Krispie Cheese Crackers
After making dozens (okay, maybe hundreds) of batches, I’ve picked up some foolproof tricks for the best Rice Krispie Cheese Crackers every time:
- Fresh cheese is key – That pre-shredded stuff has anti-caking agents that make it melt weird. Take the extra minute to shred your own sharp cheddar – it’s worth it!
- Parchment paper is non-negotiable – Without it, you’ll be chiseling cheese off your pan (been there, done that).
- Taste as you go – Want more kick? Add extra paprika or a pinch of cayenne before baking.
- Press firmly but don’t compact – You want them to hold together without turning into a dense brick.
Follow these tips, and you’ll have party-perfect crackers every single time!
Variations for Rice Krispie Cheese Crackers
Oh, the possibilities! Once you’ve mastered the basic recipe (which is perfect as-is), try these fun twists to keep things exciting:
- Spicy kick – Add ¼ teaspoon cayenne or a dash of hot sauce to the mix (my brother insists on this version!)
- Herb garden – Toss in 1 tablespoon fresh chopped rosemary or thyme for fancy flavor
- Parmesan swap – Use half cheddar, half parmesan for an extra umami punch
- Everything bagel – Sprinkle the top with everything bagel seasoning before baking
The best part? You can make a different batch every time and never get bored. Happy experimenting!
Serving and Storing Rice Krispie Cheese Crackers
Now for my favorite part – eating these crispy delights! These crackers are fantastic on their own (I may have eaten half a batch standing at the counter once), but they’re next-level with a creamy dip. My go-to? A simple ranch or spicy queso when I’m feeling fancy. They’re also amazing crumbled over tomato soup – trust me, it’s life-changing. For storage, just pop them in an airtight container at room temperature. They’ll stay crispy for about 3 days… if they last that long in your house! (Mine never do.)
Nutritional Information for Rice Krispie Cheese Crackers
Now, I’m no nutritionist, but here’s the scoop on what’s in these tasty bites! A serving (about 5-6 crackers) has roughly 180 calories, 6g protein, and that glorious cheesy goodness. Remember, these are estimates – your exact numbers might vary depending on your cheese brand or how generous you are with the butter (no judgment here!). They’re definitely a treat, but hey, everything in moderation… unless they’re fresh from the oven, then all bets are off!
Frequently Asked Questions
I’ve gotten so many questions about these Rice Krispie Cheese Crackers over the years – here are the ones that pop up most often:
Can I use pre-shredded cheese instead of fresh?
Oh honey, I know it’s tempting to grab that bag of pre-shredded cheddar, but resist! The anti-caking agents in pre-shredded cheese make it melt all wrong – you’ll end up with greasy, uneven crackers. Take those extra two minutes to shred a block of sharp cheddar yourself – it makes all the difference in texture and flavor.
How can I make these gluten-free?
Easy peasy! Just swap regular Rice Krispies for a gluten-free crispy rice cereal (most big brands have a GF version now). All the other ingredients are naturally gluten-free, so you’re good to go. My gluten-sensitive friend says these are her favorite homemade cheese crackers!
Why did my crackers turn out too crumbly?
This usually happens when you don’t press the mixture firmly enough before baking. Next time, really pack it down – I like to use the bottom of a measuring cup to get good pressure. Also, make sure you’re using enough butter (no skimping!) and letting them cool completely before cutting.
Can I freeze these cheesy snacks?
Absolutely! Once cooled, pop them in a freezer bag with parchment between layers. They’ll keep for about a month. To revive that perfect crunch, just warm them in a 300°F oven for 5 minutes. Perfect for last-minute guests or midnight snack emergencies!
Did You Make This Recipe?
I’d love to hear how your Rice Krispie Cheese Crackers turned out! Did you add any fun twists? Snap a pic and tag me—there’s nothing I enjoy more than seeing your cheesy creations. Happy snacking!
PrintIrresistible Rice Krispie Cheese Crackers in Just 30 Minutes

Crunchy and cheesy Rice Krispie Cheddar Crackers, perfect for snacking or parties.
- Prep Time: 10 minutes
- Cook Time: 18 minutes
- Total Time: 28 minutes
- Yield: 6 servings 1x
- Category: Snack
- Method: Baking
- Cuisine: American
- Diet: Vegetarian
Ingredients
- 1 ½ cups Rice Krispies cereal
- 1 ½ cups shredded sharp cheddar cheese
- 4 tablespoons unsalted butter, melted
- ½ teaspoon garlic powder
- ½ teaspoon smoked paprika (optional)
- Salt to taste
Instructions
- Preheat oven to 350°F. Line a baking sheet with parchment paper.
- In a bowl, mix Rice Krispies, shredded cheddar, garlic powder, paprika, and salt.
- Pour in melted butter and mix until fully coated.
- Press mixture into an even layer on the baking sheet.
- Bake for 15-18 minutes until edges are golden. Cool completely before slicing.
Notes
- Store in an airtight container for up to 3 days.
- Add extra spices for more flavor.
Nutrition
- Serving Size: 1 serving
- Calories: 180
- Sugar: 1g
- Sodium: 200mg
- Fat: 12g
- Saturated Fat: 7g
- Unsaturated Fat: 4g
- Trans Fat: 0g
- Carbohydrates: 12g
- Fiber: 0g
- Protein: 6g
- Cholesterol: 30mg