
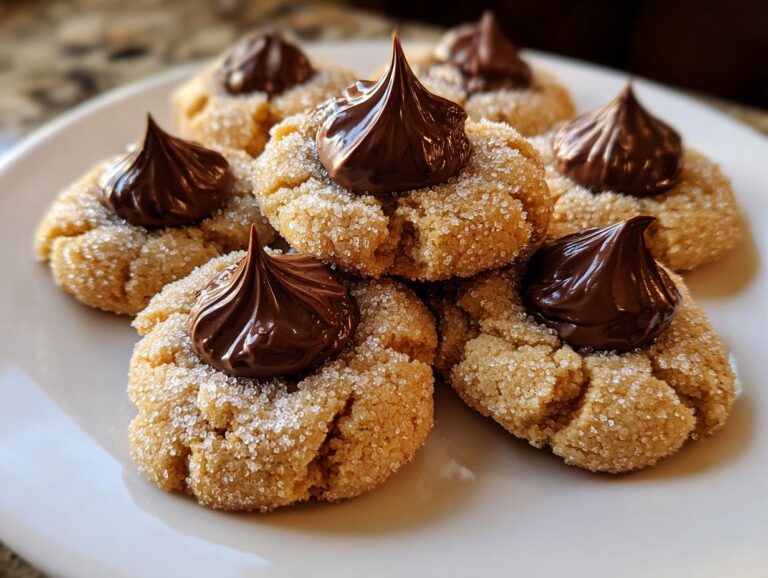
Nothing says holiday baking quite like the smell of peanut butter blossoms fresh from the oven. These classic cookies have been my family’s Christmas tradition since I was little – my mom would let me press the chocolate kisses into each warm cookie while standing on a kitchen chair. There’s something magical about that perfect peanut butter cookie base hugging a melty chocolate kiss. Simple? Absolutely. But trust me, these little gems disappear faster than you can say “Santa’s coming!”
Peanut butter blossoms are one of those rare treats that please everyone – kids go crazy for them, adults sneak seconds (or thirds), and they’re so easy to make you’ll wonder why you don’t bake them year-round. My version stays soft for days thanks to a few secret tricks I’ve picked up over the years. Let me show you how to make these holiday favorites that’ll have everyone asking for your recipe!
Why You’ll Love These Peanut Butter Blossoms
Let me tell you why these cookies have been my go-to for every holiday party, bake sale, and “I need a sweet treat ASAP” moment:
- That perfect texture – Soft and chewy centers with just the right amount of crumble (no hockey pucks here!)
- Foolproof to make – No fancy techniques, just mix, roll, and bake – even my 6-year-old nephew can help
- Christmas magic in every bite – That chocolate kiss center makes them look fancy with zero effort
- Total crowd-pleasers – I’ve never brought leftovers home from any gathering (and I bake a lot!)
- Better with age – Somehow they get even softer by day two (if they last that long!)
Ingredients for Peanut Butter Blossoms
Here’s everything you’ll need to make these dreamy cookies – I’ve learned through trial and error that quality ingredients really make a difference:
- 1 3/4 cups all-purpose flour (spooned and leveled – don’t scoop!)
- 1/2 cup granulated sugar plus extra for rolling (about 1/4 cup)
- 1/2 cup packed brown sugar (I prefer dark for richer flavor)
- 1 tsp baking soda (check it’s fresh!)
- 1/2 tsp salt (kosher salt works best)
- 1/2 cup unsalted butter, softened to room temp (about 65°F)
- 1/2 cup creamy peanut butter (see my notes below about brands)
- 1 large egg at room temperature
- 2 tbsp milk (whole milk gives best results)
- 1 tsp vanilla extract (the real stuff, please!)
- 24 chocolate kisses (Hershey’s classic or try dark chocolate for adults)
Ingredient Notes & Substitutions
Over the years, I’ve tried every variation imaginable – here’s what actually works:
Peanut butter: Stick with conventional creamy like Jif or Skippy – natural varieties make cookies too dry. If you must use crunchy, add 1 extra tbsp butter.
Butter: Salted butter works if that’s all you have – just reduce added salt to 1/4 tsp. Margarine? Don’t even think about it!
Milk: Any dairy or non-dairy milk works in a pinch, but whole milk gives the richest texture. My dairy-free friend uses almond milk with great results.
Chocolate kisses: Can’t find them? Use chocolate star candies or even Rolo caramels for a fun twist. Mini peanut butter cups pushed in upside-down? Yes please!
Flour tip: If your cookies spread too much, add 1-2 extra tablespoons flour next time. Humidity affects this!
How to Make Peanut Butter Blossoms
Okay, let’s get to the fun part – making these irresistible cookies! Don’t let the chocolate kiss topping fool you – this recipe is simpler than you think. Here’s exactly how I do it (with all my secret little tricks mixed in):
- Cream the good stuff: Beat the softened butter (not melted!), peanut butter, granulated sugar, and brown sugar together for a full 2 minutes until light and fluffy. This creates air pockets for that perfect tender texture.
- Add the wet team: Crack in the egg, pour in the milk and vanilla, then mix just until combined. Scrape down the bowl – those sneaky bits at the bottom love to stay unmixed!
- Bring in the dry ingredients: Whisk the flour, baking soda and salt together first (this prevents overmixing later). Add it to the wet mixture in two batches, mixing just until no white streaks remain. The dough should be soft but not sticky.
- Roll with it: Scoop tablespoon-sized portions (I use a #60 cookie scoop) and roll into smooth balls between your palms. Roll each ball in granulated sugar – this creates that pretty crackled top and adds just the right sweetness.
- Bake smart: Arrange dough balls 2 inches apart on parchment-lined baking sheets. Bake at 375°F for exactly 8 minutes – they’ll look underdone but perfect! This keeps them soft.
- The magic touch: Immediately press a chocolate kiss into the center of each warm cookie. The heat makes the chocolate slightly melt into the cookie – heavenly! Let cool 5 minutes on the sheet before transferring.
Shaping and Baking Tips
After making probably hundreds of batches, here are my hard-won lessons for perfect peanut butter blossoms every time:
Cookie spread too much? Your butter was probably too warm. Chill the dough balls for 15 minutes before baking if your kitchen is hot. Also, always use parchment paper – it regulates heat better than bare pans.
Kisses sliding off? You waited too long to add them! Have those little chocolates unwrapped and ready to go before the cookies even go in the oven. Press firmly but gently right when the cookies come out.
Want perfect sugar coating? Roll the dough balls in sugar twice – once after shaping, then again right before baking. This gives that professional bakery-style sparkle.
Best texture secret: Underbake slightly! The cookies should look barely set at the edges when you pull them out. They’ll continue cooking on the hot pan – this keeps them soft for days.
Pro shaping trick: If your dough sticks to your hands while rolling, lightly moisten your palms with water or rub a tiny bit of butter on them. Works like a charm!
Storing and Serving Peanut Butter Blossoms
Here’s the best part about these cookies – they actually get better the next day! But let’s be real, they rarely last that long in my house. When I do manage to save some (usually by hiding them in the back of the cupboard), here’s how I keep them fresh and delicious:
Storing at room temperature: My grandma’s old cookie tin works perfectly! Layer the cooled cookies between sheets of parchment paper in an airtight container. They’ll stay soft and dreamy for up to 5 days this way. The chocolate tops might lose their shine, but the flavor just gets better.
Freezing like a pro: These freeze beautifully – just wait until the chocolate is completely set before stacking. I freeze them in single layers in zip-top bags with all the air pressed out. When that cookie craving hits, let them thaw on the counter for about an hour. The texture stays perfect!
Serving suggestions: These are heavenly with an ice-cold glass of milk (obviously), but my adult hack is pairing them with strong black coffee – the bitterness cuts through the sweetness just right. For holiday parties, I arrange them on a vintage cake stand with some fresh cranberries for a pop of color.
Reviving day-old cookies: If by some miracle you still have cookies after a few days, pop them in the microwave for 5-8 seconds to make the chocolate all melty again. Trust me, it’s like getting fresh-baked magic all over again!
Peanut Butter Blossoms Variations
Once you’ve mastered the classic version, it’s time to play! Over the years, I’ve discovered some delicious twists that keep this recipe exciting. Here are my favorite ways to mix things up:
Chocolate upgrades: Swap the classic milk chocolate kisses for dark chocolate (my personal favorite) or even peppermint kisses during the holidays. For serious chocolate lovers, try using mini Reese’s cups pressed upside-down into the warm cookies.
Salty-sweet magic: Sprinkle a tiny pinch of flaky sea salt over each cookie right after adding the chocolate kiss. The salt makes the peanut butter flavor pop in the most addictive way!
Festive coatings: Instead of plain sugar, roll the dough balls in colored sprinkles or crushed candy canes for holiday cheer. My kids love helping with this version!
Nutty variations: Add 1/4 cup finely chopped peanuts to the dough for extra crunch. Almond butter works surprisingly well too – just reduce the sugar slightly since it’s sweeter than peanut butter.
Spice it up: Mix 1/2 teaspoon cinnamon into the sugar coating for a warm, cozy flavor that’s perfect with coffee. A dash of cayenne pepper makes a grown-up version with a subtle kick!
The best part? All these variations use the same simple dough base. Just pick your favorite twist and enjoy!
Peanut Butter Blossoms FAQs
Over the years, I’ve gotten so many questions about these classic holiday cookies – here are the answers to everything you might wonder (plus some mistakes I’ve made so you don’t have to!):
Can I freeze the dough for later?
Absolutely! These peanut butter blossoms freeze beautifully as dough balls. Just roll them in sugar first, then freeze in a single layer on a baking sheet before transferring to a freezer bag. When you’re ready, bake straight from frozen – just add 1-2 extra minutes. Perfect for last-minute cookie emergencies!
Why are my cookies crumbly?
Oh honey, I’ve been there! Usually it means either too much flour (always spoon and level!) or overbaking. Next time, try reducing the flour by 2 tablespoons and pull them out when they still look slightly underdone. That extra moisture makes all the difference for soft and chewy cookies.
Can I use natural peanut butter?
I won’t lie – I’ve tried, and it’s never as good. The oils separate and make the dough too greasy or dry. Stick with conventional creamy peanut butter for these classic Hershey kiss cookies. If you must go natural, add an extra tablespoon of butter and chill the dough for 30 minutes before shaping.
How do I prevent the chocolate kisses from melting completely?
Timing is everything! Have your chocolates unwrapped and ready before baking. Press them in immediately when the cookies come out – the residual heat will soften them just enough to stick without turning into a puddle. If your kitchen is really warm, pop the kisses in the fridge for 10 minutes first.
Can I make these without rolling in sugar?
Sure, but you’ll miss that signature crackly top! The sugar coating isn’t just pretty – it creates a delicate crust that contrasts beautifully with the soft cookie. If you’re watching sugar, try rolling in crushed peanuts instead for a nice texture.
Nutritional Information
Okay, let’s be real – we’re not eating peanut butter blossoms for their health benefits! But since I know some folks like to keep track, here’s the nutritional breakdown per cookie (based on my exact recipe). Remember, these are estimates – your actual results might vary slightly depending on exact ingredients and portion sizes.
- Calories: 130 kcal (perfect little treat size!)
- Sugar: 9g (that’s the sweet spot between the cookie and kiss)
- Fat: 6g (mostly from that delicious peanut butter and butter combo)
- Saturated Fat: 3g (the chocolate kiss contributes to this)
- Carbohydrates: 16g (worth every bite!)
- Protein: 2g (thank you, peanut butter!)
- Sodium: 100mg (not bad for such a flavorful cookie)
A little tip from my nutritionist friend: Pairing these with a protein source (like a glass of milk or handful of nuts) helps balance the sugar spike. Not that I ever need an excuse to enjoy milk and cookies together!
Final Thoughts
Well, there you have it – my absolute favorite way to make peanut butter blossoms, just like my mom taught me all those years ago. These cookies hold such a special place in my heart (and my holiday baking rotation!). There’s something so comforting about that first bite where the soft peanut butter cookie melts into the chocolate kiss – pure magic!
I hope you’ll give this recipe a try and make some sweet memories of your own. Trust me, once you start baking these, they’ll become your signature holiday treat too. Nothing beats seeing friends’ faces light up when you bring these to cookie exchanges or holiday parties.
If you do make them, I’d love to hear how they turned out! Did you stick with classic milk chocolate kisses or try one of the fun variations? Any brilliant twists you discovered? Drop me a note in the comments – I read every single one and always pick up new tips from fellow cookie lovers.
Happy baking, my friends! May your kitchen be filled with the warm, peanut-buttery scent of holiday cheer. And remember – the best cookies are always the ones shared with people you love. Now go press those chocolate kisses with gusto!
Print3 Secrets to Perfect Peanut Butter Blossoms Every Time
Peanut Butter Blossom Cookies are a classic sweet treat, perfect for holidays or any occasion. These soft and chewy cookies feature a creamy peanut butter base topped with a chocolate kiss.
- Prep Time: 15 minutes
- Cook Time: 10 minutes
- Total Time: 25 minutes
- Yield: 24 cookies 1x
- Category: Dessert
- Method: Baking
- Cuisine: American
- Diet: Vegetarian
Ingredients
- 1 3/4 cups all-purpose flour
- 1/2 cup granulated sugar (plus extra for rolling)
- 1/2 cup packed brown sugar
- 1 tsp baking soda
- 1/2 tsp salt
- 1/2 cup unsalted butter (softened)
- 1/2 cup creamy peanut butter
- 1 large egg
- 2 tbsp milk
- 1 tsp vanilla extract
- 24 chocolate kisses or ganache drops (unwrapped)
Instructions
- Beat butter, peanut butter, and both sugars until creamy.
- Mix in egg, milk, and vanilla.
- Slowly stir in flour, baking soda, and salt until dough forms.
- Roll dough into 1-inch balls and coat in granulated sugar.
- Bake at 375°F (190°C) for 8–10 minutes, then press a chocolate kiss into each cookie center.
Notes
- Store in an airtight container for up to 5 days.
- For a softer texture, slightly underbake the cookies.
- Use high-quality peanut butter for the best flavor.
Nutrition
- Serving Size: 1 cookie
- Calories: 130
- Sugar: 9g
- Sodium: 100mg
- Fat: 6g
- Saturated Fat: 3g
- Unsaturated Fat: 2g
- Trans Fat: 0g
- Carbohydrates: 16g
- Fiber: 1g
- Protein: 2g
- Cholesterol: 15mg