
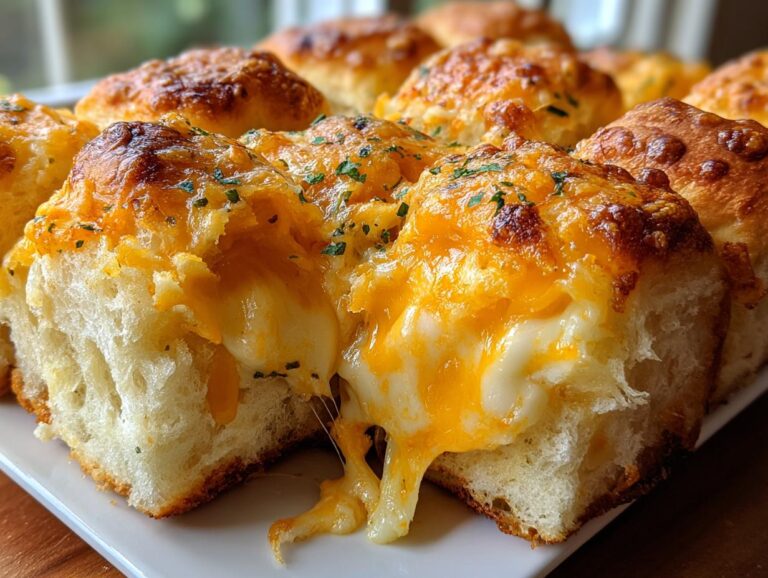
Picture this: It’s game day, and my kitchen counter is covered in snacks – chips, dips, wings – but the first platter to disappear? Always my Mini Grilled Cheese Sliders. I stumbled onto this recipe when I needed something quick for a last-minute gathering, and now it’s my secret weapon for any party. These little guys are ridiculously easy (we’re talking 10 minutes of prep!), and the way that melted cheese oozes between those sweet Hawaiian rolls? Absolute magic.
What I love most is how everyone from picky kids to fancy-food friends goes crazy for them. Last Thanksgiving, my nephew actually abandoned the turkey to hover near the slider tray – that’s when you know you’ve got a winner. The best part? You probably have most of the ingredients in your fridge right now. Just grab those Hawaiian rolls, some cheese (I’ll tell you my perfect blend later), and let’s make the easiest crowd-pleaser you’ll ever bake.
Why You’ll Love These Mini Grilled Cheese Sliders
Okay, let me tell you why these little cheesy wonders have become my go-to for every gathering:
- Lightning fast prep – I’m talking 10 minutes tops before they hit the oven. Perfect for those “oops, people are coming over?!” moments.
- Party superheroes – Whether it’s game day, book club, or just because, these Hawaiian roll grilled cheese bites disappear faster than I can refill the tray.
- Totally customizable – Swap cheeses, add bacon, sprinkle some jalapeños – make them your own!
- Kid-approved magic – The sweet rolls and melty cheese make even the pickiest eaters do a happy dance.
Seriously, these are the ultimate lazy cook’s game day appetizer that somehow makes you look like a kitchen rockstar. Win-win!
Ingredients for Mini Grilled Cheese Sliders
Here’s what you’ll need to make these irresistible little bites – I promise it’s nothing fancy:
- 1 pack Hawaiian sweet rolls (12-count) – Don’t separate them! We’re keeping them connected for that perfect pull-apart magic.
- 1 ½ cups shredded sharp cheddar cheese – Pack it lightly in your measuring cup for the right amount.
- 1 ½ cups shredded mozzarella cheese – This gives that gorgeous stretch when you pull them apart.
- 4 tbsp unsalted butter, melted – I always use unsalted so I can control the seasoning.
- 1 tsp garlic powder – Trust me, this makes all the difference!
- 1 tbsp fresh parsley, finely chopped – Or 1 tsp dried if that’s what you’ve got.
- Pinch of salt (optional) – I usually skip it since the rolls and cheese are already salty.
Ingredient Notes & Substitutions
No cheddar? No problem! Here’s how to mix it up:
- Cheese alternatives: Try Monterey Jack, Gouda, or even pepper jack for a kick. Just keep the total amount about the same.
- Butter options: Salted butter works fine – just taste before adding extra salt. For dairy-free, I’ve used olive oil in a pinch.
- Herb swaps: No parsley? Try chives or a sprinkle of Italian seasoning instead.
- Gluten-free: Use your favorite GF rolls – just make sure they’re similar in size to Hawaiian rolls.
The beauty of this recipe is how forgiving it is – I’ve made it with whatever cheese was in my fridge more times than I can count!
Equipment Needed for Mini Grilled Cheese Sliders
Don’t worry – you won’t need any fancy gadgets for these sliders! Here’s what I always grab from my kitchen:
- 9×13 baking dish – Perfect size for fitting those Hawaiian rolls snugly
- Pastry brush – For slathering that garlic butter goodness evenly
- Sharp serrated knife – Makes slicing the rolls in half a breeze
That’s seriously it! If you don’t have a pastry brush, just use the back of a spoon – I’ve done that in a pinch when my brush mysteriously disappeared (probably hiding with all my missing socks).
How to Make Mini Grilled Cheese Sliders
Okay, let’s get to the good part – baking these cheesy little beauties! I promise it’s so easy you’ll laugh, but let me walk you through each step because those tiny details make all the difference.
Step 1: Prep the Hawaiian Rolls
First, grab that pack of Hawaiian rolls and your sharp serrated knife. Here’s my trick – don’t separate them! Keep them all connected in their little roll family. Carefully slice the entire pack horizontally in half, like you’re making one giant sandwich. The bottom half goes straight into your baking dish – no need to grease it, those rolls are already buttery enough!
Step 2: Layer the Cheese
Now for the fun part – the cheese blanket! I like to mix my cheddar and mozzarella together first in a bowl, then sprinkle evenly over the bottom roll layer. Don’t skimp – you want every bite to have that perfect cheesy pull! Pro tip: leave about a 1/4-inch border around the edges so the cheese doesn’t ooze out too much when baking.
Step 3: Butter and Season
Remember that melted butter? Mix it with garlic powder and parsley until it smells like heaven. Now take your pastry brush and generously paint this golden goodness all over the top half of the rolls before placing it back on the cheese mountain. Then brush more on top – we want every bite buttery!
Step 4: Bake to Perfection
Pop them into your preheated 375°F oven and let the magic happen! In about 12-15 minutes, you’ll see the tops turn golden brown and the cheese starts bubbling around the edges. That’s your cue – they’re done! The smell will have everyone crowding your kitchen, I promise.
Step 5: Serve and Enjoy
Here’s the hardest part – wait 5 minutes before cutting! I know, torture. But this lets the cheese set just enough so your sliders don’t turn into a cheesy landslide. Then use a sharp knife to slice between the rolls – watch that cheese stretch! Serve warm and prepare for compliments.
Tips for Perfect Mini Grilled Cheese Sliders
After making these sliders more times than I can count (my friends keep requesting them!), I’ve picked up some tricks to guarantee perfection every time:
- Toast those rolls first – If you’ve got an extra minute, pop the bottom halves in the oven for 2-3 minutes before adding cheese. This prevents sogginess!
- Room temp cheese melts better – Take your shredded cheese out of the fridge 15 minutes before using. Cold cheese = uneven melting.
- Watch the browning – If your oven runs hot, tent loosely with foil halfway through baking to prevent over-browning.
- Slice while slightly warm – Cutting completely cooled sliders makes the cheese tear instead of stretch beautifully.
Oh, and one bonus tip – always make extra. Trust me, you’ll need them!
Variations for Mini Grilled Cheese Sliders
The best part about these sliders? They’re like a blank canvas for your cheesy dreams! Here are some of my favorite ways to jazz them up when I’m feeling fancy:
- Bacon lovers’ delight – Layer crispy bacon strips under the cheese before baking. The salty crunch takes these cheesy pull-apart sliders to another level!
- Spicy kick – Add thin jalapeño slices or a sprinkle of red pepper flakes between the cheese layers. My brother-in-law insists on this version every game day.
- Pesto perfection – Spread a thin layer of pesto on the bottom rolls before adding cheese. The herby flavor pairs amazingly with the sweet rolls.
- Everything bagel twist – Mix everything bagel seasoning into the melted butter topping. The sesame and garlic bits add amazing texture!
Seriously, once you master the basic recipe, the sky’s the limit – these sliders are endlessly adaptable!
Serving Suggestions for Mini Grilled Cheese Sliders
These little cheese bombs are perfect all by themselves, but if you want to take them to the next level, here’s how I love to serve them:
- Classic combo – Dunk them in warm tomato soup just like their full-sized grilled cheese cousins. The sweet rolls make this pairing extra special.
- Party platter perfection – Arrange them on a board with dipping sauces like marinara, ranch, or even honey mustard for the ultimate party snack ideas.
- Game day spread – Pair with wings and veggies for the perfect finger food lineup that’ll disappear before halftime.
- Light lunch – Serve with a simple green salad for a quick meal that feels fancier than it is!
Honestly though? They rarely make it past the serving plate – people gobble them up too fast for sides!
Storage & Reheating Instructions
Okay, confession time – these sliders rarely last long enough to store! But when they do (miracle of miracles), here’s how to keep them tasting fresh:
- Room temp: They’ll stay perfect for about 2 hours – just cover loosely with foil.
- Fridge: Store in an airtight container for up to 3 days. The rolls might soften a bit, but no worries – we’ll fix that!
- Reheating magic: Pop them in a 350°F oven or toaster oven for 5-7 minutes to bring back that crispy top. Microwaving works in a pinch, but they won’t be as crisp.
Pro tip: If you’re making ahead, assemble but don’t bake. Wrap tightly and refrigerate overnight, then bake fresh when needed!
Mini Grilled Cheese Sliders Nutrition Information
Here’s the scoop on what’s in these cheesy little wonders (per slider):
- Calories: 310
- Carbs: 25g (mostly from those sweet Hawaiian rolls!)
- Protein: 12g (thank you, melty cheese!)
- Fat: 18g (the good kind – mostly from butter and cheese)
Just remember – nutritional values are estimates and vary based on ingredients/brands used. I personally don’t count calories when it comes to melted cheese, but that’s just me!
Frequently Asked Questions
I get asked about these sliders all the time – here are the questions that pop up most often from friends and family (and random neighbors who smell them baking)!
Can I Freeze Mini Grilled Cheese Sliders?
Absolutely! Let them cool completely, then wrap tightly in foil or plastic wrap. They’ll keep for up to 2 months frozen. To reheat, pop them straight into a 350°F oven for 10-12 minutes – no thawing needed! The cheese gets melty again and the tops crisp right back up.
What’s the Best Cheese Blend?
My go-to is always sharp cheddar for flavor and mozzarella for that perfect stretch. I do a 50/50 mix, but you can play with ratios – more cheddar makes them tangier, more mozzarella makes them extra gooey. Just avoid pre-shredded cheese if you can – it doesn’t melt as smoothly!
Can I Make These Ahead?
Totally! Assemble them up to 24 hours before baking – just wrap tightly and refrigerate. You might need to add 2-3 extra minutes baking time since they’ll be cold. The garlic butter topping might soak in a bit, but they’ll still taste amazing!
Share Your Mini Grilled Cheese Sliders Experience
I’d love to hear how your sliders turned out! Did you stick with my classic version or try something wild? Snap a photo of that glorious cheese pull – I live for those melty cheese shots. Happy baking, friends!
Print“12 Irresistible Mini Grilled Cheese Sliders That Wow Every Time”
Mini grilled cheese sliders made with Hawaiian rolls, perfect for parties or quick meals.
- Prep Time: 10 minutes
- Cook Time: 15 minutes
- Total Time: 25 minutes
- Yield: 6 servings 1x
- Category: Appetizer
- Method: Baked
- Cuisine: American
- Diet: Vegetarian
Ingredients
- 1 pack of Hawaiian sweet rolls (12-count)
- 1 ½ cups shredded sharp cheddar cheese
- 1 ½ cups shredded mozzarella cheese
- 4 tbsp unsalted butter, melted
- 1 tsp garlic powder
- 1 tbsp fresh parsley, finely chopped (or 1 tsp dried)
- Pinch of salt (optional)
Instructions
- Preheat oven to 375°F. Slice the entire pack of Hawaiian rolls in half horizontally without separating them.
- Place the bottom half of the rolls in a baking dish. Evenly sprinkle cheddar and mozzarella over the base.
- Place the top half of the rolls back on. Mix melted butter with garlic powder and parsley. Brush generously over the tops.
- Bake uncovered for 12–15 minutes or until the tops are golden brown and cheese is bubbly.
- Let cool for 5 minutes, then cut into individual sliders. Serve hot.
Notes
- Great for parties or quick meals.
- Adjust cheese types for different flavors.
Nutrition
- Serving Size: 1 slider
- Calories: 310
- Sugar: 10g
- Sodium: 450mg
- Fat: 18g
- Saturated Fat: 10g
- Unsaturated Fat: 6g
- Trans Fat: 0g
- Carbohydrates: 25g
- Fiber: 1g
- Protein: 12g
- Cholesterol: 45mg