
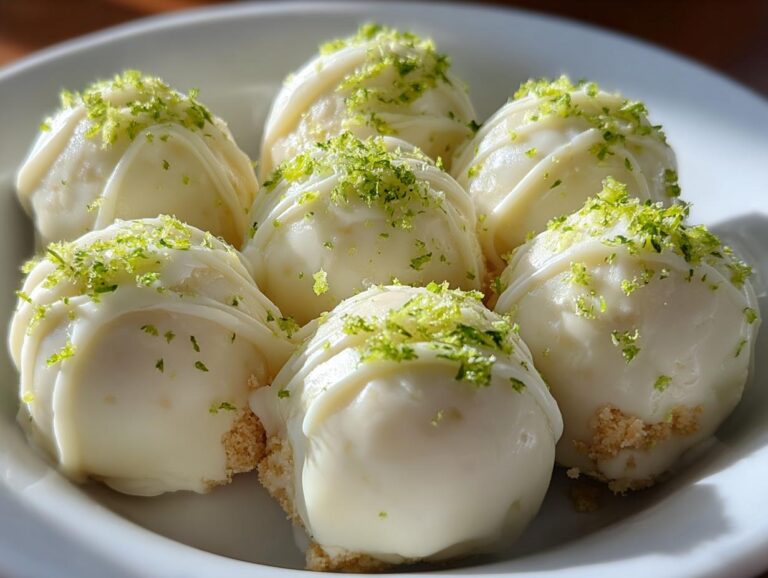
Picture this: It’s a sweltering summer afternoon, your kitchen feels like a sauna, and the last thing you want is to turn on the oven. That’s when these dreamy Key Lime Truffles come to the rescue! I first whipped these up for my best friend’s pool party last July when we needed something cool, creamy, and bursting with citrus flavor. The moment those little white chocolate-coated bites hit the dessert table? Gone in sixty seconds flat. Now they’re my go-to when I need an impressive but stupidly easy treat—no baking required, just lots of bright lime zest and silky white chocolate magic.
Why You’ll Love These Key Lime Truffles
Let me tell you why these little bites of sunshine have become my summer obsession:
- No oven required – When it’s hot outside, the last thing you want is to heat up your kitchen. These come together with just a saucepan and some fridge time.
- Creamy meets crunchy – That smooth white chocolate filling with bits of graham cracker? Absolute perfection in every bite.
- Zesty freshness – The tangy lime cuts through the sweetness so beautifully, it’s like eating key lime pie but in adorable truffle form.
- Party-ready in minutes – They look fancy but take barely any effort. I always get asked for the recipe!
Ingredients for Key Lime Truffles
Here’s everything you’ll need to make these little bites of sunshine – I promise it’s all simple stuff you can find at any grocery store:
- 1 ½ cups white chocolate chips – Don’t skimp here! The good quality ones melt smoother and taste creamier.
- ¼ cup heavy cream – This gives that luscious, melt-in-your-mouth texture.
- 2 tablespoons fresh key lime juice – Squeeze it yourself for that bright, tangy punch (about 4-5 limes).
- 1 tablespoon key lime zest plus extra for garnish – The zest packs so much flavor!
- 1 tablespoon unsalted butter – Just a pat to make everything extra silky.
- ½ cup crushed graham crackers – Smash them finely so you get little bursts of crunch.
- 1 ½ cups white chocolate melting wafers – These coat better than chips for that perfect shell.
Pro tip from my many trial runs: measure everything before you start! Once that cream starts heating, things move fast.
Equipment You’ll Need
Don’t worry – you won’t need any fancy gadgets for these truffles! Just grab these basics from your kitchen:
- Small saucepan (or double boiler if you’re feeling fancy)
- Heatproof mixing bowl – glass works best for seeing when your chocolate’s melted
- Rubber spatula – for scraping every last bit of that creamy filling
- Baking sheet lined with parchment paper – the truffles’ landing pad!
- Small cookie scoop or teaspoon – for perfectly portioned balls
- Microwave-safe bowl (if you’re lazy like me and skip the double boiler sometimes)
That’s it! The whole setup takes less space than a sheet pan, which is why I love making these when my tiny apartment kitchen feels like it’s shrinking in the summer heat.
How to Make Key Lime Truffles
Okay, let’s get to the fun part! These truffles come together in just a few simple steps – I’ll walk you through each one so yours turn out perfect. The key is patience (especially when waiting for that mixture to chill!) and working quickly when it’s time to roll and dip.
Step 1: Melt the White Chocolate Mixture
First, grab that small saucepan and heat your heavy cream and butter over medium-low heat. You want it just barely simmering – tiny bubbles around the edges, not a rolling boil. While that’s heating, dump your white chocolate chips into a heatproof bowl.
When the cream mixture is ready, pour it over the chocolate chips and let it sit untouched for exactly 2 minutes. This is crucial – walk away! The heat gently melts the chocolate without scorching it. After 2 minutes, stir slowly with your spatula until it’s completely smooth and glossy. If you see any stubborn lumps, pop the bowl over a double boiler for 30 seconds to finish melting.
Step 2: Add Lime and Graham Crackers
Now for the zesty magic! Stir in your fresh key lime juice and zest – the mixture will thicken slightly as the acid works its wonders. Next comes the graham crackers: sprinkle them over the top and gently fold them in with broad strokes. Don’t overmix here – we want those little crunchy bits to stay intact!
The mixture should look like a thick, creamy paste with speckles of lime zest and graham cracker throughout. If it seems too loose, don’t panic – that’s what chilling is for!
Step 3: Chill and Shape the Truffles
Cover the bowl with plastic wrap pressed right against the surface (this prevents condensation) and refrigerate for at least 1-2 hours. I know, waiting is the hardest part! But trust me, trying to roll soft mixture is a sticky disaster waiting to happen.
When it’s firm enough to scoop, line your baking sheet with parchment paper. Use a small cookie scoop or teaspoon to portion the mixture, then quickly roll between your palms. Pro tip: if your hands get too warm, rinse them under cold water and dry thoroughly – this keeps the truffles from melting as you work.
Step 4: Coat and Garnish
Time for the finishing touch! Melt your white chocolate wafers in 30-second bursts in the microwave, stirring between each until perfectly smooth. Working with one truffle at a time, drop it into the melted chocolate, use a fork to flip it, then lift it out letting excess chocolate drip off.
Place each coated truffle back on the parchment and immediately sprinkle with fresh lime zest before the chocolate sets. The zest sticks best when the coating is still wet but not runny. Let them harden completely at room temperature – about 20 minutes – then prepare for your tastebuds to do a happy dance!
Tips for Perfect Key Lime Truffles
After making these truffles more times than I can count (and learning from plenty of messy mistakes!), here are my foolproof tips to guarantee success every time:
- Fresh is best – Bottled lime juice just doesn’t give the same bright pop as freshly squeezed. Roll up your sleeves and juice those limes – your tastebuds will thank you!
- Chill out – If your mixture feels too soft after chilling, pop it back in the fridge for another 30 minutes. Cold hands make perfect truffle balls – I sometimes keep a bowl of ice water nearby to dip my fingers in between rolling.
- Small batches for dipping – Only melt about 1/2 cup of chocolate wafers at a time. The chocolate stays smoother longer, and you avoid that weird grainy texture that happens when reheating too many times.
- Zest first, juice later – Always zest your limes before juicing them! Trying to zest a squeezed lime half is like trying to hug a porcupine – frustrating and painful.
One last secret? If your coating cracks as it sets (happens to me when I’m impatient!), just drizzle a little extra melted chocolate over the top – no one will ever know!
Variations and Substitutions
One of the best things about these truffles is how easily you can tweak them to suit what you’ve got on hand! Here are my favorite twists that still keep that dreamy lime-chocolate vibe:
- No key limes? Regular Persian limes work just fine – you’ll need about 1 large lime for the juice and zest. The flavor’s slightly less floral but still delicious.
- Gluten-free option: Swap the graham crackers for gluten-free vanilla wafers or even crushed pretzels for a salty-sweet kick!
- Milk chocolate lovers: Try dipping in milk chocolate instead of white – the contrast with the tart lime filling is incredible.
- Coconut twist: Fold in 1/4 cup toasted coconut flakes with the graham crackers for tropical vibes.
- Adult version: Add 1 tablespoon lime liqueur (like Patrón Citrónge) to the filling – just reduce the lime juice by half so it’s not too wet.
My neighbor once used lemon instead of lime when she was in a pinch, and you know what? Still delicious. The moral of the story: don’t stress if you’re missing an ingredient – get creative and make it your own!
Serving and Storing Key Lime Truffles
Here’s the thing about these truffles – they disappear fast once people get a taste! But if by some miracle you have leftovers (or want to make them ahead), here’s how to keep them tasting fresh and fabulous:
For serving: I always arrange these on a pretty platter with extra lime zest sprinkled over the top right before guests arrive. The green flecks make them look so fancy! If it’s a really hot day, I’ll even pop the serving tray in the fridge for 10 minutes before bringing them out – that keeps the chocolate from getting melty in sticky fingers.
For storing: These babies need refrigeration! Layer them between sheets of parchment paper in an airtight container – they’ll keep beautifully for up to 5 days. The graham crackers stay crunchy, and the lime flavor actually gets better after a day or two.
Want to freeze them? You absolutely can! Freeze the uncoated truffle centers first on a baking sheet until solid (about 1 hour), then transfer to a freezer bag. When you’re ready to serve, let them thaw in the fridge overnight, then dip in fresh melted chocolate as usual. This trick saved me last Christmas when I needed a last-minute dessert!
One warning though – the zest garnish is best added fresh. If you store them pre-garnished, the zest can get soggy. I keep a little bowl of extra zest in the fridge so I can quickly perk up any truffles before serving.
Nutritional Information
Okay, let’s be real – we’re not eating truffles for their health benefits! But since I know some of you like to keep track (or need to for dietary reasons), here’s the scoop on what’s in each of these little bites:
- Calories: 140 per truffle
- Sugar: 12g
- Sodium: 25mg
- Fat: 8g (5g saturated)
- Carbs: 15g
- Protein: 1g
Now here’s my disclaimer (because I’m not a nutritionist, just a dessert enthusiast!): These values are estimates based on the exact ingredients I use. Your numbers might vary slightly depending on your specific chocolate brand or how generous you are with those graham cracker crumbs!
The good news? Each truffle packs a decent amount of calcium from all that white chocolate – and vitamin C from the fresh lime juice! So really, you could almost call these health food… if you squint really hard and maybe have another margarita first.
Frequently Asked Questions
I’ve gotten so many questions about these truffles over the years – here are the ones that pop up most often with my tried-and-true answers:
Can I use bottled lime juice instead of fresh?
Technically yes, but honestly? Don’t. The flavor just isn’t the same – bottled juice lacks that bright, zesty punch. If you’re absolutely desperate, use half the amount and add extra zest to compensate. But fresh squeezed makes all the difference!
How long do these white chocolate lime truffles last?
Stored properly in the fridge, they’ll stay delicious for about 5 days. The graham crackers might soften slightly by day 3, but the flavor actually improves! For longer storage, freeze the uncoated centers (see my storage tips above).
Can I make these without graham crackers?
Absolutely! The crackers add nice texture, but you can leave them out for smoother truffles. Try substituting crushed vanilla wafers, shortbread cookies, or even a tablespoon of coconut flour if you want that little bit of body.
Why did my chocolate coating crack?
This usually happens if the truffle centers are too cold when dipping. Let them sit at room temp for 5-10 minutes before coating. Also, make sure your melted chocolate isn’t too thick – a teaspoon of coconut oil can help thin it for smoother dipping.
Are these no-bake citrus desserts good for gifting?
They make amazing gifts! Package them in mini cupcake liners inside a pretty box. Just warn recipients to keep them refrigerated. I’ve shipped them with ice packs before – just pack tightly so they don’t roll around!
Share Your Key Lime Truffles
Nothing makes me happier than seeing your versions of these zesty little bites! Seriously, every time someone tags me in their Key Lime Truffle photos, I do a little happy dance in my kitchen. Did yours turn out extra creamy? Maybe you tried that coconut variation I mentioned? I want to hear all about it!
Drop a comment below to let me know how your truffles turned out – especially if you discovered any brilliant twists of your own. And if you snapped a photo (because let’s be real, these are almost too pretty to eat), tag me on Pinterest @LimeLovingBaker so I can show off your creation!
This recipe has become such a happy little tradition in my circle – from bridal showers to backyard BBQs – and I’d love for it to become one of your go-to treats too. Now go forth and spread the lime-chocolate joy!
PrintTantalizing Key Lime Truffles with 4 Simple Steps

Easy no-bake dessert with a creamy white chocolate and key lime filling, coated in white chocolate and garnished with lime zest.
- Prep Time: 20 minutes
- Cook Time: 5 minutes
- Total Time: 2 hours 25 minutes
- Yield: 18 truffles 1x
- Category: Dessert
- Method: No-Bake
- Cuisine: American
- Diet: Vegetarian
Ingredients
- 1 ½ cups white chocolate chips
- ¼ cup heavy cream
- 2 tablespoons fresh key lime juice
- 1 tablespoon key lime zest (plus extra for garnish)
- 1 tablespoon unsalted butter
- ½ cup crushed graham crackers
- 1 ½ cups white chocolate melting wafers
Instructions
- Heat heavy cream and butter until simmering, then pour over white chocolate chips. Let sit 2 minutes before stirring smooth.
- Mix in lime juice and zest.
- Fold in crushed graham crackers.
- Refrigerate mixture for 1–2 hours until firm.
- Scoop and roll into bite-sized balls.
- Melt white chocolate wafers and dip each truffle until fully coated.
- Place on parchment paper to set.
- Sprinkle fresh lime zest over the tops before the coating sets.
Notes
- Use fresh key lime juice for the best flavor.
- Chill the mixture thoroughly for easier rolling.
- Store in an airtight container in the refrigerator.
Nutrition
- Serving Size: 1 truffle
- Calories: 140
- Sugar: 12g
- Sodium: 25mg
- Fat: 8g
- Saturated Fat: 5g
- Unsaturated Fat: 2g
- Trans Fat: 0g
- Carbohydrates: 15g
- Fiber: 0g
- Protein: 1g
- Cholesterol: 10mg