
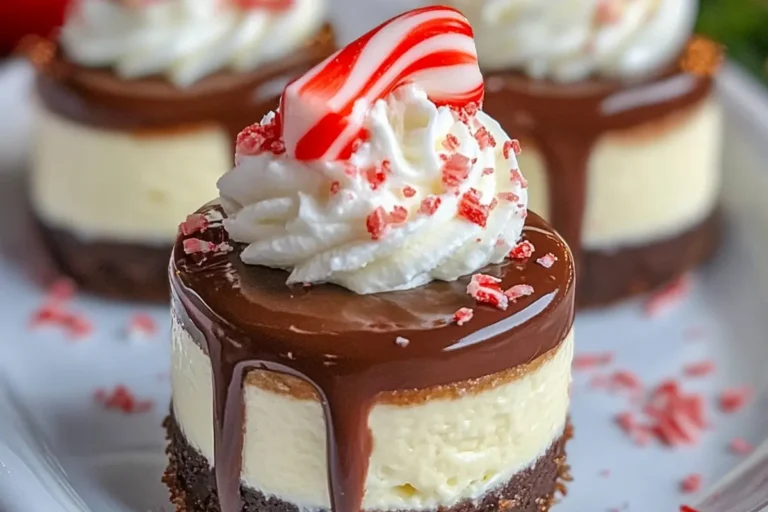
Hot Cocoa Peppermint Cheesecake Bites
The moment I tasted these Hot Cocoa Peppermint Cheesecake Bites, I knew they were holiday magic in miniature form. If you’re juggling gift wrapping, kids’ concerts, and endless to-do lists, these little gems are your sweet escape. They’re rich, minty, and oh-so-festive—like a warm mug of peppermint hot chocolate wrapped in cheesecake bliss.
I love how they fit perfectly on a cookie tray or make charming edible gifts. Plus, they’re simple enough to whip up without a culinary degree. Whether you’re hosting or gifting, these bite-sized beauties are a guaranteed crowd-pleaser this season.
Why You’ll Love This Hot Cocoa Peppermint Cheesecake Bites
These Hot Cocoa Peppermint Cheesecake Bites are a dream come true for busy holiday bakers. They’re easy to make, pretty enough to impress, and bursting with festive flavor. Think creamy peppermint cheesecake hugged by a chocolate crust, all topped with silky ganache.
Whether you’re wrangling little ones or planning a party, these mini delights bring big joy without the stress. One bite, and you’ll feel the holiday cheer.
Ingredients Hot Cocoa Peppermint Cheesecake Bites
Here’s what you’ll need to bring these festive Hot Cocoa Peppermint Cheesecake Bites to life. I’ve added little notes from my kitchen to yours—because the best recipes come with a sprinkle of real-life know-how.
- Chocolate graham cracker crumbs – These form the base of your mini cheesecakes. You can crush full crackers or buy pre-crumbled for convenience.
- Melted butter – Helps bind the crust and gives it that melt-in-your-mouth richness. I use unsalted to control the saltiness.
- Granulated sugar – Just a touch in the crust adds sweetness and balances the cocoa flavor.
- Cream cheese – The heart of any cheesecake! Make sure it’s softened for a silky-smooth filling.
- Sugar – Sweetens the cheesecake and balances the tang of the cream cheese.
- Peppermint extract – Adds that cool, festive zing. A little goes a long way, so don’t overdo it!
- Vanilla extract – Enhances the chocolate and peppermint flavors with warmth and depth.
- Eggs – These give the filling structure and help it set while baking.
- Sour cream – Adds creaminess and a hint of tang that keeps the filling from being too sweet.
- Heavy cream – Used for the ganache topping. You’ll need it warm to melt the chocolate smoothly.
- Semi-sweet chocolate chips – These melt into a luscious ganache. You can swap with dark chocolate if preferred.
- Whipped cream – Optional but so festive! Pipe it on top just before serving for that classic cocoa vibe.
- Crushed candy canes – Sprinkle over the tops for crunch, color, and peppermint sparkle.
- Mini peppermint sticks – These make the cutest garnish. Totally optional but highly recommended for presentation.
All specific amounts are listed in the printable recipe card at the bottom of this post.
How to Make Hot Cocoa Peppermint Cheesecake Bites
Making these bite-sized peppermint cheesecake treats is easier than it looks. I promise—no pastry school diploma needed. Let’s break it down step by step so you can whip up these peppermint hot chocolate cheesecake bites without breaking a sweat.
Step 1 – Prepare the Chocolate Crust
Start by preheating your oven to 325°F.
In a mixing bowl, combine the chocolate graham cracker crumbs, melted butter, and a little sugar. Stir until the texture feels like wet sand—gritty but able to hold shape when pressed.
Spoon the mixture into mini cheesecake molds or lined muffin tins. Use the back of a spoon or your fingers to press it down firmly.
Pop them in the oven for 5–7 minutes. This quick bake helps the crust firm up. Let them cool while you make the filling.
Step 2 – Mix the Peppermint Cheesecake Filling
In a large bowl, beat the softened cream cheese until it’s smooth and creamy—no lumps allowed!
Add sugar, peppermint extract, and vanilla extract. Beat again until everything’s well blended and you start smelling that dreamy peppermint aroma.
Next, add the eggs one at a time. Don’t rush this—beating too much can make your cheesecake puff and crack. Gently fold in the sour cream at the end to give the filling that rich, velvety texture.
Spoon the mixture over the cooled crusts, filling each cup about ¾ full.
Step 3 – Bake and Cool
Bake your mini peppermint cheesecake cups for 18–22 minutes. You’ll know they’re ready when the centers are just set but still slightly jiggly.
Let them cool completely at room temperature. Then, place them in the fridge for at least two hours—or overnight if you’re planning ahead.
This chill time is where the magic happens. The flavors settle, the texture firms up, and your Christmas cheesecake bites become perfectly sliceable mini desserts.
Step 4 – Make the Chocolate Ganache
Now for that luscious ganache topping! Heat the heavy cream in a small saucepan or microwave until it’s steaming but not boiling.
Pour it over the chocolate chips in a bowl. Let it sit for two minutes—resist the urge to stir right away.
After the wait, stir slowly until the ganache is glossy, smooth, and spoon-worthy.
Let it cool slightly, then spoon a layer over each chilled cheesecake bite. Don’t worry about perfection—drips are dreamy too!
Step 5 – Decorate and Serve
Top each cheesecake with a swirl of whipped cream for that hot cocoa feel.
Sprinkle with crushed candy canes to add sparkle and crunch. If you’re feeling extra festive, pop in a mini peppermint stick like a stirrer.
Serve chilled and watch your guests’ eyes light up with every bite. These hot cocoa cheesecake truffles are like holiday joy in edible form!
Tips for Success
- Use room-temperature cream cheese for a smooth, lump-free filling—cold cream cheese just won’t blend well.
- Don’t overmix the batter once you add eggs—it can cause cracking during baking.
- Chill the bites for at least two hours, but overnight is even better for flavor and texture.
- Decorate just before serving so the whipped cream and candy canes stay fresh and pretty.
- Use silicone molds or parchment liners for easy release and perfect presentation.
Equipment Needed
- Mini cheesecake pan or muffin tin – Silicone molds make popping them out a breeze.
- Mixing bowls – One for the crust, one for the filling, and one for the ganache.
- Hand mixer or stand mixer – For a smooth, creamy cheesecake base.
- Spatula and spoon – For mixing and filling without the mess.
- Small saucepan or microwave-safe bowl – To heat the cream for ganache.
Variations
- No Bake Hot Cocoa Cheesecake Bites – Skip the oven! Use a no-bake crust (crushed cookies + butter) and chill the filling with a bit of gelatin or whipped topping folded in for stability.
- White Chocolate Peppermint – Swap the semi-sweet chips in the ganache for white chocolate. It adds a creamy sweetness that pairs beautifully with peppermint.
- Gluten-Free Option – Use gluten-free chocolate cookies or graham crackers for the crust. Everything else is naturally gluten-free—easy win!
- Dark Chocolate Lovers – Prefer a richer bite? Use dark chocolate chips in the ganache and add a pinch of espresso powder to the filling for depth.
- Dairy-Free Version – Try dairy-free cream cheese, coconut cream instead of heavy cream, and vegan chocolate chips. Still dreamy and delicious!
- Extra Minty Kick – Fold crushed peppermint candies right into the cheesecake filling for little bursts of flavor in every bite.
- Mini Cheesecake Cups with Peppermint Twist – Add a peppermint chocolate cookie to the bottom of each muffin liner instead of making a crust. Quick and clever!
Serving Suggestions
- Pair these bite sized peppermint cheesecake treats with a mug of peppermint mocha or classic hot cocoa.
- Place them on a festive tray with sprigs of holly or edible glitter for extra sparkle.
- Serve alongside other mini holiday peppermint desserts for a cheerful dessert buffet.
- Wrap individually in clear treat bags with ribbon for charming edible gifts.
Frequently Asked Questions (FAQs)
Q: Can I make these Hot Cocoa Peppermint Cheesecake Bites ahead of time?
A: Absolutely! These bite-sized peppermint cheesecake treats are perfect for prepping in advance. I often make them the night before a party so they have plenty of time to chill and set. Just wait to decorate until right before serving to keep the whipped cream fluffy and the candy canes crisp. They hold up beautifully in the fridge for up to 3 days.
Q: Are these mini peppermint cheesecake recipe bites freezer-friendly?
A: Yes, they freeze like a dream! Once fully chilled and set, place your Christmas cheesecake bites on a baking sheet to freeze individually first. Then, transfer to an airtight container or freezer bag. Skip the toppings until you’re ready to serve—whipped cream and candy canes don’t love the freezer. Thaw in the fridge overnight and you’re party-ready!
Q: Can I make no bake hot cocoa cheesecake bites instead?
A: Sure thing! For a no bake hot cocoa cheesecake bite, use a crushed cookie crust mixed with melted butter and press it into liners. For the filling, beat softened cream cheese with peppermint extract, sugar, and fold in whipped topping or stabilized whipped cream. Chill until firm. You’ll still get all the festive flavor with a fraction of the effort—and no oven heating required!
Q: What’s the best way to crush candy canes for topping?
A: I’ve tried every method under the candy-cane-sun, and here’s what works best: place the candy canes in a zip-top bag, seal it, and crush them gently with a rolling pin. Don’t go full Hulk—just enough to get those pretty peppermint shards. Sift out the powder if you want a cleaner look on your festive hot chocolate peppermint desserts.
Q: Can I use white chocolate instead of semi-sweet for the ganache?
A: Definitely! White chocolate adds a sweet, creamy twist that pairs beautifully with the peppermint. Just keep in mind, white chocolate is a bit more temperamental when melting, so stir gently and avoid overheating. If you’re going for a snowy winter vibe, it’s a lovely swap for your hot cocoa cheesecake truffles.
Final Thoughts
Baking these Hot Cocoa Peppermint Cheesecake Bites felt like wrapping up tiny gifts of joy—each one bursting with holiday cheer. From the cozy chocolate crust to the cool peppermint swirl and that dreamy ganache, every bite is a festive celebration.
They’ve become a holiday tradition in our house, and I hope they’ll warm hearts in yours too. Whether you’re treating yourself after a long day or sharing with loved ones, these easy holiday cheesecake recipes deliver magic in mini form.
So go ahead—pour a cup of cocoa, pop a bite, and let the season’s sweetness melt your worries away.