
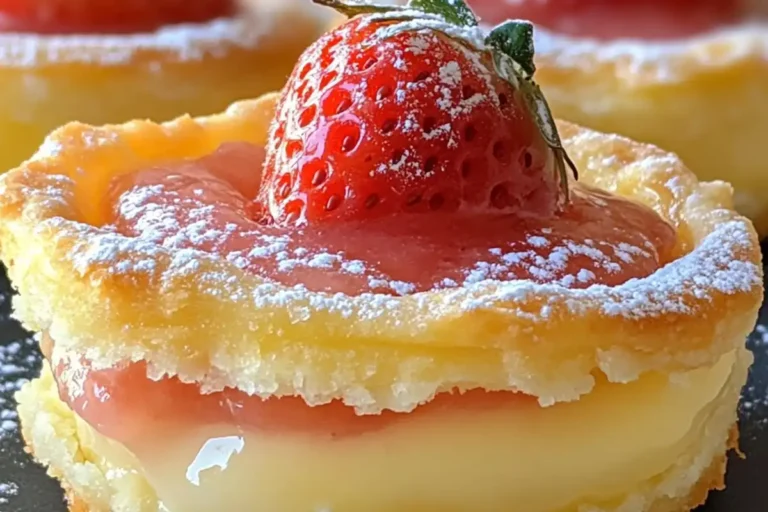
Baby Strawberry Lemon Impossible Pies
If you’re anything like me, you crave a dessert that’s light, fruity, and doesn’t take all afternoon. These Baby Strawberry Lemon Impossible Pies are exactly that—a little sweet, a little tangy, and totally irresistible. I whipped them up one sunny Saturday when I needed something quick but impressive for a backyard brunch.
They’re creamy bite-sized wonders, with a zesty lemon custard base and a glossy strawberry topping. Think retro charm meets modern freshness. Perfect for spring picnics, summer potlucks, or just a quiet treat after a long day. These mini miracles bake themselves—so yes, you deserve this.
Why You’ll Love This Baby Strawberry Lemon Impossible Pies
These baby strawberry lemon pies check every box—easy, quick, and bursting with flavor. They come together in one bowl, with no crust fuss, and bake into creamy little gems. The fresh lemon zing and sweet strawberry glaze make each bite a burst of sunshine. Whether you’re juggling dinner, homework, or just craving comfort, this strawberry lemon impossible pie recipe brings joy without the extra effort.

Ingredients Baby Strawberry Lemon Impossible Pies
These mini summer fruit pies use simple ingredients you probably already have on hand. Each one plays a role in creating that creamy, citrusy magic with a sweet strawberry finish. Here’s what you’ll need, plus a few handy tips and swaps. (Exact amounts are listed at the bottom of the post in the printable recipe card.)
- All-purpose flour – Helps form the pie’s base and gives structure to the custard.
- Sugar – Adds the right amount of sweetness to balance the tart lemon and fruity strawberry glaze.
- Eggs – These bind everything together and give the pie its smooth, custard-like texture.
- Milk – I use whole milk for richness, but 2% works too. Avoid skim—it’s too watery.
- Fresh lemon juice – The star of the show! Adds bright tartness. Bottled works in a pinch, but fresh is best.
- Lemon zest – Packs an extra punch of citrus aroma. Don’t skip it if you have fresh lemons!
- Melted butter – For richness and that classic retro impossible pie flavor.
- Vanilla extract – Adds warmth and depth beneath the citrus notes. Real vanilla makes a difference.
- Pinch of salt – Balances the sweetness and enhances all the other flavors.
- Strawberry preserves or jam – This forms the glossy topping. You can use homemade or store-bought.
- Water – Just a splash to thin out the preserves and make them drizzle-friendly.
- Fresh strawberries – Halved and perched on top, they make these baby strawberry lemon pies extra pretty and fresh.
- Powdered sugar – For a light dusting finish. Optional, but oh-so charming.
Optional twist? Add a drop of almond extract for a subtle nutty note that complements the fruit beautifully.
How to Make Baby Strawberry Lemon Impossible Pies
Making these baby strawberry lemon impossible pies is easier than wrestling with a pie crust on a humid day. Trust me—I’ve done both. This strawberry lemon impossible pie recipe skips the dough drama and lets your oven do the magic. Each bite is creamy, citrusy, and kissed with strawberry sweetness. Let’s dive in step by step.
Step 1 – Prep the Oven and Muffin Tin
First things first—preheat your oven to 350°F (175°C). You want it nice and warm before your mini pies go in.
Grease a standard muffin tin well, or better yet, use silicone muffin liners. These mini lemon impossible pies with strawberries are delicate, and silicone makes them pop out like a dream.
Step 2 – Mix the Dry Ingredients
In a large mixing bowl, whisk together the flour, sugar, and just a pinch of salt. That little bit of salt? It makes the sweet and citrus sing louder—like background vocals for your flavor band.
Step 3 – Add the Wet Ingredients and Combine
Now for the good stuff. Add eggs, milk, melted butter, lemon juice, lemon zest, and vanilla extract into the bowl of dry ingredients.
Whisk everything together until smooth. The batter will be thin—that’s what you want. It’s the magical part of this retro impossible pie with a fruit twist.
Step 4 – Pour Batter into Muffin Tin
Carefully pour the batter into your prepared muffin cups, filling each about 3/4 full. Use a ladle or measuring cup for less mess.
Don’t worry if it looks watery. In the oven, it transforms into a soft, custardy center with lightly golden edges—like sunshine in pie form.
Step 5 – Bake Until Golden and Set
Place the tin in the oven and bake for 22–25 minutes. They’re ready when the tops are lightly golden and don’t jiggle like jelly.
When I made my first batch of strawberry lemon pie cups, I overbaked them by five minutes. Still tasty, but the edges were a bit too firm. Keep an eye on them!
Step 6 – Cool and Glaze with Strawberry Topping
Let the pies cool completely in the pan. Meanwhile, warm your strawberry preserves with a splash of water in the microwave or on the stovetop.
Stir until smooth and glossy. Then spoon a little over each pie. It’s like giving them a fruity little hat—adorable and delicious.
Step 7 – Garnish and Serve
Top each pie with a halved fresh strawberry. Dust with powdered sugar if you’re feeling fancy. And why not? You’ve earned it.
These easy strawberry lemon desserts are best served chilled or at room temperature. I like to chill them just enough so the custard sets firm but still melts in your mouth.

Tips for Success
- Use fresh lemon juice and zest for the brightest flavor—it makes a big difference.
- Don’t skip greasing the muffin tin or using silicone liners to avoid sticking.
- Let the pies cool fully before glazing or garnishing to keep the topping from sliding off.
- A thin batter is normal—don’t panic! It bakes into creamy perfection.
- Chill before serving for the best texture and flavor.
Equipment Needed
- Muffin tin – A standard 12-cup tin works perfectly for these mini pies.
- Mixing bowl – One large bowl for easy, one-step mixing.
- Whisk – To blend your batter smooth and lump-free.
- Measuring cups and spoons – Precision makes perfect, especially with baking.
- Silicone muffin liners – For easy release and minimal cleanup (or grease your tin well).
- Small saucepan or microwave-safe bowl – To warm the strawberry preserves just right.
- Spoon or small ladle – Ideal for neatly filling your muffin cups.
- Cooling rack – Helps the pies cool evenly without condensation underneath.
Variations
- Gluten-Free Option – Swap the all-purpose flour for a 1:1 gluten-free baking mix. It works like a charm and keeps the custard texture intact.
- Dairy-Free Twist – Use unsweetened almond milk or oat milk and plant-based butter. The pies will still turn out creamy and luscious.
- Berry Blend – Mix in a few mashed raspberries or blueberries with the preserves for a deeper berry flavor. It’s a mini summer fruit pie medley!
- Lemon-Lime Kick – Add a teaspoon of lime juice or zest along with the lemon for a citrusy zing that dances on your tongue.
- Tartlet Style – Pour the batter into mini tart pans instead of muffin tins for a more elegant presentation—hello, strawberry lemon tartlets!
- Almond Accent – A tiny splash of almond extract in the batter adds a subtle, nutty note that pairs beautifully with the strawberries.
- Chocolate Drizzle – For a decadent touch, drizzle melted white or dark chocolate over the cooled pies. It’s like a dessert love story.
- Fresh Fruit Topping – Top with a mix of fresh berries instead of just strawberries. Think strawberries, raspberries, and even thin kiwi slices for color and flair.
Serving Suggestions
- Serve chilled with a dollop of whipped cream and a twist of lemon zest on top.
- Pair with iced tea or sparkling lemonade for a refreshing summer vibe.
- Arrange on a tiered dessert tray with fresh mint for brunch or baby showers.
- Dust with powdered sugar just before serving for a pretty, retro finish.

Frequently Asked Questions (FAQs)
Q: Can I make these baby strawberry lemon pies ahead of time?
A: Absolutely! These baby strawberry lemon pies are perfect for prepping ahead. I often bake them the night before a gathering and chill overnight. Just wait to add the strawberry glaze and fresh toppings until right before serving so they stay pretty and fresh. They hold their flavor and texture beautifully for up to two days in the fridge.
Q: What’s the best way to store mini lemon impossible pies with strawberries?
A: Once cooled and topped, store your mini lemon impossible pies with strawberries in an airtight container in the fridge. I like to separate layers with parchment paper if I’m stacking them. They’ll stay fresh for 2–3 days. If you’re storing just the baked custards without glaze or garnish, they’ll last even longer—up to 4 days.
Q: Can I swap the strawberry preserves for fresh berries?
A: You bet! If you’ve got juicy ripe berries, you can mash them lightly and cook them down with a little sugar and water to make your own topping. It turns these mini summer fruit pies into a fresher, more rustic treat. Just make sure your mixture is thick enough to spoon on without running everywhere.
Q: Is this strawberry lemon custard pie recipe gluten-free?
A: Not as written, since it uses all-purpose flour. But you can easily make this strawberry lemon custard pie gluten-free by using a 1:1 gluten-free flour blend. I’ve tested it, and it bakes up creamy and just as delicious—no one will notice the swap.
Q: How do I keep the baby pies from sticking to the pan?
A: Great question, especially since these strawberry lemon pie cups are delicate. I highly recommend using silicone muffin liners—they’re my secret weapon. If you’re using a regular muffin tin, be generous with the grease or use paper liners lightly sprayed with nonstick spray. Cooling completely also helps them release more easily.
Final Thoughts
There’s something magical about baking these Baby Strawberry Lemon Impossible Pies. Maybe it’s the way the custard sets like silk, or how the strawberry glaze catches the light just right. Every time I make them, I feel like I’m bottling up sunshine and joy into a dozen tiny bites. They’re quick, they’re pretty, and they never fail to bring smiles. Whether you’re baking for a crowd or just treating yourself after a long day, these little pies offer comfort and charm in every spoonful. Trust me—once you try them, you’ll come back to this recipe again and again.