
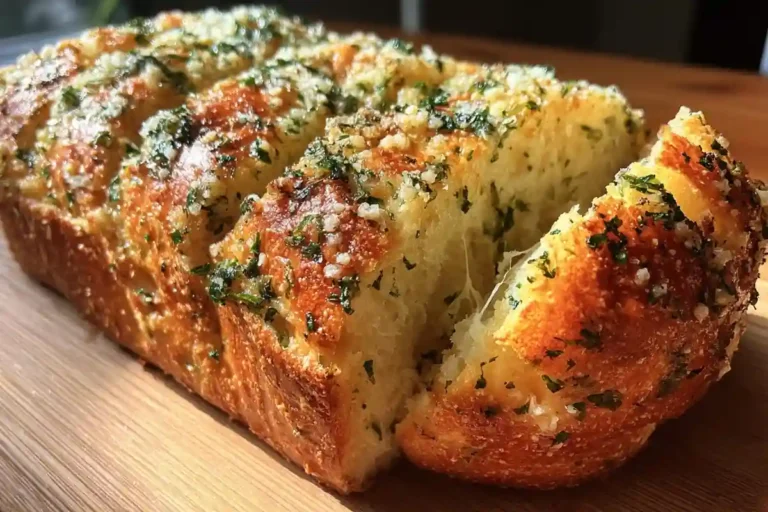
There’s something undeniably cozy about the aroma of fresh-baked Garlic Parmesan Bread wafting through your home. It’s like a warm hug at the end of a long day. As a busy mom, I know how precious time can be, and that’s why this recipe quickly became a favorite in my kitchen. It’s not just a quick solution for a busy day; it’s a dish that impresses your loved ones and brings everyone together. Whether you’re serving it alongside pasta or savoring it on its own, this cheesy pull-apart loaf is sure to be a crowd-pleaser!
Why You’ll Love This Garlic Parmesan Bread
This Garlic Parmesan Bread is a treasure trove of flavor and simplicity! It’s incredibly easy to whip up, making it perfect for those hectic weeknights. The rich, buttery garlic taste dances on your palate, while the Parmesan adds a delightful savoriness. Plus, it’s a fantastic way to elevate any meal. With just a few ingredients, you can create a stunning, comforting side that’ll have everyone asking for seconds!
Ingredients for Garlic Parmesan Bread
Creating the perfect Garlic Parmesan Bread begins with some simple ingredients. Here’s what you’ll need:
- All-purpose flour: This is the backbone of your bread, providing structure and texture. You can substitute with whole wheat flour for a heartier version.
- Active dry yeast: This helps your bread rise and gives it that fluffy texture. Make sure it’s fresh for best results.
- Warm water: The key to activating the yeast. Aim for the temperature of a cozy bath—too hot, and you’ll kill the yeast!
- Sugar: Just a tablespoon to help the yeast bloom and add a hint of sweetness.
- Salt: Essential for flavor, balancing out the sweetness and enhancing the overall taste.
- Olive oil: This adds richness and helps keep the bread moist. You could use melted butter instead for a buttery flavor.
- Unsalted butter: To contribute to that luscious, buttery taste. Remember, it needs to be melted for easy mixing.
- Garlic: The star of the show! Freshly minced garlic delivers that irresistible aroma and flavor.
- Parmesan cheese: Grated for easy melting, it adds a cheesy, savory punch that’s hard to resist.
- Fresh parsley: A pop of color and freshness! You can use dried parsley if fresh isn’t available.
- Dried oregano and thyme: These herbs add depth and a hint of earthiness to your bread. Feel free to mix in other herbs you love!
For exact measurements, check the bottom of the article where I’ve provided a printable recipe. Happy baking!
How to Make Garlic Parmesan Bread
Now, let’s dive into the heart of this recipe! Making Garlic Parmesan Bread is a delightful journey, and I promise it’s simpler than you might think. Follow these easy steps, and you’ll have a warm, cheesy loaf that’s perfect for any meal!
Step 1: Activate the Yeast
Start by taking your warm water and pouring it into a bowl. Add the sugar and then sprinkle the active dry yeast on top. Give it a gentle stir, and let it sit for about 5–10 minutes. You’ll know it’s ready when it becomes foamy and bubbly. This step is crucial; without it, your bread won’t rise like it should!
Step 2: Mix the Dough
Once your yeast is foamy, it’s time to mix the dough! Add in the all-purpose flour, salt, and olive oil to the yeast mixture. Stir everything together until it forms a shaggy dough. Then, turn it out onto a floured surface and knead it for about 5–7 minutes. You want it to be smooth and elastic; this will give your Garlic Parmesan Bread that perfect tender crumb!
Step 3: Let It Rise
Now comes the waiting part, but trust me, it’s worth it! Place your dough in a lightly oiled bowl and cover it with a clean kitchen towel. Let it rise in a warm spot for about 1 hour or until it doubles in size. This step is key to achieving that fluffy, pull-apart texture that everyone loves!
Step 4: Prepare the Topping
While your dough is rising, let’s whip up the delicious topping! In a small bowl, mix together the melted butter, minced garlic, grated Parmesan cheese, chopped parsley, oregano, and thyme. This garlicky goodness will take your bread to the next level. Just imagine that aroma filling your kitchen!
Step 5: Shape, Bake & Serve
Once your dough has risen, punch it down gently to release the air. Now, you can shape it into a loaf or divide it into rolls, depending on your mood. Place your shaped dough into a greased baking pan. Brush it generously with the herb butter mixture, ensuring every inch is covered. Bake it in a preheated oven at 375°F for 25–30 minutes, until it’s golden brown. Serve it warm, and watch it disappear in minutes!
Tips for Success
- Always check your yeast’s expiration date for the best rise.
- For a softer crust, cover the bread with foil during baking.
- Brush the bread with extra herb butter right after baking for more flavor.
- Experiment with different cheeses like mozzarella or cheddar for unique twists.
- Let the bread cool slightly before pulling it apart to avoid burning your fingers!
Equipment Needed
- Mixing bowl: A large bowl for combining ingredients. A pot will work in a pinch.
- Measuring cups and spoons: Essential for accurate ingredient amounts. Use a kitchen scale if you prefer precision.
- Wooden spoon or spatula: Perfect for mixing the dough. Your hands can do the job too!
- Floured surface: For kneading the dough. A clean countertop or cutting board will suffice.
- Baking pan: A greased loaf or round pan is ideal. A baking sheet can work for rolls.
Variations
- Herb-Infused: Add fresh basil or rosemary to the dough for an aromatic twist.
- Cheesy Garlic Breadsticks: Shape the dough into sticks instead of a loaf for easy dipping!
- Spicy Kick: Mix in red pepper flakes or jalapeños for a hot flavor boost.
- Whole Wheat Option: Substitute half the all-purpose flour with whole wheat for added nutrition.
- Vegan Version: Replace butter with vegan margarine and use a plant-based cheese alternative.
Serving Suggestions
- Pair Garlic Parmesan Bread with a fresh garden salad for a light meal.
- Serve it alongside your favorite pasta dish for a cheesy, comforting combo.
- A glass of red wine complements the savory flavors beautifully.
- For a cozy presentation, wrap the bread in a linen cloth and serve warm.
- Try dipping it in marinara sauce for an extra burst of flavor!
Frequently Asked Questions (FAQs)
Q: Can I make this Garlic Parmesan Bread ahead of time?
A: Absolutely! You can prepare the dough in advance, let it rise, and shape it. Just cover it tightly and refrigerate. When you’re ready to bake, let it come to room temperature before baking.
Q: How do I store leftover Garlic Parmesan Bread?
A: Store it in an airtight container at room temperature for up to 2 days. For longer freshness, wrap it in foil and freeze. Just reheat in the oven when you’re ready to enjoy it again!
Q: Can I use different cheeses in this homemade garlic bread recipe?
A: Yes! Feel free to mix and match cheeses. Mozzarella, cheddar, or even a spicy pepper jack can add a unique twist to your cheesy herb pull-apart loaf.
Q: What can I serve with Garlic Parmesan Bread?
A: This savory Parmesan bread pairs beautifully with pasta dishes, hearty stews, or even as a side for soups. A fresh salad or a glass of red wine makes it a complete meal!
Q: Is this recipe suitable for vegetarians?
A: Yes! This Garlic Parmesan Bread is vegetarian-friendly, making it a perfect addition to any plant-based meal!
Final Thoughts
Making Garlic Parmesan Bread is more than just baking; it’s about creating a warm, inviting atmosphere for family and friends. The joy of pulling apart a cheesy, buttery loaf, with that irresistible garlic aroma filling the air, is simply unmatched. Each bite feels like a celebration, turning an ordinary meal into something special. Whether it’s for a cozy family dinner or a gathering with friends, this bread is sure to be a hit. I hope you find as much joy in making it as I do. Happy baking, and may your kitchen always be filled with love and delicious smells!
PrintGarlic Parmesan Bread: The Ultimate Comfort Food Recipe!
A buttery, cheesy pull-apart loaf that is a crowd favorite, perfect for serving with pasta or hearty stews.
- Prep Time: 15 minutes (plus 1 hour rise)
- Cook Time: 30 minutes
- Total Time: 1 hr 45 mins
- Yield: 8 servings 1x
- Category: Side Dish
- Method: Baking
- Cuisine: Italian
- Diet: Vegetarian
Ingredients
- 3 cups all-purpose flour
- 1 packet (2¼ tsp) active dry yeast
- 1 cup warm water (110°F)
- 1 tbsp sugar
- 1 tsp salt
- 2 tbsp olive oil
- 4 tbsp unsalted butter, melted
- 4 cloves garlic, minced
- ½ cup grated Parmesan cheese
- 2 tbsp chopped fresh parsley
- 1 tsp dried oregano
- 1 tsp dried thyme
Instructions
- Activate the Yeast: In a bowl, combine warm water, sugar, and yeast. Let it sit 5–10 minutes until foamy—a must-do step for fluffy, bakery-style bread and fail-proof rise every time.
- Mix the Dough: Add flour, salt, and olive oil to the yeast mixture. Mix and knead until smooth and elastic—the base for a soft, tender crumb and perfect homemade bread texture.
- Let It Rise: Place dough in an oiled bowl, cover, and let rise for 1 hour or until doubled. This step is key to getting that puffy, pull-apart bread that’s total comfort food gold.
- Prepare the Topping: In a small bowl, mix melted butter, garlic, Parmesan, parsley, oregano, and thyme. Brush this garlicky goodness all over the dough—flavor-loaded topping and next-level cheesy finish.
- Shape, Bake & Serve: Punch down dough, shape into a loaf or rolls, and place in a greased baking pan. Brush with herb butter again. Bake at 375°F (190°C) for 25–30 minutes until golden and cooked through. Serve warm—your go-to side for pasta nights or hearty stews.
Notes
- Make sure the water is warm but not too hot to avoid killing the yeast.
- You can add more herbs or cheese to the topping for extra flavor.
- This bread is best served warm but can be reheated in the oven.
Nutrition
- Serving Size: 1 slice
- Calories: 210
- Protein: 6g