
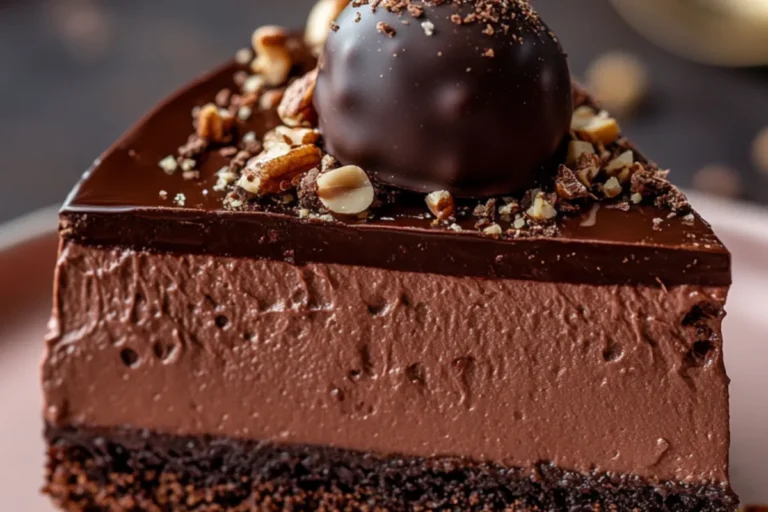
Chocolate Hazelnut Mousse Cake
There’s something magical about a Chocolate Hazelnut Mousse Cake. It’s like a warm hug on a chilly day, isn’t it? This delightful dessert combines rich chocolate with the creamy allure of hazelnut, creating a sweet escape from the hustle and bustle of everyday life. Whether you’re a busy mom juggling kids’ activities or a professional trying to impress friends at a gathering, this cake is your secret weapon. It’s indulgent yet surprisingly simple, perfect for both celebrations and quiet evenings at home. Trust me, once you try it, you’ll want to make this cake a regular in your recipe rotation!
Why You’ll Love This Chocolate Hazelnut Mousse Cake
This Chocolate Hazelnut Mousse Cake is a dream come true for any dessert lover. It’s incredibly easy to whip up, allowing you to indulge without spending hours in the kitchen. The combination of rich chocolate and nutty hazelnut creates a taste sensation that will leave your taste buds dancing. Plus, it looks stunning, making it the perfect showstopper for gatherings. You’ll definitely earn some serious brownie points with this one!
Ingredients for Chocolate Hazelnut Mousse Cake
Gathering the right ingredients is half the battle, and I promise, you’ll love what goes into this Chocolate Hazelnut Mousse Cake. Each component contributes to the rich, decadent flavor profile that makes this dessert a standout.
- Butter: Adds richness to the brownie base. You can use unsalted for better control of the saltiness.
- Sugar: Sweetens the cake, creating that delightful balance with the chocolate. For a healthier option, consider using coconut sugar.
- Cocoa Powder: The heart of the brownie base, providing that intense chocolate flavor. Opt for high-quality dark cocoa for a deeper taste.
- Eggs: They give structure and moisture. Farm-fresh eggs can elevate the flavor.
- Flour: All-purpose flour is standard, but feel free to swap in almond flour for a gluten-free base.
- Dark Chocolate: The star of the mousse! Choose a good quality chocolate with at least 70% cocoa for a rich flavor.
- Heavy Cream: Essential for whipping into fluffy peaks, adding a luscious texture to the mousse.
- Hazelnut Spread: This is where the magic happens! It adds that irresistible nutty flavor. Nutella is a popular choice, but feel free to explore other brands.
- Ganache: Made from dark chocolate and cream, this glossy topping brings everything together. Use the same chocolate as in the mousse for consistency.
- Hazelnuts: For decoration, they add a lovely crunch. Consider toasting them for an extra flavor boost.
Exact quantities for each ingredient are available at the bottom of the article for easy printing. Trust me, you’ll want to keep this recipe handy!
How to Make Chocolate Hazelnut Mousse Cake
Now, let’s get into the fun part—making this Chocolate Hazelnut Mousse Cake! I want to guide you through each step, ensuring you have a delightful baking experience. You’ll find that this process is straightforward, and the end result is simply divine.
Step 1: Prepare the Brownie Base
Start by preheating your oven to 350°F. While it warms up, melt the butter in a bowl. Then, mix in the sugar and cocoa powder until combined. Add the eggs one at a time, stirring well after each addition. Next, gently fold in the flour, ensuring no lumps remain.
Pour this rich mixture into a greased baking dish and spread it evenly. Bake for 15 to 18 minutes. You can check for doneness by inserting a toothpick—it should come out with a few moist crumbs. Once baked, let the brownie cool completely in the pan. This is crucial for a perfect layer!
Step 2: Make the Whipped Chocolate Hazelnut Mousse
While the brownie base cools, let’s whip up that luscious mousse. Start by melting the dark chocolate gently in a microwave or over a double boiler. In another bowl, whip the heavy cream until soft peaks form. Now, mix the melted chocolate with the hazelnut spread until smooth.
Carefully fold the whipped cream into the chocolate-hazelnut mixture. Be gentle here! This folding technique is vital for creating that airy, whipped chocolate hazelnut mousse texture. You want it light and fluffy, not deflated!
Step 3: Chill the Mousse
Once your mousse is ready, it’s time to chill. Spread it evenly over the cooled brownie base. The chilling step is essential as it allows the mousse to set properly, giving it that perfect sliceable texture later. Cover it with plastic wrap and pop it in the refrigerator for at least four hours. Patience is key!
Step 4: Create the Chocolate Hazelnut Ganache
Now, let’s prepare the decadent chocolate hazelnut ganache. Heat the cream in a small saucepan until just simmering, then pour it over the chopped dark chocolate in a bowl. Let it sit for a minute before stirring until smooth. You want it glossy and rich.
If the ganache seems too thick, you can add a splash more cream. This ganache will provide a beautiful, velvety finish on top of your mousse. Let it cool slightly before pouring it over the chilled mousse.
Step 5: Assemble the Cake
With your mousse set and ganache ready, it’s time to assemble! Pour the warm ganache over the mousse layer, smoothing it out to cover completely. This creates a stunning layer of chocolate hazelnut goodness. Feel free to let some ganache drip down the sides for that gourmet look!
Step 6: Chill and Serve
After assembling the cake, return it to the fridge for another hour to let the ganache set. When ready to serve, slice with a sharp knife for clean edges. If you want to elevate the presentation, top with toasted hazelnuts or chocolate truffles.
And there you have it! Your own Chocolate Hazelnut Mousse Cake, ready to impress. Each slice is a little piece of heaven that’s sure to delight.
Tips for Success
- Always use room temperature eggs for better mixing.
- Don’t rush the chilling time; it’s crucial for texture.
- When folding whipped cream, use a gentle hand to keep it airy.
- For a richer ganache, use high-quality chocolate.
- Toast hazelnuts before decorating for an extra flavor kick.
Equipment Needed
- Mixing bowls: Use glass or stainless steel for easy mixing.
- Whisk: A hand whisk works, but an electric mixer saves time.
- Baking dish: Any square or rectangular dish will do.
- Spatula: A silicone spatula is great for folding ingredients.
- Measuring cups and spoons: Essential for accuracy.
Variations
- For a coffee twist, add 1-2 tablespoons of espresso powder to the brownie base for a mocha flavor.
- Swap out hazelnut spread for almond butter for a different nutty flavor.
- Make it dairy-free by using coconut cream and dairy-free chocolate in the mousse and ganache.
- Add a hint of orange zest to the mousse for a refreshing citrus touch.
- For a crunchier texture, mix in some crushed hazelnuts into the mousse before chilling.
Serving Suggestions
- Pair with a dollop of freshly whipped cream for an airy touch.
- Serve alongside fresh berries for a burst of color and flavor.
- Drizzle with extra chocolate sauce for that indulgent finish.
- Enjoy with a cup of coffee or a dessert wine.
- Garnish with mint leaves for a refreshing contrast.
Frequently Asked Questions (FAQs)
Q: Can I use milk chocolate instead of dark chocolate?
A: Yes, using milk chocolate will result in a sweeter mousse. Just keep in mind that it may alter the rich flavor profile of the Chocolate Hazelnut Mousse Cake.
Q: How can I make this cake gluten-free?
A: Substitute almond flour for regular flour in the brownie base. This easy swap will keep your cake delicious and gluten-free, perfect for those with dietary restrictions!
Q: Can I prepare the mousse a day in advance?
A: Absolutely! The mousse can be made a day ahead and stored in the fridge. This not only saves time but also allows the flavors to meld beautifully.
Q: What if I don’t have hazelnut spread?
A: You can use any nut butter, like almond or peanut butter, to create a different twist on this mousse. It will still be creamy and delicious!
Q: How should I store leftovers?
A: Keep any leftover Chocolate Hazelnut Mousse Cake in an airtight container in the fridge. It should stay fresh for up to three days—if it lasts that long!
Final Thoughts
Making a Chocolate Hazelnut Mousse Cake is more than just a baking project; it’s an experience filled with joy and indulgence. Every step, from the rich brownie base to the silky mousse and glossy ganache, brings a sense of accomplishment. Sharing this cake with loved ones creates memories that linger long after the last slice is gone. It’s perfect for celebrations or a cozy night in. So, grab your apron, embrace the deliciousness, and let this cake be a reminder that life is sweeter with a little chocolate and hazelnut bliss sprinkled in!
PrintChocolate Hazelnut Mousse Cake: Indulge in Pure Bliss!
A decadent Chocolate Hazelnut Mousse Cake with a rich brownie base, silky mousse, and luscious ganache, perfect for indulgence.
- Prep Time: 20 minutes
- Cook Time: 18 minutes
- Total Time: 4 hours 38 minutes
- Yield: 8 servings 1x
- Category: Dessert
- Method: Baking and Chilling
- Cuisine: American
- Diet: Vegetarian
Ingredients
- Brownie Base:
- ½ cup butter
- ¾ cup sugar
- ⅓ cup cocoa powder
- 2 eggs
- ½ cup flour
- Mousse:
- 200 g dark chocolate
- 1 cup heavy cream
- ⅓ cup hazelnut spread
- Ganache:
- ½ cup cream
- 100 g dark chocolate
Instructions
- Bake brownie base at 175°C (350°F) for 15–18 minutes. Cool.
- Fold whipped cream into chocolate-hazelnut mixture. Spread over base. Chill 4 hours.
- Pour warm ganache over mousse and smooth.
- Decorate with hazelnuts and truffles. Chill before slicing.
Notes
- Use almond flour for gluten-free base
Nutrition
- Serving Size: 1 slice
- Calories: 350
- Sugar: 25g
- Sodium: 50mg
- Fat: 20g
- Saturated Fat: 10g
- Unsaturated Fat: 5g
- Trans Fat: 0g
- Carbohydrates: 40g
- Fiber: 2g
- Protein: 5g
- Cholesterol: 100mg