
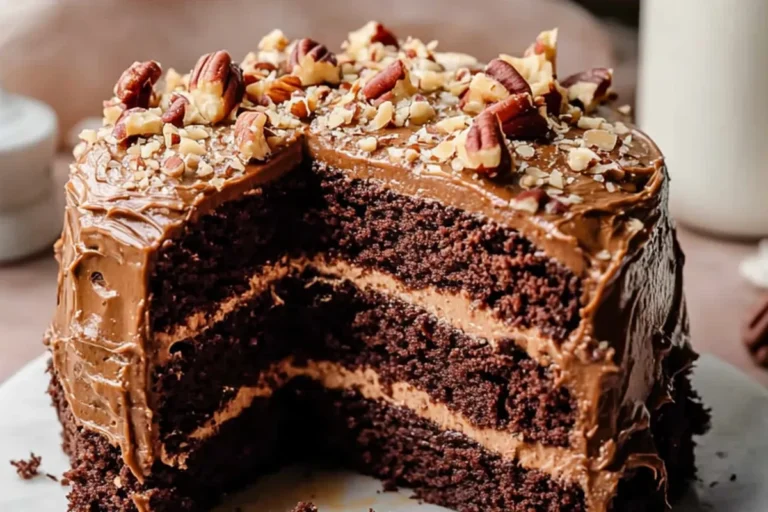
Butterscotch Chocolate Layer Cake
As a passionate home cook, I can’t help but get excited when I think about this Butterscotch Chocolate Layer Cake. It’s the kind of dessert that’s perfect for those busy evenings when you want to whip up something impressive without spending hours in the kitchen. Imagine the delight on your loved ones’ faces as they savor each moist bite of chocolate, perfectly complemented by the rich butterscotch frosting. This cake is a beautiful blend of flavors, making it the ideal centerpiece for any gathering, or simply a sweet treat for yourself after a long day.
Why You’ll Love This Butterscotch Chocolate Layer Cake
This Butterscotch Chocolate Layer Cake is a delightful combination of flavors that’s easy to make, even on your busiest days. The moist chocolate layers paired with the creamy butterscotch frosting create a heavenly taste that will leave everyone asking for seconds. Plus, it’s quick to prepare, making it a fantastic solution for last-minute gatherings or just a sweet surprise for your family. You’ll fall in love with every slice!
Ingredients for Butterscotch Chocolate Layer Cake
To create this dreamy Butterscotch Chocolate Layer Cake, you’ll need a selection of simple yet essential ingredients. Let’s break them down:
- All-purpose flour: The backbone of any cake, it provides structure and stability.
- Granulated sugar: This adds sweetness and helps create that moist texture we all love.
- Unsweetened cocoa powder: The star of the show! It delivers that rich chocolate flavor.
- Baking powder and baking soda: These leavening agents ensure your cake rises beautifully.
- Salt: A little pinch enhances all the flavors and balances the sweetness.
- Milk: It adds moisture to the batter, making each bite tender and delicious.
- Vegetable oil: This keeps the cake moist and adds a touch of richness.
- Eggs: They bind the ingredients together and help with that lovely rise.
- Vanilla extract: A splash of this adds a warm, comforting flavor to your cake.
- Boiling water: Yes, you read that right! It activates the cocoa powder, making the cake incredibly moist.
For the Butterscotch Frosting, you’ll need:
- Unsalted butter: The base of your frosting, giving it that creamy texture.
- Packed brown sugar: This gives the frosting its rich, caramel-like flavor.
- Salt: Just a pinch to enhance the sweetness of the frosting.
- Milk: Helps achieve the perfect spreadable consistency.
- Powdered sugar: The sweetener that gives your frosting its delightful sweetness and thickness.
- Vanilla extract: Just like in the cake, it adds depth to the frosting.
Finally, for topping, you can sprinkle some chopped pecans and chopped walnuts for that extra crunch and flavor.
For exact quantities and to make your baking experience smoother, check the bottom of the article where you’ll find the detailed recipe available for printing!
How to Make Butterscotch Chocolate Layer Cake
Step 1: Preheat the Oven and Prepare Pans
First things first, let’s get that oven roaring! Preheat to 350°F (175°C). While it warms up, grease and flour three 8-inch round cake pans. This step is crucial! Properly prepared pans ensure your cake slides out easily. Safety tip: Always use oven mitts when handling hot pans. It’s better to be safe than sorry!
Step 2: Mix Dry Ingredients
In a large bowl, whisk together the flour, sugar, cocoa powder, baking powder, baking soda, and salt. Mixing dry ingredients first is vital for an even texture. It allows the leavening agents to distribute evenly, ensuring your Butterscotch Chocolate Layer Cake rises beautifully!
Step 3: Combine Wet Ingredients
Now it’s time to add the wet ingredients. Pour in the milk, vegetable oil, eggs, and vanilla extract. Mix on medium speed for about two minutes. Properly incorporating these ingredients is essential for a smooth batter, which leads to a moist chocolate layer cake that everyone will love!
Step 4: Add Boiling Water
Here’s the magic touch—add one cup of boiling water to the batter. This step may seem odd, but it activates the cocoa powder. The result? A super moist cake that’s simply irresistible! Just be careful not to splash; that hot water can be tricky!
Step 5: Bake the Cake
Divide the batter evenly among the prepared pans and pop them in the oven. Bake for 30 to 35 minutes. To check for doneness, insert a toothpick into the center. If it comes out clean, your cake is ready. If not, give it a few more minutes!
Step 6: Make the Butterscotch Frosting
While the cake cools, let’s whip up that luscious butterscotch frosting! In a saucepan, melt the butter and brown sugar over medium heat. Stir until the sugar dissolves, then add milk and bring to a boil. Remove from heat and let it cool. Once cooled, beat in vanilla and gradually mix in powdered sugar until the frosting reaches that perfect spreadable consistency!
Step 7: Assemble the Cake
With your cake layers cooled, it’s time to assemble! Place one layer on your serving plate, slather on a generous layer of butterscotch frosting, and repeat with the remaining layers. Spread frosting over the top and sides. For a final touch, sprinkle chopped pecans and walnuts on top for that delightful crunch!
Tips for Success
- Always measure your ingredients accurately for the best results.
- Let your cake layers cool completely before frosting to prevent melting.
- Chill your butterscotch frosting for a few minutes for easier spreading.
- Use dark cocoa powder for an even richer chocolate flavor.
- Don’t rush the baking; every oven is different, so keep an eye on your cake.
Equipment Needed
- Mixing bowls: Use any size, but a large bowl is best for mixing batter.
- Whisk or electric mixer: A whisk works, but an electric mixer saves time.
- Measuring cups and spoons: Essential for accurate ingredient measurements.
- Spatula: Perfect for scraping down the sides of bowls and spreading frosting.
- Oven mitts: Always handy to protect your hands from hot pans.
Variations
- Gluten-Free: Substitute all-purpose flour with a 1:1 gluten-free baking blend for a delicious gluten-free option.
- Nut-Free: Omit the pecans and walnuts or replace them with toasted coconut for a different crunch.
- Chocolate Ganache Topping: For a richer experience, top your cake with a butterscotch ganache instead of frosting.
- Vegan Option: Use a plant-based milk, coconut oil, and flax eggs as substitutes for a vegan-friendly cake.
- Flavor Infusion: Add espresso powder to the dry ingredients to enhance the chocolate flavor further.
Serving Suggestions
- Pair each slice with a scoop of creamy vanilla bean ice cream for added decadence.
- Serve alongside a strong cup of coffee to balance the sweetness of the cake.
- Garnish with fresh berries for a pop of color and a burst of freshness.
- Dust with cocoa powder or cinnamon for a beautiful presentation.
- Consider a drizzle of caramel sauce for an extra sweet touch!
Frequently Asked Questions (FAQs)
Q: Can I make the Butterscotch Chocolate Layer Cake ahead of time?
A: Absolutely! You can bake the cake layers a day in advance. Just wrap them tightly in plastic wrap and store them at room temperature. Frost the cake on the day you plan to serve it for the best texture and flavor.
Q: How can I make the butterscotch frosting thicker?
A: If you find your butterscotch frosting too thin, simply add a bit more powdered sugar. Mix it in gradually until you reach your desired consistency. This frosting should be spreadable but not runny!
Q: Can I use a different frosting for this cake?
A: Of course! While the butterscotch frosting is a star, feel free to experiment. A cream cheese frosting or chocolate buttercream would pair beautifully with this rich chocolate cake.
Q: Is this cake suitable for special dietary needs?
A: Yes! You can easily adapt this recipe. For a gluten-free version, substitute the all-purpose flour with a gluten-free blend. You can also make it vegan by using plant-based milk and flax eggs.
Q: What’s the best way to store leftover cake?
A: Store any leftover slices in an airtight container at room temperature for up to two days. If you want to keep it longer, refrigerate it for up to five days. Just be sure to let it come to room temperature before serving for the best flavor!
Final Thoughts
Baking this Butterscotch Chocolate Layer Cake isn’t just about creating a dessert; it’s an experience filled with joy and love. Each slice brings together moist chocolate cake and creamy butterscotch frosting, making it a delightful treat for family gatherings or even a quiet night at home. I love how the aroma wafts through my kitchen, creating a warm, inviting atmosphere. Sharing this cake with loved ones transforms ordinary moments into cherished memories. So, roll up your sleeves, gather your ingredients, and let this cake bring a touch of sweetness to your day!
PrintButterscotch Chocolate Layer Cake: A Dreamy Delight!
A moist and gooey Butterscotch Chocolate Layer Cake that is a dreamy delight for chocolate lovers!
- Prep Time: 25 minutes
- Cook Time: 35 minutes
- Total Time: 1 hour
- Yield: 10 servings 1x
- Category: Dessert
- Method: Baking
- Cuisine: American
- Diet: Vegetarian
Ingredients
- For the Chocolate Cake:
- 2 cups all-purpose flour
- 2 cups granulated sugar
- 3/4 cup unsweetened cocoa powder
- 2 teaspoons baking powder
- 1 1/2 teaspoons baking soda
- 1 teaspoon salt
- 1 cup milk
- 1/2 cup vegetable oil
- 2 eggs
- 2 teaspoons vanilla extract
- 1 cup boiling water
- For the Butterscotch Frosting:
- 1/2 cup unsalted butter
- 1 cup packed brown sugar
- 1/4 teaspoon salt
- 1/4 cup milk
- 2 to 2 1/2 cups powdered sugar
- 1 teaspoon vanilla extract
- For Topping:
- 1/2 cup chopped pecans
- 1/4 cup chopped walnuts
Instructions
- Preheat oven to 350°F (175°C). Grease and flour three 8-inch round cake pans.
- In a large bowl, whisk together flour, sugar, cocoa powder, baking powder, baking soda, and salt.
- Add milk, oil, eggs, and vanilla. Beat on medium speed for 2 minutes.
- Stir in boiling water until batter is well combined (it will be thin).
- Divide evenly into prepared pans and bake 30–35 minutes or until a toothpick comes out clean.
- Cool cakes in pans for 10 minutes, then transfer to wire racks to cool completely.
- In a saucepan over medium heat, melt butter and add brown sugar and salt. Cook while stirring for 2–3 minutes until sugar dissolves.
- Add milk, stir and bring to a boil. Remove from heat and let cool to room temperature.
- Beat in vanilla and gradually mix in powdered sugar until frosting is thick and spreadable.
- Place one cake layer on a serving plate. Spread a layer of butterscotch frosting on top. Repeat with remaining layers.
- Spread frosting over top and sides of the cake. Sprinkle chopped pecans and walnuts generously over the top.
Notes
- Serve with a scoop of vanilla bean ice cream.
- Pair with strong coffee or a creamy milkshake.
- Dust lightly with cocoa or cinnamon for extra aroma.
- Use dark cocoa powder for a deeper chocolate flavor.
- Let frosting chill slightly before spreading for smooth layers.
- Store covered at room temperature for 2 days or in fridge for 5 days.
Nutrition
- Serving Size: 1 slice
- Calories: 450
- Sugar: 40g
- Sodium: 350mg
- Fat: 20g
- Saturated Fat: 10g
- Unsaturated Fat: 8g
- Trans Fat: 0g
- Carbohydrates: 60g
- Fiber: 2g
- Protein: 5g
- Cholesterol: 80mg