
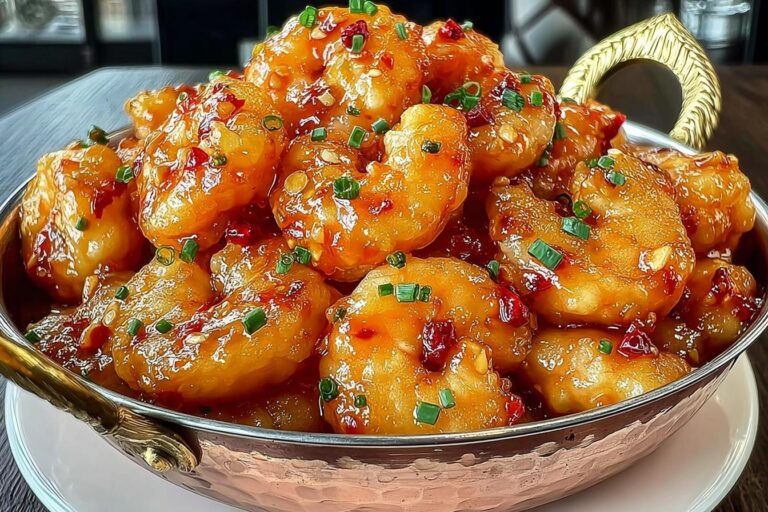
Oh my gosh, you have to try this Sweet Chili Shrimp – it’s seriously better than anything you’d get from takeout! The first time I made it, I couldn’t believe how easy it was to whip up something so crispy, sticky, and packed with flavor. That perfect balance of sweet and spicy? Absolute magic. The shrimp fry up golden and crunchy, then get tossed in a glossy, garlicky chili sauce that you’ll want to lick off the plate. It’s my go-to when I’m craving something quick but impressive – and trust me, once you taste it, you’ll be hooked too.
Why You’ll Love This Sweet Chili Shrimp
This recipe is a total game-changer, and here’s why:
- Crispy perfection: That golden, crunchy coating? It’s like biting into the best shrimp tempura you’ve ever had—without the fuss of a deep fryer.
- Better than takeout: Skip the greasy containers! This homemade version has way more flavor (and none of the mystery ingredients).
- Ready in a flash: From fridge to table in 35 minutes—perfect for those “I need something amazing NOW” moments.
- Sweet-spicy magic: The sauce clings to every bite with just the right kick. Trust me, you’ll be sneaking spoonfuls straight from the pan.
Ingredients for Sweet Chili Shrimp
Here’s everything you’ll need to make the crispiest, most flavorful sweet chili shrimp you’ve ever tasted. I swear by these exact measurements—they’re what give that perfect balance between crunchy shrimp and sticky-sweet sauce every single time.

- 1½ lbs large shrimp, peeled and deveined (trust me, fresh makes all the difference)
- 1 cup cornstarch (the secret to that ultra-crispy shell)
- ½ cup all-purpose flour
- 1 tsp garlic powder (because you can never have too much garlic!)
- 1 tsp onion powder
- ½ tsp smoked paprika (my little flavor booster)
- Salt and freshly ground black pepper, to taste
- 2 eggs, beaten (they help the coating stick like glue)
- Vegetable oil, for frying (about 2 cups, but have extra just in case)
For the Addictive Sweet Chili Sauce:
- ⅓ cup sweet chili sauce (I use Mae Ploy brand – it’s my favorite)
- 2 tbsp honey (for that perfect sticky sweetness)
- 2 tbsp soy sauce
- 2 cloves garlic, minced (don’t be shy here!)
- 1 tsp fresh ginger, grated (none of that powdered stuff – it makes all the difference)
- 1 tsp sesame oil (that nutty aroma is everything)
- 1 tsp rice vinegar (just enough tang to balance the sweetness)
- 1 tsp cornstarch mixed with 1 tbsp water (our thickening magic trick)
For Garnish (Don’t Skip These!):
- 1 tbsp sesame seeds
- 2 tbsp chopped fresh chives
- 1 tsp crushed red pepper flakes (adjust to your spice tolerance)
Equipment You’ll Need
No fancy gadgets here! Just grab these basic kitchen tools—I bet you already have most of them:
- Deep skillet or wok (for frying those shrimp to golden perfection – about 10-12 inches wide works great)
- 2 mixing bowls (one for dry ingredients, one for eggs – I use my trusty old Pyrex ones)
- Whisk or fork (for beating eggs and mixing sauces – I always grab my whisk because it’s quicker)
- Slotted spoon or spider strainer (to scoop out those crispy shrimp without bringing extra oil with them)
- Paper towel-lined plate (for draining – this keeps them crunchy instead of soggy)
- Small saucepan (for simmering that amazing sweet chili sauce to sticky perfection)
That’s it! See? Nothing complicated – just like my grandma always said, good food doesn’t need fancy equipment to taste incredible.
How to Make Sweet Chili Shrimp
Alright, let’s get to the fun part—making that crispy, sticky, sweet-spicy magic happen! Don’t worry, I’ve broken it down into simple steps so you can nail this recipe like a pro. Follow along, and soon you’ll be tossing those golden shrimp in that glossy sauce like you’ve been doing it forever.
Step 1: Prepare the Shrimp
First things first—let’s get those shrimp ready for their crispy makeover. Pat them dry with paper towels (this is crucial—wet shrimp won’t get as crispy!). In one bowl, whisk together the cornstarch, flour, garlic powder, onion powder, smoked paprika, salt, and pepper. In another bowl, beat those eggs until they’re nice and smooth.

Now, the fun part: dredge each shrimp in the dry mix, shaking off any excess, then dip them into the egg wash. Let the excess drip off, then toss them back into the dry mix one more time. This double-dip method? It’s the secret to that insane crunch you’re going to love. Lay them on a plate while you heat the oil—trust me, they’ll fry up so much better if they’re not crowded.
Step 2: Fry to Crispy Perfection
Heat about 1½ inches of vegetable oil in your skillet or wok over medium-high heat. You’ll know it’s ready when a pinch of flour sizzles immediately (or if you have a thermometer, aim for 350°F). Carefully add the shrimp in batches—don’t overcrowd the pan, or they’ll steam instead of fry. I do about 8-10 at a time depending on the size of my skillet.
Fry for 2-3 minutes per side until they’re golden brown and crispy. Use your slotted spoon to transfer them to the paper towel-lined plate to drain. Repeat with the rest of the shrimp, keeping an eye on the oil temperature—if it gets too hot, just lower the heat a smidge. Oh, and resist the urge to snack on them straight out of the fryer (okay, maybe just one… for quality control).
Step 3: Make the Sweet Chili Sauce
While the shrimp drain, let’s whip up that addictive sauce. In your small saucepan, combine the sweet chili sauce, honey, soy sauce, minced garlic, grated ginger, sesame oil, and rice vinegar. Bring it to a simmer over medium heat, stirring occasionally. After about 2 minutes, give the cornstarch slurry a quick stir (it settles!) and drizzle it into the sauce while stirring constantly. Keep simmering for another minute or two until it thickens slightly—it should coat the back of a spoon. Turn off the heat; it’ll keep thickening as it cools.
Step 4: Toss and Garnish
Time for the grand finale! Add the crispy shrimp to a large bowl and pour that gorgeous sauce over them. Gently toss until every single shrimp is coated—I like to use a rubber spatula for this to avoid breaking the crispy coating. Transfer to a serving dish and immediately sprinkle with sesame seeds, chopped chives, and a pinch of red pepper flakes for that extra kick. Serve it hot (and maybe hide a few for yourself before the crowd descends).
Tips for the Best Sweet Chili Shrimp
After making this recipe more times than I can count (okay fine, I’m obsessed), I’ve picked up some foolproof tricks to guarantee perfect sweet chili shrimp every single time. These are my kitchen-tested secrets – the little things that take this dish from good to “oh-my-gosh-what-is-this-sorcery” amazing.
- Fresh shrimp is non-negotiable: That frozen stuff just won’t get as plump and juicy. Look for shrimp that smells like the ocean (but not fishy!) and has a firm texture. Bonus tip: if you must use frozen, thaw them overnight in the fridge – never in water!
- Dry those shrimp thoroughly: I’m talking paper-towel-pat-down like you’re prepping them for a spa day. Any extra moisture = less crispy coating. I sometimes let them air-dry on a rack for 10 minutes after patting.
- Oil temperature is everything: Too hot and they’ll burn before cooking through; too cool and they’ll soak up oil like sponges. If you don’t have a thermometer, test with a wooden spoon handle – bubbles should form around it immediately when dipped in.
- Work in batches religiously: I know it’s tempting to dump them all in, but overcrowding drops the oil temp fast. Give each shrimp its personal bubble space – your patience will be rewarded with perfect crunch.
- Sauce thickness perfection: The cornstarch slurry is your best friend here. Want it thicker? Add another 1/2 tsp cornstarch. Too thick? A splash of warm water fixes it. Aim for honey-like consistency.
- Serve immediately: This isn’t a make-ahead dish. The magic is in that contrast between piping hot crispy shrimp and sticky sauce. Leftovers lose their crunch (though I won’t judge if you eat them cold from the fridge at midnight).
- Spice to your taste: Start with 1/2 tsp red pepper flakes, then add more at the end. Remember – you can always add heat but you can’t take it away! My husband likes it nuclear, so I keep extra flakes on the table.
There you have it – my hard-earned wisdom from many delicious (and a few disastrous) batches. Follow these tips and you’re guaranteed restaurant-quality sweet chili shrimp right in your own kitchen!
Serving Suggestions
Now that you’ve got this gorgeous pile of sticky, crispy sweet chili shrimp, let’s talk about how to serve it up right! I’ve tried every possible combo over the years, and these are my absolute favorite ways to make it a complete meal (or an irresistible appetizer).
- Steamed jasmine rice: My go-to! The fluffy grains soak up that amazing sauce like a dream. Sometimes I’ll toss in some chopped scallions right before serving for extra freshness.
- Cold sesame noodles: The contrast between hot shrimp and chilled noodles is magical. Just toss cooked noodles with a bit of sesame oil, soy sauce, and rice vinegar.
- Simple cucumber salad: Thinly sliced cukes with rice vinegar and sesame seeds cut through the richness perfectly. My grandma always served it this way.
- Stir-fried veggies: Bok choy, snap peas, or broccoli make it feel like a full takeout feast without the guilt. Toss them in the same pan after frying the shrimp!
- Appetizer style: Just pile them high on a platter with toothpicks – they disappear faster than you can say “more please!” Perfect for game nights.
Honestly? Sometimes I just eat them straight from the pan with chopsticks while standing over the stove. No judgment here!
Storing and Reheating Sweet Chili Shrimp
Listen, these shrimp are best fresh—that crispiness is everything! But if you must save some (who has willpower?), store them in an airtight container in the fridge for up to 2 days. To reheat, skip the microwave—toss them in a hot skillet for a minute to bring back some crunch. The sauce will never be quite as glossy, but hey, midnight snack rules don’t count!
Sweet Chili Shrimp Variations
I love this recipe exactly as written, but sometimes I get creative and mix things up! Here are my favorite ways to play with the formula – all tested in my kitchen and guaranteed to keep things exciting.
Veggie-Packed Version
When I want to sneak in more greens (or just clean out the fridge), I toss in veggies right at the end. Thinly sliced bell peppers, snap peas, or broccoli florets work wonders. Just stir-fry them for 2 minutes after the shrimp are done, then add everything back to the pan with the sauce. The veggies stay crisp and add this amazing texture contrast to the sticky shrimp.
Protein Swaps
Don’t have shrimp? No problem! I’ve made this with:
- Chicken: Cut boneless thighs into bite-sized pieces and follow the same coating method (fry 5-6 minutes instead). The sauce clings beautifully!
- Tofu: Extra-firm tofu, pressed dry and cubed, gets insanely crispy. My vegetarian friends beg me to make this version.
The sauce is so versatile – once you master it, you’ll want to put it on everything. (I may or may not have dipped pizza in it last week…)
FAQs About Sweet Chili Shrimp
I get questions about this recipe all the time—here are the ones that pop up most often, along with my tried-and-true answers from years of making this dish. Don’t see your question here? Drop it in the comments and I’ll help you out!
Can I use frozen shrimp instead of fresh?
You can, but fresh really does make a difference in texture. If you must use frozen, thaw them overnight in the fridge (never in water!) and pat them extra dry. The double coating helps, but they won’t get quite as plump as fresh shrimp. Still tasty though—I’ve definitely made it this way in a pinch!
What if I don’t have sweet chili sauce?
In a real emergency, mix 3 tbsp ketchup, 2 tbsp honey, 1 tsp rice vinegar, and a pinch of red pepper flakes. It won’t be identical, but it’ll give you that sweet-spicy vibe. That said—Mae Ploy sweet chili sauce is worth hunting down! I always keep an extra bottle in my pantry.
How spicy is this recipe?
With just 1 tsp red pepper flakes, it’s got a gentle warmth that most people enjoy. Want more kick? Add an extra ½ tsp when making the sauce. For kids or spice-averse folks, leave out the flakes entirely—the sauce still has amazing flavor from the garlic and ginger.
Can I bake instead of frying for crispy shrimp?
I’ve tried—it’s just not the same. The oil gives that perfect crackly crust you can’t replicate in the oven. But if you must bake, spray the coated shrimp heavily with oil and bake at 425°F for 10-12 minutes, flipping halfway. They’ll be decent, but won’t have that takeout-quality crunch.
Can I freeze leftover sweet chili shrimp?
Honestly? I don’t recommend it. The crispy coating turns soggy when thawed, and reheating makes them rubbery. This is one of those “make it fresh and devour immediately” kind of dishes. If you must freeze, do it before saucing—just freeze the fried shrimp separately and make fresh sauce later.
Nutritional Information
Okay, let’s be real – we’re not eating crispy sweet chili shrimp for its diet-friendly qualities, but here’s the scoop for those who like to keep track (or just feel better about seconds!). These numbers are per serving, based on 4 servings from the recipe:
- Calories: 490 (mostly from that amazing crispy coating and sauce – worth every bite!)
- Protein: 30g (shrimp are little protein powerhouses)
- Carbs: 60g (thank the cornstarch and sweet sauce for this one)
- Sugar: 20g (it’s that sweet chili magic – but no refined sugars here!)
- Fat: 15g (most comes from the frying oil – use fresh oil and it’s healthier)
Remember: Nutritional values are estimates and vary based on ingredients used. The exact numbers depend on how much oil your shrimp absorb during frying and which brand of sweet chili sauce you use. I like to think of it as “happy food math” – too delicious to worry about exact numbers!

Try this recipe and share your results in the comments!
PrintCrispy Sweet Chili Shrimp Recipe That Beats Takeout Every Time

Crispy Sweet Chili Shrimp is a delicious, better-than-takeout dish featuring crispy fried shrimp coated in a sticky sweet chili sauce.
- Prep Time: 20 minutes
- Cook Time: 15 minutes
- Total Time: 35 minutes
- Yield: 4 servings 1x
- Category: Main Dish
- Method: Frying
- Cuisine: Asian
- Diet: Low Lactose
Ingredients
- 1½ lbs large shrimp, peeled and deveined
- 1 cup cornstarch
- ½ cup all-purpose flour
- 1 tsp garlic powder
- 1 tsp onion powder
- ½ tsp smoked paprika
- Salt and freshly ground black pepper, to taste
- 2 eggs, beaten
- Vegetable oil, for frying
- ⅓ cup sweet chili sauce
- 2 tbsp honey
- 2 tbsp soy sauce
- 2 cloves garlic, minced
- 1 tsp fresh ginger, grated
- 1 tsp sesame oil
- 1 tsp rice vinegar
- 1 tsp cornstarch mixed with 1 tbsp water
- 1 tbsp sesame seeds
- 2 tbsp chopped fresh chives
- 1 tsp crushed red pepper flakes
Instructions
- Coat the shrimp in the seasoned flour mixture.
- Fry the shrimp in hot oil until golden and crispy.
- Prepare the sweet chili sauce by simmering ingredients until thickened.
- Toss the fried shrimp in the sauce until evenly coated.
- Garnish with sesame seeds, chives, and red pepper flakes before serving.
Notes
- Use fresh shrimp for the best texture.
- Adjust the spice level by reducing or increasing red pepper flakes.
- Serve immediately for maximum crispiness.
Nutrition
- Serving Size: 1 serving
- Calories: 490
- Sugar: 20g
- Sodium: 800mg
- Fat: 15g
- Saturated Fat: 3g
- Unsaturated Fat: 10g
- Trans Fat: 0g
- Carbohydrates: 60g
- Fiber: 2g
- Protein: 30g
- Cholesterol: 250mg