
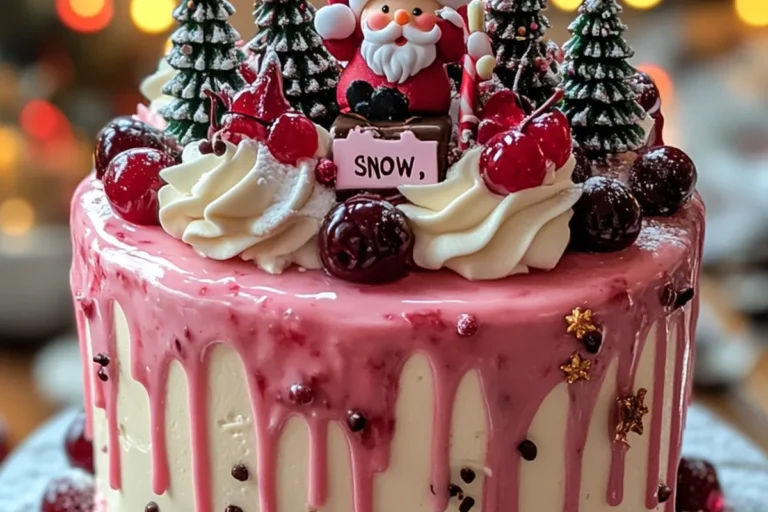
SANTA CHERRY VANILLA DRIP CAKE
As the holidays approach, I find myself longing for festive desserts that not only taste divine but also bring cheer to my kitchen. That’s where the Santa Cherry Vanilla Drip Cake comes into play! This delightful cake is a sweet solution for busy moms like me, who want to impress their loved ones without spending hours in the kitchen. With its creamy layers and vibrant cherry topping, it’s sure to steal the spotlight at any holiday gathering. Plus, each slice is like a warm hug, wrapped in velvety goodness and holiday spirit!
Why You’ll Love This SANTA CHERRY VANILLA DRIP CAKE
This Santa Cherry Vanilla Drip Cake not only looks stunning, but it also delivers on taste and texture. It’s quick to whip up, making it perfect for busy days. The fluffy vanilla cake pairs wonderfully with the tart cherries, creating a delightful flavor explosion in every bite. Plus, the elegant drip effect adds a festive flair that will leave your guests in awe. It’s a showstopper that’s surprisingly easy to make!
Ingredients for SANTA CHERRY VANILLA DRIP CAKE
Gathering the right ingredients is the first step to creating a fabulous Santa Cherry Vanilla Drip Cake. Each component plays a vital role in delivering the delightful flavors and textures we crave during the holidays. Here’s what you’ll need:
- All-purpose flour: The backbone of your cake, giving it structure and fluffiness.
- Baking powder: This leavening agent helps the cake rise and stay light.
- Baking soda: Adds extra lift, ensuring your cake isn’t dense.
- Salt: Just a pinch enhances all the flavors, balancing the sweetness.
- Vegetable oil: Keeps the cake moist and tender, making each bite irresistible.
- Plain yogurt: Adds richness and a subtle tang, elevating the cake’s flavor profile.
- Granulated sugar: Sweetens the batter and helps create that golden crust.
- Large eggs: The binding agents that help the cake hold its shape.
- Vanilla extract: A must-have for that warm, sweet aroma that fills your kitchen.
- Whole milk: Adds moisture, ensuring a soft and tender crumb.
- Fresh or frozen cherries: The star of the show; they add a burst of fruity flavor and color.
- Sugar (for the cherry compote): Sweetens the cherries, enhancing their natural flavor.
- Lemon juice: Brightens the cherry compote, complementing the sweetness.
- Cornstarch: Thickens the cherry compote, giving it a luscious texture.
- Heavy whipping cream: For the whipped topping, it brings creaminess and volume.
- Powdered sugar: Sweetens the whipped cream without grittiness.
- Dairy cream: Enhances the richness of the ganache for a smooth finish.
- White chocolate chips: Used to create the gorgeous drip effect that makes this cake pop!
- Food coloring: A few drops give the ganache that festive pink or red hue.
- Whole cherries (for garnish): Adds a charming touch on top of your cake.
- Mini Santa cake toppers: Perfect for bringing in the holiday spirit!
- Mini chocolate trees: A fun decoration that adds a whimsical touch.
- Whipped cream swirls: For that extra flair and creaminess on top.
- Powdered sugar (for garnish): A dusting to mimic snow for a wintery look.
For exact measurements, check the bottom of the article where you can find everything listed for easy printing. Enjoy the journey of gathering these ingredients; each one adds to the magic of the Santa Cherry Vanilla Drip Cake!
How to Make SANTA CHERRY VANILLA DRIP CAKE
Now that you have all your ingredients ready, let’s dive into the fun part: making this stunning Santa Cherry Vanilla Drip Cake! Follow these steps, and soon you’ll have a festive masterpiece that’s sure to impress everyone. Let’s get baking!
Step 1: Preheat the Oven
First things first, preheat your oven to 350°F (175°C).
While that’s warming up, grease and line three 8-inch round cake pans. This will keep your cake layers from sticking and make for easy removal!
Step 2: Prepare the Dry Ingredients
In a large mixing bowl, whisk together the all-purpose flour, baking powder, baking soda, and salt.
This combination is essential for creating a fluffy vanilla cake that holds up to the luscious cherry topping!
Step 3: Mix the Wet Ingredients
In another bowl, combine the vegetable oil, granulated sugar, eggs, vanilla extract, plain yogurt, and whole milk.
Mixing these ingredients well ensures they blend perfectly, creating a rich batter that’s bursting with flavor.
Step 4: Combine Wet and Dry Ingredients
Gradually add the dry ingredients to the wet mixture. Stir until everything is smooth.
Don’t overmix; just combine until you no longer see dry flour. This will keep your cake light and airy!
Step 5: Bake the Cake
Divide the batter evenly between the prepared pans.
Bake for 25–30 minutes or until a toothpick inserted in the center comes out clean. The aroma will be heavenly, trust me!
Step 6: Make the Cherry Compote
While the cakes are baking, it’s time to make the cherry compote!
In a saucepan over medium heat, combine the pitted cherries, sugar, and lemon juice. Cook until the cherries soften.
Then, add the cornstarch mixture to thicken it up. Let it cool once thickened—this will be a delicious layer in your cake!
Step 7: Prepare the Whipped Cream
In a cold mixing bowl, beat the heavy whipping cream, powdered sugar, and vanilla extract until stiff peaks form.
This fluffy whipped cream will be the perfect topping and filling for your cake!
Step 8: Assemble the Cake
Once the cake layers have cooled, place one layer on a serving plate.
Spread a generous layer of whipped cream followed by a layer of cherry compote. Repeat with the second cake layer, and then top it with the third layer.
Frost the entire cake with the remaining whipped cream, giving it a smooth finish.
Step 9: Create the Drip Effect
Now, let’s make that stunning drip effect!
Heat the dairy cream until it’s steaming, then pour it over the white chocolate chips. Let it sit for a minute before stirring until smooth.
Add a few drops of pink or red food coloring for that festive touch. Let it cool slightly before drizzling it over the top edges of the cake!
Step 10: Decorate
To finish off your Santa Cherry Vanilla Drip Cake, pipe some whipped cream swirls on top.
Add whole cherries, mini chocolate trees, and those adorable mini Santa cake toppers.
A light dusting of powdered sugar will mimic a winter wonderland. Your cake is now ready to shine!
Tips for Success
- Always use room temperature ingredients for a smoother batter.
- For even baking, rotate the cake pans halfway through the baking time.
- Let the cake layers cool completely before assembling to avoid melting the whipped cream.
- If your ganache is too thick, add a splash of warm cream to loosen it up.
- Feel free to experiment with different fruits for the compote, like raspberries or strawberries!
Equipment Needed
- Three 8-inch round cake pans (or use two pans and slice one layer in half).
- Mixing bowls (a large one for dry ingredients and a medium one for wet).
- Whisk (or an electric mixer for ease).
- Measuring cups and spoons for accuracy.
- Spatula for smooth frosting and layering.
Variations
- For a chocolate twist, replace half of the all-purpose flour with cocoa powder for a Chocolate Cherry Vanilla Drip Cake.
- Make it gluten-free by using a gluten-free flour blend, ensuring everyone can enjoy this festive treat!
- Add spices like cinnamon or nutmeg to the cake batter for a warm, holiday flavor.
- Substitute the cherries with cranberries for a tart and vibrant Holiday Cherry Cake.
- For a vegan version, swap eggs for flax eggs and use plant-based yogurt and cream.
Serving Suggestions
- Pair your Santa Cherry Vanilla Drip Cake with a scoop of vanilla ice cream for an indulgent treat.
- Serve with a hot cup of spiced chai or peppermint tea to complement the festive flavors.
- For a beautiful presentation, garnish with fresh mint leaves alongside the whole cherries.
- Consider adding a side of whipped cream for extra creaminess and appeal.
Frequently Asked Questions (FAQs)
Q: Can I make this Santa Cherry Vanilla Drip Cake ahead of time?
A: Absolutely! You can bake the cake layers a day in advance. Just wrap them well in plastic wrap and store them in the fridge. Assemble the cake on the day you plan to serve it for the freshest taste.
Q: What can I substitute for the cherries in the cherry vanilla drip cake?
A: If cherries aren’t your favorite, you can substitute them with raspberries, strawberries, or even blueberries. Each will give a unique twist to this Christmas drip cake recipe!
Q: How should I store the leftover cake?
A: Store any leftovers in an airtight container in the fridge. It will stay fresh for up to three days, but I bet it won’t last that long!
Q: Can I use different types of flour for this cake?
A: Yes, you can use a gluten-free flour blend if needed. Just ensure it’s a 1:1 substitute to maintain the cake’s lovely texture.
Q: How do I achieve a perfect drip effect on the cake?
A: The key is to let the ganache cool slightly before drizzling. Use a spoon to gently encourage the ganache to flow over the edges, creating a beautiful drip effect!
Final Thoughts
Baking the Santa Cherry Vanilla Drip Cake is more than just creating a dessert; it’s about sharing joy and warmth with family and friends. Every slice is a celebration of flavors, combining the sweetness of cherries with the light fluffiness of vanilla cake. As the festive season unfolds, this cake becomes a centerpiece, sparking smiles and creating memories. Whether you’re hosting a holiday gathering or enjoying a quiet evening with loved ones, this cake brings a delightful touch of cheer to any occasion. So roll up your sleeves, and let the holiday magic begin in your kitchen!
PrintSANTA CHERRY VANILLA DRIP CAKE: A Festive Delight!

A festive cherry vanilla drip cake that is creamy, fluffy, fruity, and full of Christmas cheer with every sweet, velvety slice.
- Prep Time: 40 minutes
- Cook Time: 30 minutes
- Total Time: 1 hour 40 minutes
- Yield: 12 servings 1x
- Category: Dessert
- Method: Baking
- Cuisine: American
- Diet: Vegetarian
Ingredients
- 2 1/2 cups all-purpose flour
- 2 1/2 tsp baking powder
- 1/2 tsp baking soda
- 1/2 tsp salt
- 1/2 cup vegetable oil
- 1/2 cup plain yogurt
- 1 1/4 cups granulated sugar
- 4 large eggs
- 2 tsp vanilla extract
- 1/2 cup whole milk
- 1 1/2 cups fresh or frozen cherries (pitted)
- 2 tbsp sugar
- 1 tsp lemon juice
- 1 tsp cornstarch mixed with 2 tbsp water
- 2 cups heavy whipping cream
- 1/4 cup powdered sugar
- 1 tsp vanilla extract
- 1/2 cup dairy cream
- 1 cup white chocolate chips
- Few drops of pink or red food coloring
- Whole cherries (for garnish)
- Mini Santa cake toppers (for garnish)
- Mini chocolate trees (for garnish)
- Whipped cream swirls (for garnish)
- Powdered sugar (for garnish)
Instructions
- Preheat oven to 350°F (175°C). Grease and line three 8-inch round cake pans.
- In a bowl, whisk flour, baking powder, baking soda, and salt.
- In another bowl, mix oil, sugar, eggs, vanilla, yogurt, and milk. Gradually add the dry ingredients and mix until smooth.
- Divide batter between pans and bake 25–30 minutes or until a toothpick comes out clean. Cool completely.
- In a saucepan over medium heat, combine cherries, sugar, and lemon juice. Simmer until softened. Add cornstarch mixture and stir until thickened. Let cool.
- In a cold bowl, beat heavy cream, powdered sugar, and vanilla until stiff peaks form. Keep chilled.
- Place one cake layer on a serving plate. Spread a layer of whipped cream and cherry compote. Repeat with remaining layers. Frost the entire cake with whipped cream and chill for 30 minutes.
- Heat cream until steaming, then pour over white chocolate. Let sit 1–2 minutes, stir until smooth. Tint with pink food coloring. Cool slightly, then drip over the top edges of the cake using a spoon.
- Pipe whipped cream swirls on top. Decorate with cherries, chocolate trees, and Santa toppers. Dust with powdered sugar for a snowy touch.
Notes
- Optional Dressing: Sprinkle crushed freeze-dried cherries or edible glitter for extra sparkle.
- Tip: Swap yogurt for sour cream for extra richness.
- Use gluten-free flour blend to make it celiac-friendly.
- Store in the fridge for up to 3 days.
Nutrition
- Serving Size: 1 slice
- Calories: 350
- Sugar: 25g
- Sodium: 150mg
- Fat: 18g
- Saturated Fat: 10g
- Unsaturated Fat: 8g
- Trans Fat: 0g
- Carbohydrates: 45g
- Fiber: 2g
- Protein: 4g
- Cholesterol: 70mg