
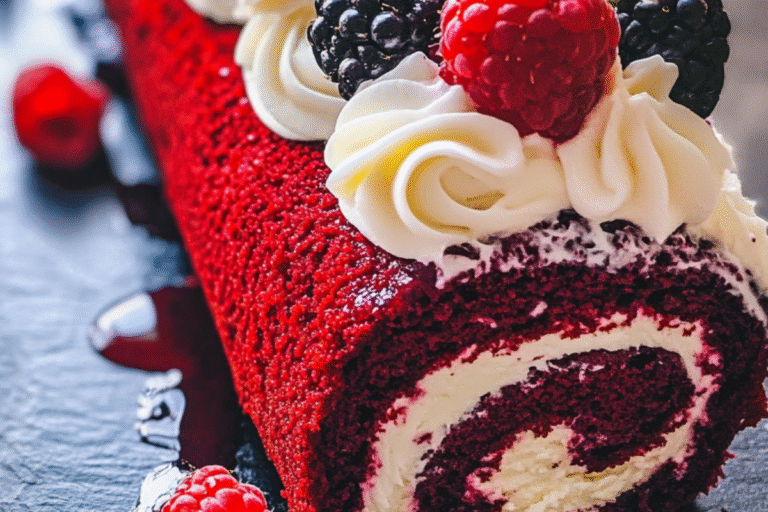
Red Velvet Swiss Roll
Welcome to the delightful world of dessert! If you’re looking for a showstopper that’s surprisingly easy to whip up, let me introduce you to the Red Velvet Swiss Roll. This stunning dessert not only dazzles the eyes but also satisfies the taste buds. I often find myself reaching for this recipe when I want to impress loved ones without spending hours in the kitchen. It’s perfect for celebrations, cozy family dinners, or even a sweet treat on a busy day. Trust me, once you’ve rolled this beauty, you’ll want to share it with everyone you know!
Why You’ll Love This Red Velvet Swiss Roll
This Red Velvet Swiss Roll is a delightful combination of flavor and elegance, making it a favorite in my kitchen. It’s not just visually appealing; it’s incredibly easy to prepare, even for busy moms or professionals. In just over an hour, you can create a dessert that tastes as good as it looks. Plus, the rich cream cheese filling adds a luxurious touch that’s sure to impress your guests!
Ingredients for Red Velvet Swiss Roll
Creating this elegant rolled cake is a joy, especially when you gather these ingredients. Here’s what you’ll need:
- All-purpose flour: This forms the base of our soft sponge roll cake, giving it structure.
- Unsweetened cocoa powder: Adds a touch of chocolate flavor, balancing the sweetness perfectly.
- Baking powder: Essential for leavening, it helps the cake rise beautifully.
- Salt: Just a pinch enhances all the flavors, making them pop.
- Eggs: The backbone of the cake, they provide moisture and richness.
- Sugar: Sweetens the deal and contributes to the cake’s tender texture.
- Vegetable oil: Keeps the cake moist and tender, preventing dryness.
- Vanilla extract: A classic flavor enhancer that adds warmth to the cake.
- Red food coloring: The star of the show, giving the cake its iconic red hue.
- Whipping cream: This is for the creamy filling, making each bite indulgent.
- Powdered sugar: Sweetens the filling while adding a silky texture.
- More vanilla extract: For an extra burst of flavor in the filling.
- Cream cheese: The heart of the filling, providing richness and tang.
- Whipped cream: Optional for piping on top, adding a decorative touch.
- Fresh berries: Raspberries, blackberries, or blueberries make delightful garnishes.
- Mint leaves: For an optional fresh touch that brightens the presentation.
- Berry sauce or coulis: Optional, but it makes for a beautiful drizzle!
For exact quantities, check the bottom of the article where you’ll find all the measurements available for printing. Happy baking!
How to Make Red Velvet Swiss Roll
Now that we have our ingredients ready, let’s dive into the fun part: making the Red Velvet Swiss Roll! Follow these simple steps, and I promise you’ll create a dessert that will leave everyone in awe.
Step 1: Preheat and Prepare
First things first, preheat your oven to 350°F (175°C). This ensures your cake bakes evenly. Don’t forget to line a 10×15-inch jelly roll pan with parchment paper. This prevents sticking and makes it easier to roll later. Trust me, this step is crucial for a smooth process!
Step 2: Combine Dry Ingredients
In a bowl, sift together the all-purpose flour, cocoa powder, baking powder, and salt. Sifting is important! It breaks up clumps and adds air, resulting in a lighter texture. You want your rolled red velvet cake to be fluffy, not dense!
Step 3: Beat Eggs and Sugar
In another bowl, beat the eggs and sugar together for about 5–7 minutes. You’re aiming for a thick and pale mixture. This step is vital because it incorporates air, giving your cake that wonderful lift. You’ll know it’s ready when it forms a ribbon when you lift the whisk.
Step 4: Fold in Dry Ingredients
Now, gently fold the dry ingredients into the egg mixture. Use a spatula to combine them without overmixing. This ensures you keep that light, airy texture. You’re creating a soft sponge roll cake that will melt in your mouth!
Step 5: Bake the Cake
Pour the batter into your prepared pan and spread it evenly. Bake for 10–12 minutes, but keep an eye on it! To check for doneness, lightly touch the center. If it springs back, it’s ready! Avoid overbaking, as that can make the cake dry and hard to roll.
Step 6: Roll the Cake
Once baked, remove the cake from the oven. While it’s still warm, roll it up in the parchment paper or a kitchen towel from the short end. This helps the cake hold its shape. Let it cool completely rolled. This way, it won’t crack when you unroll it later!
Step 7: Prepare the Filling
While the cake cools, let’s make the filling. In a bowl, beat the softened cream cheese, powdered sugar, and vanilla extract until smooth. In another bowl, whip the cold whipping cream until stiff peaks form. Gently fold the whipped cream into the cream cheese mixture for a light, fluffy filling!
Step 8: Assemble the Roll
Unroll the cooled cake carefully. Spread the cream cheese filling evenly over the surface, leaving a small border around the edges. Then, roll it up tightly again. If you’re gentle, you won’t create cracks. It’s all about the technique!
Step 9: Garnish and Chill
To finish, pipe some whipped cream on top and add fresh berries for a pop of color. Chill the roll for at least 30 minutes before slicing. This helps set the filling and makes it easier to cut. You’re now ready to serve this elegant rolled cake!
Tips for Success
- Always preheat your oven for even baking.
- Don’t skip the sifting step; it makes a difference in texture.
- Roll the cake while it’s warm to prevent cracks.
- Use a clean kitchen towel for rolling if you don’t have parchment.
- Chill the cake before slicing for cleaner cuts.
Equipment Needed
- 10×15-inch jelly roll pan: A baking sheet works too, but parchment is key.
- Mixing bowls: Use different sizes for wet and dry ingredients.
- Electric mixer: A hand whisk can work, but it’ll take longer.
- Spatula: Essential for folding and spreading.
- Parchment paper: Prevents sticking; a silicone mat is a great alternative.
Variations
- For a chocolate twist, add chocolate chips to the cream cheese filling for an extra indulgent treat.
- Make it gluten-free by substituting all-purpose flour with a gluten-free blend.
- Switch up the filling by using lemon curd for a zesty contrast to the rich red velvet.
- For a healthier option, reduce the sugar in the cake and filling, or use a sugar substitute.
- Add spices like cinnamon or nutmeg to the batter for a warm, cozy flavor.
Serving Suggestions
- Pair with a scoop of vanilla ice cream for a delightful contrast in temperature and texture.
- Serve alongside a fresh fruit salad to add a refreshing touch.
- Drizzle with berry sauce for a pop of color and flavor.
- Accompany with a cup of coffee or tea to balance the sweetness.
- For a stunning presentation, dust with powdered sugar just before serving.
Frequently Asked Questions (FAQs)
Let’s tackle some questions you might have about this fabulous Red Velvet Swiss Roll. I’ve gathered a few common queries to help you on your baking journey!
Q: Can I make this Red Velvet Swiss Roll ahead of time?
A: Absolutely! You can make the rolled red velvet cake a day in advance. Just keep it wrapped in the fridge. It actually tastes better as the flavors meld together!
Q: What if I don’t have cream cheese?
A: No worries! You can substitute it with mascarpone cheese or even a whipped cream filling for a lighter option. It’ll still be delicious!
Q: How do I store leftovers?
A: Store any leftover Red Velvet Swiss Roll in an airtight container in the fridge. It should stay fresh for about 3 days. Just make sure to slice it before serving for easy access!
Q: Can I freeze the Swiss roll?
A: Yes, you can! Wrap it tightly in plastic wrap and freeze for up to a month. Just thaw it in the fridge overnight before serving.
Q: What can I use instead of red food coloring?
A: If you prefer a natural option, you can use beet juice or powder for coloring. It provides a lovely hue without artificial ingredients!
Final Thoughts
Creating this Red Velvet Swiss Roll is more than just baking; it’s about crafting a memorable experience. Each slice reveals a beautiful swirl of rich red and creamy goodness that never fails to impress. I love watching my family’s eyes light up with joy as they taste the soft sponge and luscious filling. Whether it’s a special celebration or a simple family gathering, this dessert brings a touch of elegance to any occasion. So roll up your sleeves, dive into this delightful recipe, and share the love—because nothing says “I care” quite like a homemade treat!
PrintRed Velvet Swiss Roll: A Stunning Dessert Recipe!

A stunning and elegant Red Velvet Swiss Roll filled with creamy goodness, perfect for celebrations or as a delightful dessert.
- Prep Time: 30 minutes
- Cook Time: 12 minutes
- Total Time: 1 hour 42 minutes
- Yield: 8–10 servings 1x
- Category: Dessert
- Method: Baking
- Cuisine: American
- Diet: Vegetarian
Ingredients
- 3/4 cup all-purpose flour
- 1/4 cup unsweetened cocoa powder
- 1 tsp baking powder
- 1/4 tsp salt
- 4 large eggs
- 3/4 cup sugar
- 2 tbsp vegetable oil
- 1 tsp vanilla extract
- 1 tbsp red food coloring
- 1 1/4 cups whipping cream, cold
- 1/4 cup powdered sugar
- 1 tsp vanilla extract
- 200g cream cheese, softened
- Whipped cream (piped)
- Fresh raspberries, blackberries, blueberries
- Mint leaves (optional)
- Berry sauce or coulis (optional)
Instructions
- Preheat oven to 350°F (175°C). Line a 10×15-inch jelly roll pan with parchment.
- In a bowl, sift flour, cocoa powder, baking powder, and salt. Set aside.
- Beat eggs and sugar for 5–7 minutes until thick and pale. Add oil, vanilla, and red food coloring. Gently fold in the dry ingredients.
- Pour batter into the pan and spread evenly. Bake for 10–12 minutes.
- While warm, roll cake in parchment or a towel from the short end. Let cool completely.
- For filling, beat cream cheese, vanilla, and powdered sugar. In a separate bowl, whip cream until stiff peaks form. Fold into cream cheese mixture.
- Unroll cooled cake, spread filling evenly, then roll up tightly.
- Pipe whipped cream on top, garnish with berries and mint. Chill before slicing.
Notes
- Don’t overbake the sponge to keep it pliable.
- Roll the cake while warm to avoid cracks.
- Use fresh berries only before serving to keep them vibrant.
Nutrition
- Serving Size: 1 slice
- Calories: 320 kcal
- Sugar: 22g
- Sodium: 180mg
- Fat: 18g
- Saturated Fat: 10g
- Carbohydrates: 35g
- Protein: 5g