
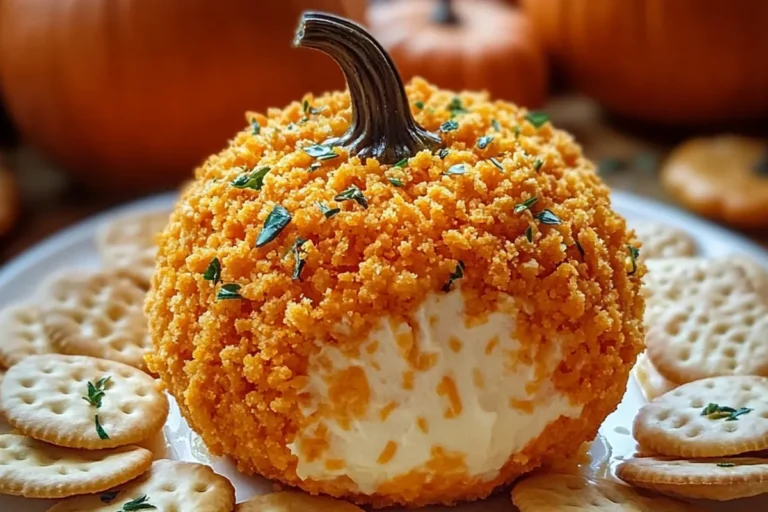
Pumpkin-Shaped Cheddar Cheese Ball
As the leaves begin to change and the air turns crisp, I find myself yearning for cozy gatherings. This Pumpkin-Shaped Cheddar Cheese Ball is my go-to recipe for fall festivities, whether it’s a Halloween party or a Thanksgiving feast. It’s not just an appetizer; it’s a conversation starter that brings smiles to the table. Quick to prepare and packed with flavor, this delightful cheese ball is perfect for busy moms like us. Trust me, it’s a dish that’ll impress your loved ones and make you the star of any autumn snack table!
Why You’ll Love This Pumpkin-Shaped Cheddar Cheese Ball
This Pumpkin-Shaped Cheddar Cheese Ball is a lifesaver for busy schedules. It comes together in just 15 minutes, and with minimal fuss, you can create a crowd-pleasing appetizer. The rich, cheesy goodness paired with the festive shape makes it a delightful treat for any gathering. Plus, it’s a versatile dish that works for Halloween, Thanksgiving, or any fall celebration. You’ll love how it adds a touch of warmth to your autumn festivities!
Ingredients for Pumpkin-Shaped Cheddar Cheese Ball
Creating the perfect Pumpkin-Shaped Cheddar Cheese Ball starts with a handful of simple ingredients. Each one adds a unique touch to this savory delight. Here’s what you’ll need:
- Shredded sharp cheddar: This is the star of the show! Its bold flavor makes the cheese ball stand out.
- Cream cheese: The creamy base that binds everything together, giving it that smooth texture.
- Grated mozzarella: For a milder flavor and that gooey stretch we all love.
- Garlic powder: A pinch of this adds a savory kick that elevates the entire dish.
- Onion powder: This brings a subtle sweetness and depth to the cheese ball.
- Smoked paprika: Not just for color, but it infuses a warm, smoky flavor reminiscent of cozy autumn evenings.
- Salt & pepper: Essential seasonings to enhance the flavors of your cheese ball.
- Crushed cheese crackers: These not only add crunch but also a cheesy flavor that complements the ball perfectly.
- Small bell pepper stem: A creative garnish that gives your cheese ball its pumpkin shape.
- Fresh thyme sprigs: These not only look pretty but also add a fresh herbal note.
For those with dietary preferences, consider using dairy-free cheese for a vegan option. If you like a little heat, throw in some jalapeños. And don’t forget, you can serve it with gluten-free crackers if that suits your needs. For exact quantities of each ingredient, check the bottom of the article where you can also find a handy printable version!
How to Make Pumpkin-Shaped Cheddar Cheese Ball
Now that you have your ingredients ready, let’s dive into the fun part—making the Pumpkin-Shaped Cheddar Cheese Ball! This is where the magic happens, and I promise it’s easier than you might think. Just follow these simple, step-by-step instructions, and you’ll impress everyone at your next gathering!
Step 1: Combine the Cheeses and Seasonings
Start by grabbing a large mixing bowl. Add the shredded sharp cheddar, cream cheese, and grated mozzarella. Using a hand mixer or a sturdy spatula, blend everything together until smooth and creamy. I love how the colors mix together, creating a beautiful base for our pumpkin cheese ball. Then, sprinkle in the garlic powder, onion powder, smoked paprika, salt, and pepper. Mix it all up again! The aroma at this stage is heavenly, and it’s just the beginning!
Step 2: Shape the Cheese Ball
Once everything is well-combined, it’s time to shape your cheese ball! Take the creamy mixture and wrap it tightly in plastic wrap. Form it into a ball, pressing gently to ensure it holds together. To create those charming pumpkin ridges, use the edge of a spoon or your fingers to press lines into the surface. This little detail makes a big difference in presentation. After shaping, pop it in the fridge for about an hour. Chilling helps it firm up, making it easier to handle later.
Step 3: Chill and Coat
After your cheese ball has chilled, it’s time to give it a crunchy coat! Remove it from the fridge and unwrap it. Roll the cheese ball in the crushed cheese crackers until it’s completely covered. This adds a fantastic texture and a burst of cheesy flavor to every bite. Plus, who doesn’t love a little crunch in their appetizers? The vibrant orange color of the crackers also enhances the pumpkin theme!
Step 4: Garnish and Serve
Now, for the finishing touches! Grab that small bell pepper stem you saved and gently press it into the top of the cheese ball, just like a real pumpkin. Then, take a few fresh thyme sprigs and sprinkle them around as leaves. This makes your pumpkin cheese ball look even more festive and inviting. When it’s time to serve, place it on a colorful platter with an assortment of crackers or veggies. Your guests will be wowed by this delightful autumn snack!
Tips for Success
- Make sure your cream cheese is softened for easy mixing.
- Chill the cheese ball overnight for enhanced flavors.
- Use a sturdy bowl to prevent spills while mixing.
- Feel free to adjust seasonings to suit your taste.
- Experiment with different cracker coatings for variety.
- Double the recipe for larger gatherings—it disappears fast!
Equipment Needed
- Mixing bowl: A medium-sized bowl works well; a large one can help prevent spills.
- Hand mixer or spatula: Either will do for mixing the cheese mixture.
- Plastic wrap: Essential for shaping and chilling the cheese ball.
- Measuring cups and spoons: Handy for portioning out your ingredients.
- Serving platter: Choose a festive one to showcase your pumpkin cheese ball!
Variations of Pumpkin-Shaped Cheddar Cheese Ball
- Add a spicy twist by mixing in diced jalapeños for a kick!
- For a smoky flavor, incorporate crumbled bacon or smoked Gouda.
- Try using different cheeses like pepper jack for heat or feta for a tangy twist.
- Make it vegan by substituting dairy-free cheese alternatives and using cashew cream.
- For a herbaceous note, mix in fresh chopped herbs like chives or parsley.
- Incorporate dried cranberries or chopped nuts for added texture and flavor.
Serving Suggestions for Pumpkin-Shaped Cheddar Cheese Ball
- Pair with an assortment of colorful crackers for a delightful crunch.
- Serve alongside fresh veggies like celery sticks, cucumber slices, or bell pepper strips.
- Complement with a glass of crisp apple cider or a light white wine.
- For a festive touch, arrange on a wooden board with fall-themed decorations.
Frequently Asked Questions (FAQs)
Q: Can I make the pumpkin cheese ball ahead of time?
Absolutely! This pumpkin cheese ball is perfect for making ahead. You can prepare it up to two days in advance. Simply follow all the steps, shape it, and chill it in the fridge. When you’re ready to serve, roll it in the crushed cheese crackers and add your garnish. Just remember to keep it covered in plastic wrap to maintain freshness. This makes it an easy make-ahead cheese ball that will save you time on the day of your gathering!
Q: What can I serve with the cheddar cheese ball appetizer?
When it comes to serving, think variety! Pair your cheddar cheese ball appetizer with a colorful assortment of crackers for that delightful crunch. Fresh veggies like celery sticks, carrot sticks, or bell pepper strips add a refreshing contrast. You could even include some apple slices for a sweet touch. For drinks, a glass of crisp apple cider or a light white wine complements the flavors beautifully. Your guests will appreciate the thoughtful spread!
Q: How can I modify the pumpkin-shaped party dip for dietary restrictions?
There are plenty of ways to adapt this savory pumpkin cheese ball for different dietary needs! For a gluten-free option, simply serve it with gluten-free crackers or veggies. If you’re catering to a vegan crowd, swap out the dairy cheese for dairy-free alternatives and consider using cashew cream to maintain that creamy texture. Want a little heat? Toss in some diced jalapeños for a spicy kick. These modifications ensure everyone can enjoy this festive fall appetizer!
Final Thoughts
Creating this Pumpkin-Shaped Cheddar Cheese Ball is more than just cooking; it’s about crafting memories. As I shape and decorate this delightful appetizer, I can’t help but feel a surge of joy knowing it will bring smiles to friends and family. Whether it graces a festive fall gathering or a cozy Halloween night, it never fails to impress. The rich, cheesy flavor wrapped in a cheerful pumpkin shape truly captures the essence of autumn. So, roll up your sleeves, gather your loved ones, and let this savory pumpkin cheese ball be the highlight of your next celebration!
PrintPumpkin-Shaped Cheddar Cheese Ball Delights Await You!

Cheesy, savory, and shaped to impress! This Pumpkin-Shaped Cheddar Cheese Ball is a delightful appetizer perfect for fall parties, Halloween, and Thanksgiving celebrations.
- Prep Time: 15 min
- Total Time: 1 hr 15 min
- Yield: 8–10 servings 1x
- Category: Appetizer
- Method: Chilling
- Cuisine: American
- Diet: Vegetarian
Ingredients
- 200g shredded sharp cheddar
- 225g cream cheese, softened
- 60g grated mozzarella
- 1 tsp garlic powder
- 1/2 tsp onion powder
- 1/4 tsp smoked paprika
- Salt & pepper
- 100g crushed cheese crackers
- 1 small bell pepper stem
- Fresh thyme sprigs
Instructions
- Combine cheeses, garlic, onion, paprika, salt, and pepper. Mix until smooth and creamy.
- Wrap in plastic and form a ball. Use string or spoon edge to create ridges. Chill for 1 hour.
- Roll in crushed crackers. Add the stem and thyme leaves for garnish.
Notes
- Use dairy-free cheese for a vegan option.
- Add jalapeños for a spicy kick.
- Serve with gluten-free crackers for a gluten-free option.
Nutrition
- Serving Size: 1 serving
- Calories: 220 kcal
- Fat: 18g
- Carbohydrates: 3g
- Protein: 9g