
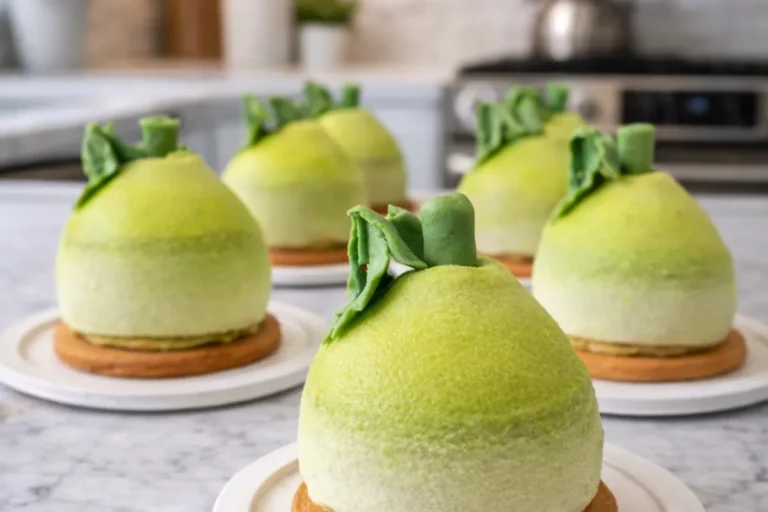
PEAR-SHAPED MOUSSE DESSERT
Welcome to the delightful world of desserts! Today, I’m excited to share my recipe for a stunning pear-shaped mousse dessert. This charming treat isn’t just a feast for the eyes; it’s a delicious way to impress your loved ones without spending all day in the kitchen. With a luscious creamy interior and that glossy green finish, it’s perfect for any occasion, from a family gathering to a fancy dinner party. Plus, it’s a fantastic option for busy moms and professionals seeking a quick yet elegant solution for dessert. Let’s dive into this culinary adventure together!
Why You’ll Love This PEAR-SHAPED MOUSSE DESSERT
This pear-shaped mousse dessert is a true showstopper! It combines elegance with simplicity, making it a breeze to whip up even on your busiest days. The refreshing taste of pear, paired with a creamy texture, makes every bite a delight. Plus, it’s a make-ahead dessert, allowing you to spend more time with your family and less time in the kitchen. It’s the perfect balance of beauty and flavor!
Ingredients for PEAR-SHAPED MOUSSE DESSERT
Gathering the right ingredients is key to creating this pear-shaped mousse dessert. Here’s what you’ll need:
- Pear puree: The star of the show! Fresh pear puree adds a sweet, fruity flavor that is essential for our mousse.
- Heavy cream: This gives the mousse its light and airy texture. You can also use whipped coconut cream for a dairy-free option.
- Sugar: This sweetens the mousse perfectly. Feel free to substitute with honey or maple syrup for a healthier twist.
- Lemon juice: A splash of acidity balances the sweetness and enhances the pear flavor.
- Gelatin: This is the magic ingredient that helps the mousse set. Vegetarian alternatives like agar-agar can also work here.
- Vanilla extract: Adds depth and warmth to the flavor profile, making everything taste even more delightful.
For the base:
- Shortbread or digestive biscuit crumbs: These create a buttery, crunchy layer. You can use gluten-free cookies if needed.
- Melted butter: This binds the crumbs together, creating a solid foundation. Coconut oil can be a great substitute for a different flavor profile.
- Sugar: A touch of sweetness in the base complements the mousse beautifully.
For the glaze:
- Pear juice (or pear liqueur): This gives the glaze its fruity essence. If you prefer, apple juice is a fine alternative.
- Green food coloring: Optional, but it adds a vibrant touch to mimic a real pear!
For decoration:
- Green fondant or marzipan: These are perfect for creating realistic leaves and stems. Get creative with your decorations!
For exact measurements, check the bottom of the article where everything is available for printing. Let’s make this delicious, pear-shaped mousse dessert a reality!
How to Make PEAR-SHAPED MOUSSE DESSERT
Step 1: Prepare the Pear Mixture
Start by preparing the pear puree, which is the heart of our pear-shaped mousse dessert. If using fresh pears, peel, core, and chop them before blending until smooth. In a saucepan, combine the pear puree with sugar and a splash of lemon juice. The sugar enhances sweetness while the lemon juice brightens the flavor. Heat the mixture gently over low heat, stirring until the sugar dissolves completely. This fruity mixture will be the base of our creamy mousse!
Step 2: Dissolve the Gelatin
Now, let’s work on the gelatin, which will help our mousse set beautifully. In a small bowl, sprinkle the gelatin over a few tablespoons of cold water and let it bloom for about five minutes. Once it’s absorbed the water, heat it gently in the microwave or on the stove until dissolved. Remove the pear mixture from the heat, and while it’s still warm, stir in the dissolved gelatin. This ensures our mousse has that delightful, airy texture!
Step 3: Fold in the Whipped Cream
Next, it’s time to add some lightness to our mixture. In a separate bowl, whip the heavy cream until soft peaks form. Allow the pear mixture to cool slightly before carefully folding in the whipped cream and a splash of vanilla extract. This step is crucial; you want to keep as much air in the mixture as possible. The folding technique creates a fluffy texture, which is perfect for our elegant pear mousse dessert!
Step 4: Create the Shortbread Base
Let’s move on to the base that will support our mousse. In a bowl, combine shortbread or digestive biscuit crumbs with melted butter and sugar. Mix until the crumbs are evenly coated. Press this mixture firmly into the bottom of dome molds or a baking tray. This buttery layer adds a lovely crunch to balance the creamy mousse. Make sure it’s compact, so it holds up when you take it out of the mold later!
Step 5: Fill the Molds
Now comes the fun part! Carefully spoon the pear mousse mixture over the shortbread base in each mold. Use a spatula to smooth the surface and remove any air bubbles. It’s important to fill them evenly to ensure a beautiful shape once set. Imagine how gorgeous these pear-shaped delights will look when you unmold them! Once filled, gently tap the molds on the counter to settle the mixture.
Step 6: Chill to Set
Patience is key here! Cover the molds with plastic wrap and place them in the fridge to chill for at least four hours, or preferably overnight. This chilling time is essential for achieving a firm mousse that holds its shape. I often use this time to clean up my kitchen or prep some other meals. Trust me, the wait will be worth it when you unveil these stunning desserts!
Step 7: Prepare the Glaze
While the mousse is setting, let’s prepare the gorgeous glaze. In a small saucepan, combine pear juice and sugar, heating until the sugar dissolves. Sprinkle gelatin over a bit of cold pear juice to bloom, then add it to the warm mixture, stirring until fully dissolved. If you want that vibrant green color, add a few drops of food coloring. This pear mirror glaze will give your dessert a shiny finish that’s simply irresistible!
Step 8: Glaze the Mousse
Once your mousse has set beautifully, it’s time to add the glaze. Carefully pour the cooled glaze over each mousse dome, ensuring it covers the entire surface. This step transforms your pear-shaped mousse dessert into a work of art! Return the decorated mousse to the fridge for a bit longer, letting the glaze firm up. Watching the glaze set is like magic unfolding right in your kitchen!
Step 9: Decorate the Mousse
Finally, let’s bring our pear-shaped mousse dessert to life with some charming decorations. Use green fondant or marzipan to create realistic leaves and stems. It’s like dressing up your dessert for a special occasion! You can get creative here—maybe add some edible flowers for an extra pop of color. These little touches make your dessert not just a treat, but a centerpiece that will wow everyone!
Tips for Success
- Use fresh pears for the puree; they enhance the flavor significantly.
- Ensure the mousse is completely set before glazing for a smooth finish.
- Chill the mousse overnight for the best texture and flavor.
- Experiment with different fruit purees for unique flavors.
- Customize decorations to match your occasion—get creative!
Equipment Needed
- Dome molds or baking tray: These shape your pear mousse. Silicone molds work great for easy release.
- Mixing bowls: Essential for combining ingredients. Use glass or stainless steel for easy cleanup.
- Whisk or electric mixer: For whipping cream to fluffy perfection.
- Spatula: Ideal for folding ingredients gently.
- Small saucepan: Useful for heating mixtures and preparing the glaze.
Variations
- Pear Chocolate Mousse: Add melted dark chocolate to the mousse mixture for a rich and decadent twist.
- Pear Vanilla Mousse: Enhance the vanilla flavor by using vanilla bean paste instead of extract for a more intense taste.
- Vegan Option: Substitute heavy cream with coconut cream and use agar-agar instead of gelatin for a plant-based dessert.
- Spiced Pear Mousse: Incorporate ground cinnamon or nutmeg into the mousse for a warm, spiced flavor that’s perfect for fall.
- Mixed Fruit Mousse: Combine pear with other fruits like mango or raspberry for a colorful and flavorful dessert.
Serving Suggestions
- Pair your pear-shaped mousse dessert with a dollop of whipped cream for an extra touch of creaminess.
- Serve alongside a light fruit salad to complement the flavors.
- A glass of sparkling wine or a fruity mocktail enhances the celebration.
- For presentation, arrange the mousses on a decorative platter with fresh mint leaves.
Frequently Asked Questions (FAQs)
Q: Can I make pear-shaped mousse dessert ahead of time?
A: Absolutely! This pear mousse dessert is perfect for making ahead. Just prepare and chill it a day in advance. The flavors will meld beautifully while it sets, giving you a delicious, elegant dessert ready to impress.
Q: How do I store leftover pear mirror glaze dessert?
A: Store any leftovers in an airtight container in the fridge for up to three days. The glaze may lose some shine, but the flavors will still be delightful, making it a nice treat for later!
Q: Can I use other fruits instead of pears in this mousse?
A: Yes! This molded mousse dessert is versatile. You can substitute pears with fruits like mango, raspberry, or even mixed berries. Just ensure your fruit puree is smooth for the best texture.
Q: Is it possible to make this pear entremet recipe vegan?
A: Definitely! For a vegan version, use coconut cream instead of heavy cream and substitute gelatin with agar-agar. You’ll still achieve a delicious and beautiful fruit-shaped mousse cake!
Q: What can I serve with my pear chocolate mousse?
A: Pair your mousse with a light fruit salad or a scoop of vanilla ice cream for a delightful contrast. A splash of sparkling wine or lemonade can enhance the experience, too!
Final Thoughts
Creating this pear-shaped mousse dessert is more than just making a sweet treat; it’s about crafting a delightful experience for both you and your loved ones. Each step allows you to express your creativity, while the final result is a stunning centerpiece that sparks joy. The laughter and smiles at the dinner table as you serve these beautiful desserts will be memories to cherish. So, roll up your sleeves and embark on this culinary journey. Whether it’s a special occasion or just a weekday pick-me-up, this pear mousse dessert is sure to bring happiness and sweetness into your home!
PrintPEAR-SHAPED MOUSSE DESSERT: A Creative Recipe to Impress!
A stunning and creative pear-shaped dessert with a glossy green finish, filled with a luscious creamy interior.
- Prep Time: 30 minutes
- Total Time: 4 hours 30 minutes
- Yield: 6 servings 1x
- Category: Dessert
- Method: Chilling
- Cuisine: French
- Diet: Vegetarian
Ingredients
- For the pear mousse:
- 1 cup pear puree
- 1/2 cup heavy cream
- 1/4 cup sugar
- 1 tablespoon lemon juice
- 1 tablespoon gelatin
- 1/2 teaspoon vanilla extract
- For the base:
- 1 1/2 cups shortbread or digestive biscuit crumbs
- 1/4 cup melted butter
- 2 tablespoons sugar
- For the glaze:
- 1/2 cup pear juice (or pear liqueur)
- 1 tablespoon gelatin
- 2 tablespoons sugar
- Green food coloring (optional)
- For the decoration:
- Green fondant or marzipan for leaves and stems
Instructions
- In a saucepan, combine pear puree, sugar, and lemon juice. Heat gently and stir until sugar dissolves.
- Dissolve gelatin in a small amount of water and add it to the pear mixture. Stir well and remove from heat.
- Let the mixture cool slightly before folding in whipped heavy cream and vanilla extract.
- Combine shortbread crumbs, melted butter, and sugar. Press the mixture into the bottom of individual dome molds or a baking tray.
- Fill the mousse mixture into the molds, on top of the shortbread base, and smooth the surface.
- Chill in the fridge for at least 4 hours, or overnight, to set.
- Heat pear juice with sugar, dissolve the gelatin, and add a few drops of green food coloring. Stir well and cool.
- Once the mousse is set, pour the glaze over each mousse dome, ensuring it covers the entire surface.
- Let the glaze set in the fridge.
- Decorate each mousse with fondant or marzipan leaves and stems to mimic a pear.
Notes
- Ensure the mousse is completely set before glazing for a smooth finish.
- Use pear puree made from fresh pears for the best flavor.
- Customize the decoration with edible flowers for an elegant touch.
Nutrition
- Serving Size: 1 mousse
- Calories: 250 kcal
- Fat: 15g
- Saturated Fat: 8g
- Carbohydrates: 28g
- Fiber: 2g
- Protein: 4g