
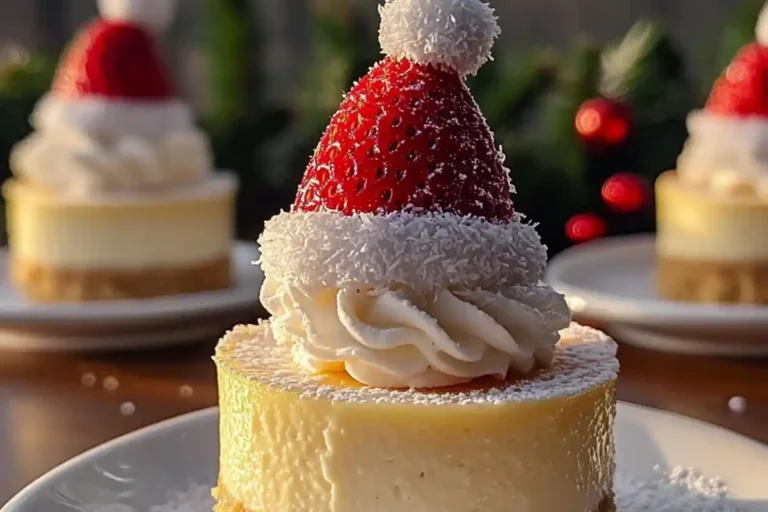
Mini Santa Hat Cheesecakes
As the holiday season approaches, I find myself searching for festive treats that bring a smile to my family’s faces. That’s where my Mini Santa Hat Cheesecakes come in! They are not just adorable but also a creamy delight that’s perfect for gatherings. If you’re a busy mom or professional like me, these little bites serve as a quick solution for those last-minute parties or family get-togethers. Plus, they look fantastic on any dessert table, making you the star of the show! Let’s dive into this cute holiday cheesecake recipe that’s sure to impress!
Why You’ll Love This Mini Santa Hat Cheesecakes
These Mini Santa Hat Cheesecakes are a holiday game-changer! They’re incredibly easy to whip up, and the baking time is a breeze. With a creamy filling and a delightful crust, they offer a burst of flavor in every bite. Plus, they make for stunning presentation pieces that will wow your guests. You’ll adore how quickly they disappear at parties, leaving everyone wanting more!
Ingredients for Mini Santa Hat Cheesecakes
Gathering the right ingredients is half the fun of baking! For these Mini Santa Hat Cheesecakes, you’ll need a mix of sweet and creamy components to create that festive flavor. Here’s what you’ll need:
- Graham cracker crumbs: These form the delightful crust. You can buy them pre-made or crush your own crackers for a fresher taste.
- Melted butter: This binds the crumbs together, giving your crust a rich, buttery flavor.
- Sugar: A little sweetness enhances the crust and balances the cheesecake filling.
- Cream cheese: The star of the show! It provides that creamy, smooth texture we all love in cheesecakes.
- Granulated sugar: This sweetens the filling and brings out the flavors of the other ingredients.
- Vanilla extract: A splash of this adds depth and warmth to the cheesecake.
- Eggs: Essential for binding the filling together. They help achieve that perfect creamy consistency.
- Sour cream: This adds a tangy twist, balancing the sweetness of the cheesecake.
- Lemon juice: A hint of citrus brightens up the flavors and enhances the overall taste.
- Whipped cream: For topping! It adds a light, fluffy finish that makes the cheesecakes look festive.
- Fresh strawberries: These serve as the “Santa hats” and add a pop of color and flavor.
- Shredded coconut: A sprinkle on top mimics snow, adding a whimsical touch to your dessert.
- Powdered sugar: A dusting on top gives a sweet finish and enhances the holiday vibe.
For those with dietary needs, you can easily adapt this recipe. Use vegan cream cheese and coconut whip for a plant-based version. If you’re looking for a gluten-free option, simply substitute with a gluten-free crust. The exact quantities for each ingredient are listed at the bottom of this article, ready for printing!
How to Make Mini Santa Hat Cheesecakes
Now that we have our ingredients ready, let’s jump into the fun part—making these festive bites! Follow these steps, and you’ll have a tray of Mini Santa Hat Cheesecakes ready to wow your loved ones.
Step 1: Preheat and Prepare
First things first, preheat your oven to 325°F. This ensures your cheesecakes bake evenly. While the oven is warming up, line a muffin tin with cupcake liners. These little liners not only make serving easier but also add to the cute holiday cheesecake recipe vibe!
Step 2: Make the Crust
In a bowl, mix together the graham cracker crumbs, melted butter, and sugar until everything is well combined. The mixture should look sandy and moist. Now, grab a spoon and press this mixture firmly into each muffin liner. You want a nice, even layer to form the crust of your mini Christmas cheesecakes.
Step 3: Bake the Crust
Pop the muffin tin into the oven and bake the crust for just 5 minutes. This quick bake helps set the crust and gives it that delicious crunch. Once done, take it out and let the crust cool for a few minutes before adding the filling.
Step 4: Prepare the Filling
In a mixing bowl, beat together the cream cheese, granulated sugar, vanilla extract, sour cream, and lemon juice. Use an electric mixer for a smooth consistency. The goal is to achieve a creamy filling without any lumps. Trust me, this step is crucial for those delightful holiday strawberry cheesecake bites!
Step 5: Combine Eggs
Now it’s time for the eggs! Add them one at a time into the cream cheese mixture, mixing well after each addition. This helps incorporate them evenly, making your filling rich and smooth. Once combined, pour this heavenly mixture over your cooled crusts in the muffin tin.
Step 6: Bake the Cheesecakes
Return the muffin tin to the oven and bake for 18–20 minutes. You’ll know they’re done when the centers are just set but still slightly jiggly. This is key for that creamy texture! After baking, let them cool to room temperature, then refrigerate for at least 2 hours. This chilling time is essential for the flavors to meld and for the cheesecakes to firm up.
Step 7: Decorate
When you’re ready to serve, it’s time to get creative! Pipe whipped cream on top of each cheesecake. Then, place a fresh strawberry on top to create that iconic Santa hat look. Add a small dot of whipped cream and a sprinkle of shredded coconut to mimic snow. Finally, dust with powdered sugar for that extra festive touch. Your Mini Santa Hat Cheesecakes are now ready to steal the show at any Christmas party!
Tips for Success
- Make sure your cream cheese is at room temperature for easier mixing.
- Use a cookie scoop for even crust portions.
- Don’t overmix the filling after adding the eggs to maintain a creamy texture.
- Chill the cheesecakes overnight for the best flavor.
- Experiment with toppings like crushed candy canes for a festive twist!
Equipment Needed
- Muffin tin: A standard muffin tin works perfectly; mini muffin tins can create bite-sized treats.
- Cupcake liners: These make serving easy and keep the cheesecakes intact.
- Mixing bowls: Have a few on hand for combining your ingredients.
- Electric mixer: This makes beating the cream cheese a breeze, but a whisk can work too.
- Piping bag: For decorating, but a ziplock bag works well in a pinch!
Variations for Mini Santa Hat Cheesecakes
- Chocolate Delight: Add melted chocolate to the cream cheese mixture for a rich, chocolaty twist. You can also drizzle chocolate on top for an extra treat!
- Berry Bliss: Swap out strawberries for raspberries or blueberries. These berries can add a lovely tartness and beautiful color to your cheesecakes.
- Pumpkin Spice: For a fall-inspired version, mix in pumpkin puree and a dash of cinnamon and nutmeg into the filling. Perfect for Thanksgiving gatherings!
- Vegan Option: Use vegan cream cheese and coconut whip for a dairy-free treat. You won’t miss the creaminess!
- Gluten-Free: Substitute the graham crackers with gluten-free crumbs made from nuts or gluten-free cookies for a delightful crust.
- Mini Cheesecake Parfaits: Layer the cheesecake filling with crushed graham crackers and whipped cream in a glass for a beautiful presentation.
Serving Suggestions
- Pair these Mini Santa Hat Cheesecakes with a warm cup of cocoa or eggnog for a cozy treat.
- Serve alongside a fruit platter for a refreshing balance to the rich cheesecakes.
- For a festive touch, arrange them on a decorative holiday platter.
- Consider adding sprigs of mint or edible flowers for a pop of color.
- These make great gifts! Package them in clear containers tied with festive ribbons.
Frequently Asked Questions (FAQs)
Q: Can I make Mini Santa Hat Cheesecakes ahead of time?
Absolutely! These Mini Santa Hat Cheesecakes can be made a day or two in advance. Just follow the recipe, refrigerate them, and they’ll be ready to serve when you need them. This makes them a perfect addition to your holiday dessert spread without the last-minute rush!
Q: How do I store leftover Mini Santa Hat Cheesecakes?
To store any leftover Mini Santa Hat Cheesecakes, place them in an airtight container and keep them in the refrigerator. They’ll stay fresh for up to five days. Just be sure to cover them well to maintain their creamy texture and delicious flavor!
Q: Are there any substitutes for cream cheese in this recipe?
Yes, there are several alternatives! You can use vegan cream cheese for a dairy-free option. Silken tofu blended until smooth can also work as a substitute, giving you that creamy texture without the dairy. Just remember to adjust the sweetness to taste!
Final Thoughts
There’s something truly magical about sharing a plate of Mini Santa Hat Cheesecakes with loved ones during the holiday season. These little bites not only satisfy your sweet cravings but also bring joy and laughter to any gathering. With their festive appearance and delicious flavors, they become a centerpiece of celebration and warmth. I hope you feel inspired to whip up these adorable treats and let the holiday spirit shine through your kitchen. Remember, the best moments are often made sweeter with a little creativity and a lot of love. Happy baking!
PrintMini Santa Hat Cheesecakes are a festive delight!
Mini Santa Hat Cheesecakes are a festive delight, creamy and fun, perfect for holiday gatherings.
- Prep Time: 25 minutes
- Cook Time: 20 minutes
- Total Time: 2 hours 45 minutes
- Yield: 12 servings 1x
- Category: Dessert
- Method: Baking
- Cuisine: American
- Diet: Vegetarian
Ingredients
- 1 cup graham cracker crumbs
- 3 tbsp melted butter
- 1 tbsp sugar
- 16 oz cream cheese
- 1/2 cup sugar
- 1 tsp vanilla extract
- 2 large eggs
- 2 tbsp sour cream
- 1 tbsp lemon juice
- Whipped cream
- Fresh strawberries
- Shredded coconut
- Powdered sugar
Instructions
- Preheat to 325°F and line muffin tin with liners.
- Mix graham cracker crumbs, melted butter, and sugar. Press into each liner.
- Bake the crust for 5 minutes and allow to cool.
- Beat cream cheese, sugar, vanilla extract, sour cream, and lemon juice until smooth.
- Add eggs one at a time, mixing well after each addition. Pour mixture over the crusts.
- Bake for 18–20 minutes until set. Cool and refrigerate for at least 2 hours.
- Pipe whipped cream on top, place a strawberry, and add a dot of cream and coconut for decoration. Dust with powdered sugar.
Notes
- Use vegan cream cheese and coconut whip for a plant-based version.
- For gluten-free, use a gluten-free crust.
- These cheesecakes are great for gifting or holiday trays!
Nutrition
- Serving Size: 1 mini cheesecake
- Calories: Approximately 150
- Sugar: 10g
- Sodium: 150mg
- Fat: 10g
- Saturated Fat: 5g
- Unsaturated Fat: 3g
- Trans Fat: 0g
- Carbohydrates: 15g
- Fiber: 1g
- Protein: 3g
- Cholesterol: 40mg