
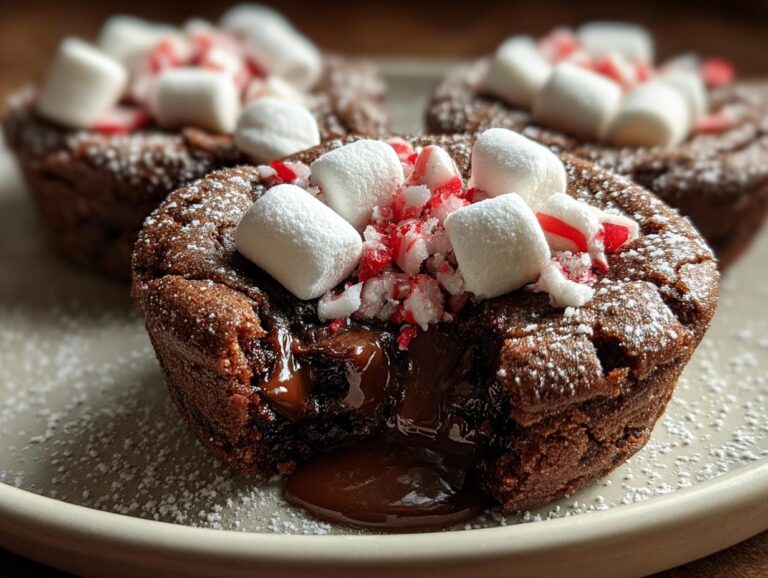
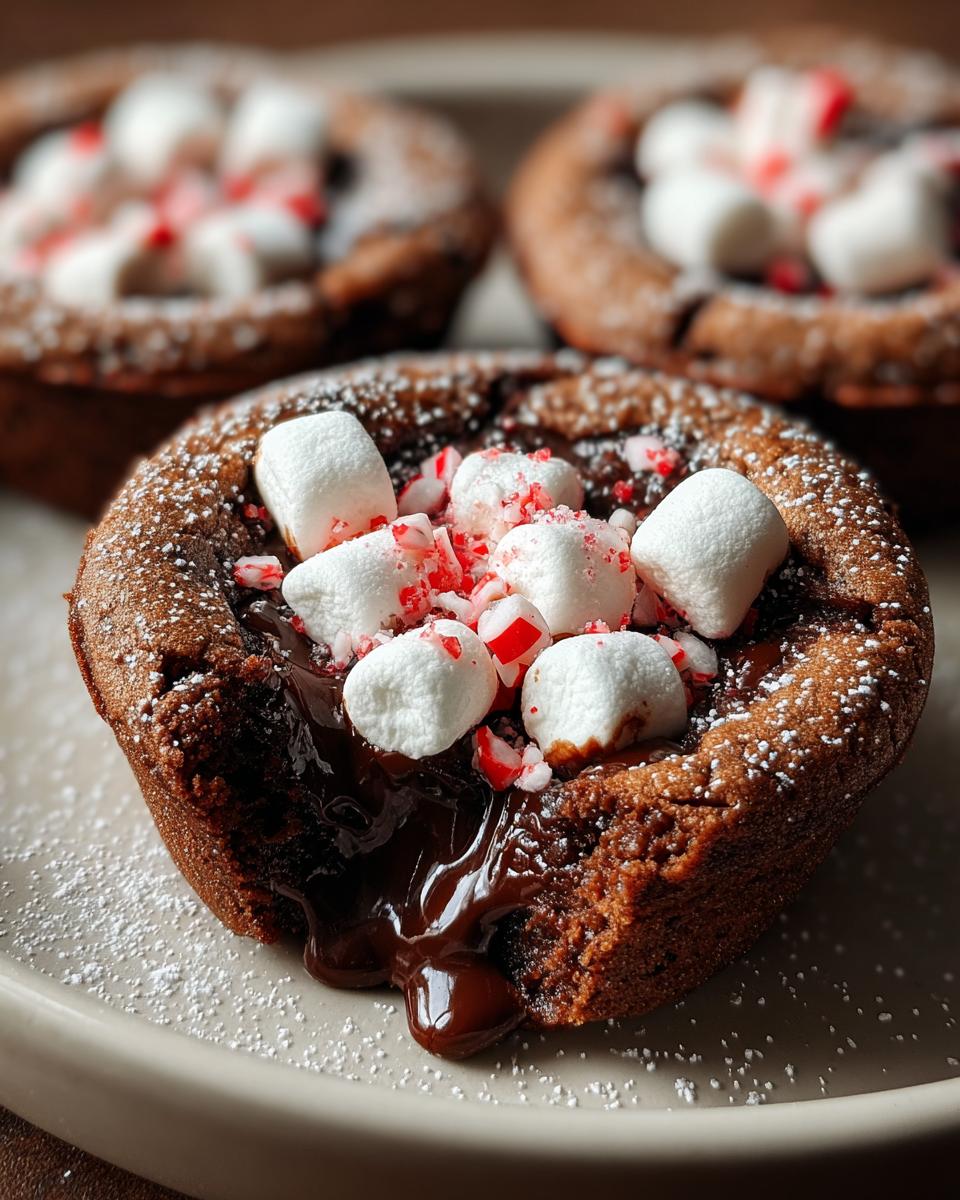
There’s something magical about holiday baking that makes my kitchen feel like the coziest place on earth. And let me tell you, nothing captures that warmth quite like my Hot Chocolate Cookie Cups. Picture this: rich chocolate cookie cups with melty centers, topped with gooey marshmallows and a sprinkle of crushed peppermint – it’s like drinking hot cocoa but in cookie form! I first made these for our family’s Christmas Eve gathering last year, and now my nieces and nephews won’t let me show up without them. The best part? That moment when you break into the warm center and the chocolate oozes out – pure holiday happiness in every bite.
Why You’ll Love These Hot Chocolate Cookie Cups
Trust me, these aren’t just any cookies—they’re little edible hugs that’ll make your holiday baking shine. Here’s why they’ve become my go-to treat every December:
- That melty center – Break into the warm chocolate middle and watch it ooze like the perfect cup of cocoa
- So easy even Santa could make them – No fancy techniques, just simple mixing and baking (great for baking with kids!)
- Instant holiday vibes – The marshmallow topping and peppermint crunch scream “festive” without any fuss
- Crowd-pleasing magic – I’ve never brought these to a party without someone asking for the recipe
The best part? That moment when your guests take their first bite and their eyes light up—just like mine did when I first tried these!
Ingredients for Hot Chocolate Cookie Cups
Here’s everything you’ll need to make these irresistible treats. I always measure everything before starting – it makes the baking process so much smoother!
- 1 cup unsalted butter, softened (leave it out for 30 minutes – it should indent slightly when pressed)
- 1 cup packed brown sugar (pack it firmly into your measuring cup for the perfect amount)
- ½ cup granulated sugar
- 2 large eggs (room temperature blends better)
- 2 tsp vanilla extract (the real stuff makes all the difference!)
- 2 ½ cups all-purpose flour (fluff it before measuring)
- ½ cup unsweetened cocoa powder (I like Dutch-processed for richer flavor)
- 1 tsp baking soda
- ½ tsp salt
- 1 cup semi-sweet chocolate chips (or chunks for extra melty pockets)
- Mini marshmallows (for topping – the tiny ones melt perfectly)
- Extra chocolate chips or ganache (for filling – I sometimes use both!)
- Powdered sugar for dusting (optional but pretty)
Crushed peppermint candies (for that festive crunch)
Ingredient Notes & Substitutions
No worries if you need to make swaps! Use dairy-free butter for a vegan version, or gluten-free flour if needed. Not a peppermint fan? Skip it or try cinnamon instead. Out of brown sugar? Use all granulated with 1 tbsp molasses. The marshmallows are optional too, but they really make these special!
How to Make Hot Chocolate Cookie Cups
Okay, let’s get baking! These festive treats come together in just three simple steps. Don’t be surprised if your kitchen starts smelling like a chocolate shop halfway through – that’s how you know you’re doing it right!
Step 1: Prepare the Dough
First things first – preheat that oven to 350°F (175°C). While it’s heating, grab your mixer and beat the softened butter with both sugars until it’s light and fluffy. This usually takes me about 2 minutes – you’ll know it’s ready when the color lightens slightly and the mixture looks like fluffy clouds. Add the eggs one at a time, mixing well after each, then splash in that vanilla. Oh, and don’t forget to scrape down the sides of the bowl – that’s where all the good stuff hides!
In another bowl, whisk together your dry ingredients (flour, cocoa powder, baking soda, and salt). Now slowly add this to your butter mixture. I like to do this in three batches to avoid flour explosions (learned that the messy way!). Once combined, fold in those chocolate chips – the more the merrier, I say!
Step 2: Shape and Bake
Grease a muffin tin really well (trust me, you don’t want your cookie cups sticking!). Scoop about 3 tablespoons of dough into each cup – I use my cookie scoop for this. Now here’s the trick: use your fingers or the back of a spoon to press the dough up the sides, creating little cups. They don’t need to be perfect – rustic is charming!
Bake for 10-12 minutes. They’re ready when the edges look set but the centers still seem slightly soft. I always set my timer for 10 minutes and check – better to underbake slightly than overbake! The cookies will continue cooking a bit as they cool.
Step 3: Fill and Decorate
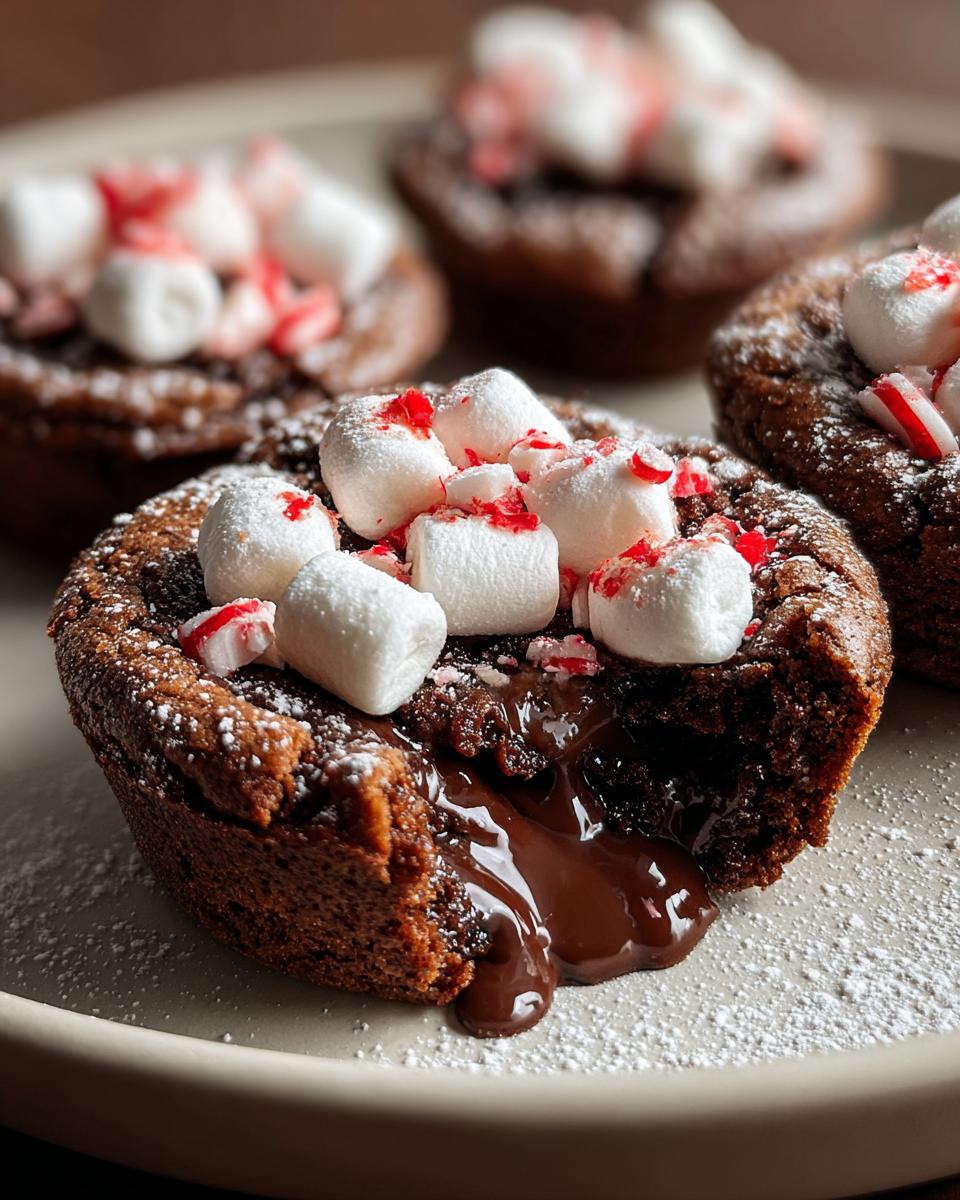
Here comes the fun part! As soon as the cookie cups come out of the oven, use a spoon to gently press down the centers (careful, they’re hot!). This creates the perfect little well for all our delicious fillings. I immediately add extra chocolate chips or a spoonful of ganache – the residual heat makes it all melty and dreamy.
Top with mini marshmallows while still warm – they’ll get slightly toasted and gooey. Then sprinkle with crushed peppermint for that festive crunch. A light dusting of powdered sugar makes them look like they’re covered in snow! Let them cool for about 5 minutes in the pan before transferring to a wire rack. But let’s be real – I always eat one straight away while it’s still warm and the chocolate is extra oozy!
Tips for Perfect Hot Chocolate Cookie Cups
After making dozens of batches (for “quality control,” of course!), here are my tried-and-true secrets for cookie cup success:
- Don’t overbake! The edges should be set but centers still slightly soft – they’ll firm up as they cool while staying gloriously gooey inside
- Fresh marshmallows are key – Stale ones won’t get that perfect melt. Keep them sealed until ready to use
- Warm before serving – Just 10 seconds in the microwave makes the chocolate center ooze like a fresh-baked treat
- Grease every nook – Really get into those muffin tin crevices so your cups pop out intact
Pro tip: I always bake a test cup first to check my oven’s exact timing – no two ovens bake alike!
Serving and Storing Hot Chocolate Cookie Cups
Oh, the best way to enjoy these? Straight from the oven when the chocolate is gloriously molten and the marshmallows are at peak gooeyness! I usually serve them warm on a pretty holiday platter – they disappear fast, so I recommend making a double batch. For parties, I’ll keep a tray warming in the oven at 200°F (95°C) so guests can grab fresh, melty cups throughout the evening.
Leftovers? (As if!) But if you somehow have any, store them in an airtight container at room temperature for up to 3 days. The marshmallows will dry out a bit, but here’s my trick: pop them in the microwave for 10-15 seconds before serving to bring back that fresh-baked magic. You can also freeze them for up to a month – just thaw at room temperature and warm slightly before enjoying. I’ve been known to stash a few in the freezer for emergency cookie cravings during those cold January nights!
One last tip: these make fantastic holiday gifts! I package them in festive cookie boxes with parchment paper between layers – just add a ribbon and they’re ready to spread some chocolatey cheer. My mail carrier gets a special batch every year, and let’s just say our packages always arrive extra promptly during December!
Hot Chocolate Cookie Cups Nutritional Info
Okay, let’s be real – we’re not eating these for their health benefits! But since you asked, here’s the scoop on what’s in each delicious Hot Chocolate Cookie Cup. Remember, these are estimates since ingredients and brands vary (and let’s be honest, who actually measures those extra chocolate chips?).
Each cookie cup (based on 12 servings) contains roughly:
- Calories: 310 (worth every single one!)
- Sugar: 25g (it’s the holidays, live a little)
- Fat: 15g (that rich butter and chocolate goodness)
- Carbs: 40g (mostly from that amazing chocolatey center)
Now for my baker’s confession – I never actually count when I’m making these. The marshmallows might vary, I might “accidentally” add extra chocolate chips, and sometimes that peppermint topping gets a little generous. That’s the beauty of homemade treats – they’re made with love, not calculators! If you’re watching specific dietary needs, you can always tweak the recipe with sugar substitutes or gluten-free flour.
The bottom line? These are special occasion treats meant to be savored and shared with people you love. One bite of that warm, melty center and I guarantee you won’t be thinking about nutrition facts – just how soon you can have another!
FAQ About Hot Chocolate Cookie Cups
Over the years, I’ve gotten so many questions about these festive treats! Here are the answers to what everyone wants to know – straight from my cookie-stained recipe notebook:
Can I freeze Hot Chocolate Cookie Cups?
Absolutely! That’s my secret for stress-free holiday hosting. Let them cool completely, then freeze in a single layer before transferring to an airtight container. They’ll keep for up to a month. When the cookie craving hits, just thaw at room temperature for 30 minutes and warm slightly – good as fresh!
Can I use white chocolate instead of semi-sweet?
Oh, that sounds delicious! White chocolate makes a festive twist, especially paired with crushed candy canes. Just know the cups will be sweeter, so you might want to reduce the sugar slightly in the dough. I sometimes do half semi-sweet, half white chocolate for the best of both worlds.
My marshmallows hardened overnight – how do I fix this?
Don’t worry – mine do this too! Simply pop them in the microwave for 10 seconds or under the broiler for 30 seconds to bring back the gooey magic. If serving at a party, I’ll often wait to add marshmallows until right before serving for maximum meltiness.
Can I make these without a muffin tin?
You bet! I’ve successfully used ramekins in a pinch. Just grease them well and keep an eye on baking time. For a free-form version, scoop balls of dough onto a baking sheet and press the centers after baking – they won’t hold as much filling but still taste amazing!
What’s the best way to crush peppermint for topping?
My favorite kitchen hack for this: place candies in a zip-top bag and roll with a rolling pin. No mess! For extra-fine sprinkles, pulse in a food processor. And if you’re like me and sometimes “taste test” too much candy, starlight mints work great too!
If you want to see more recipes, check out my Pinterest profile.
Print3 Melt-in-Your-Mouth Hot Chocolate Cookie Cups Recipe Perfection
Hot Chocolate Cookie Cups are melty, gooey, and festive — your next holiday baking hit! These cookie cups have a gooey center filled with mini marshmallows, crushed peppermint, and chocolate for a warm holiday treat.
- Prep Time: 20 minutes
- Cook Time: 12 minutes
- Total Time: 32 minutes
- Yield: 12 cups 1x
- Category: Dessert
- Method: Baking
- Cuisine: American
- Diet: Vegetarian
Ingredients
- 1 cup unsalted butter, softened
- 1 cup brown sugar
- ½ cup granulated sugar
- 2 large eggs
- 2 tsp vanilla extract
- 2 ½ cups all-purpose flour
- ½ cup unsweetened cocoa powder
- 1 tsp baking soda
- ½ tsp salt
- 1 cup semi-sweet chocolate chips
- Mini marshmallows (for topping)
- Crushed peppermint candies (for topping)
- Extra chocolate chips or ganache (for filling)
- Powdered sugar for dusting (optional)
Instructions
- Preheat oven to 350°F (175°C). Cream butter and sugars until fluffy. Beat in eggs and vanilla.
- In another bowl, whisk flour, cocoa, baking soda, and salt. Mix dry ingredients into wet until dough forms. Fold in chocolate chips.
- Scoop dough into a greased muffin tin and press to form shallow cups. Bake for 10–12 minutes.
- Once baked, press centers down to create a cavity. Fill with chocolate ganache or extra chocolate chips.
- Top with mini marshmallows and crushed peppermint. Dust with powdered sugar if desired. Serve warm.
Notes
- Best enjoyed fresh from the oven or reheated slightly.
- Store in an airtight container for up to 3 days.
- For extra gooey centers, add more chocolate ganache while warm.
Nutrition
- Serving Size: 1 cookie cup
- Calories: 310
- Sugar: 25g
- Sodium: 150mg
- Fat: 15g
- Saturated Fat: 9g
- Unsaturated Fat: 5g
- Trans Fat: 0g
- Carbohydrates: 40g
- Fiber: 2g
- Protein: 3g
- Cholesterol: 45mg