
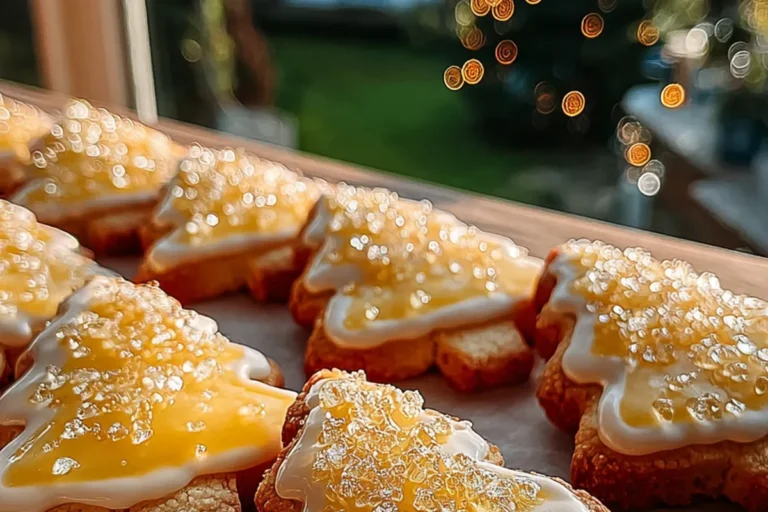
GLAZED LEMON SHORTBREAD TREE COOKIES
As the holiday season rolls in, I can’t help but feel a rush of excitement. It’s that time of year when the aroma of freshly baked cookies fills the air, and I can’t wait to share my GLAZED LEMON SHORTBREAD TREE COOKIES with family and friends. These delightful cookies are not just a treat; they’re a celebration in every bite! Perfect for busy moms like us, they require minimal fuss but deliver maximum flavor. Imagine buttery, zesty goodness topped with a sweet glaze – it’s like a hug for your taste buds! Whether for a festive gathering or a cozy family night, these cookies are sure to impress.
Why You’ll Love This GLAZED LEMON SHORTBREAD TREE COOKIES
These GLAZED LEMON SHORTBREAD TREE COOKIES are the epitome of simplicity and delight. They come together quickly, making them perfect for those hectic days when time feels like a luxury. The buttery texture melts in your mouth, while the zesty lemon adds a refreshing twist. Plus, they’re a beautiful addition to any holiday spread, turning even the busiest moments into a festive celebration. Who wouldn’t love that?
Ingredients for GLAZED LEMON SHORTBREAD TREE COOKIES
Gathering the right ingredients is the first step in crafting these delightful GLAZED LEMON SHORTBREAD TREE COOKIES. Here’s what you’ll need:
- Unsalted butter: The star of the show! Softened butter brings richness and a luscious texture.
- Powdered sugar: This fine sugar sweetens the cookies while contributing to their melt-in-your-mouth quality.
- All-purpose flour: A classic for cookie making, providing structure and a delicate crumb.
- Salt: A pinch of salt enhances the flavors, balancing the sweetness beautifully.
- Vanilla extract: A splash of vanilla adds a warm, comforting aroma that pairs perfectly with lemon.
- Lemon zest: The zest packs a punch of citrusy flavor, brightening every bite with its vibrant aroma.
For the glaze, you’ll need:
- Powdered sugar (for glaze): The base for a sweet and shiny finish that makes these cookies festive.
- Lemon juice: Freshly squeezed juice adds tanginess to the glaze, enhancing the lemon flavor.
- Lemon zest (for glaze): More zest means more zing! It ensures the glaze has that refreshing lemony kick.
- Optional toppings: Sparkling sugar or crushed candy can add a fun crunch and a pop of color!
For exact measurements, check the bottom of the article where I’ve provided everything you need for easy printing!
How to Make GLAZED LEMON SHORTBREAD TREE COOKIES
Making your own GLAZED LEMON SHORTBREAD TREE COOKIES is a delightful adventure! Let’s walk through each step together. I promise, it’s easier than you think, and the results are absolutely worth it!
Step 1: Cream the Butter and Sugar
Start by placing your softened unsalted butter and powdered sugar in a large mixing bowl. Using an electric mixer, beat them together until the mixture is light and fluffy. This step is crucial! Properly creamed butter and sugar create a lovely texture in your cookies. Think of it as building the foundation of a cozy home – it sets the stage for everything else!
Step 2: Mix in Flavorings and Flour
Next, add the lemon zest, vanilla extract, and salt to your fluffy butter mixture. Stir them in gently to infuse that zesty, aromatic flavor throughout. Gradually, mix in the all-purpose flour until just combined. Be careful not to overmix! This is where your lemon shortbread Christmas cookies begin to take shape. You want them to be tender and buttery, not tough!
Step 3: Chill the Dough
Now it’s time to chill the dough. Wrap it in plastic wrap and place it in the refrigerator for at least an hour. Chilling helps the dough firm up, making it easier to roll out later. Plus, it enhances the flavors as they meld together, like a cozy winter evening where everyone gathers around the fire!
Step 4: Preheat and Roll Out
Once your dough is chilled, preheat your oven to 350°F (175°C). Lightly flour your work surface and roll out the dough to about ¼ inch thick. The key here is to keep it even – aim for consistency so your cookies bake uniformly. This step is where the fun begins, as you can decide just how festive you want your lemon tree cookies to be!
Step 5: Cut and Bake the Cookies
Using a tree-shaped cookie cutter, cut out your cookies and place them on a baking sheet lined with parchment paper. Bake them for 10 to 12 minutes, or until the edges are a pale golden color. Keep an eye on them! You want to catch them right at that moment when they are perfectly baked, just like catching the first snowflakes of winter.
Step 6: Prepare the Glaze
While the cookies cool, let’s whip up that delicious glaze! In a bowl, combine powdered sugar, lemon juice, and lemon zest. Whisk until everything is smooth and glossy. The glaze will be the crowning glory of your lemon glazed cookies, adding a sweet, tangy finish that’s simply irresistible!
Step 7: Decorate the Cookies
Once the cookies are fully cooled, it’s time to decorate! Spoon or pipe the glaze over the cookies, letting it drizzle down the sides for a charming look. If you’re feeling festive, sprinkle on some sparkling sugar or crushed candy before it sets. This adds a delightful crunch and sparkle, making your cookies truly shine like holiday ornaments!
Tips for Success
- Make sure your butter is at room temperature for easy creaming.
- Don’t skip the chilling time; it’s crucial for the perfect texture.
- Use fresh lemon juice and zest for the best flavor.
- Check your cookies a minute or two before the timer goes off.
- Experiment with food coloring in the glaze for a festive touch!
Equipment Needed
- Mixing bowl: Any large bowl will do, but a glass one lets you see the butter and sugar cream together.
- Electric mixer: A hand mixer works well; a stand mixer is great if you have it.
- Rolling pin: Use a wine bottle in a pinch!
- Cookie cutters: Tree shapes are festive, but feel free to use any shape you like.
- Baking sheet: A standard sheet lined with parchment paper is perfect.
Variations of GLAZED LEMON SHORTBREAD TREE COOKIES
- Gluten-Free Version: Substitute all-purpose flour with a gluten-free blend to make these cookies suitable for gluten-sensitive friends and family.
- Herb Infusion: Add a teaspoon of finely chopped rosemary or thyme to the dough for a unique twist that complements the lemon beautifully.
- Chocolate Drizzle: Instead of a lemon glaze, melt dark chocolate and drizzle it over the cooled cookies for a decadent treat.
- Nutty Flavor: Incorporate finely chopped nuts, like almonds or pistachios, into the dough for added crunch and flavor.
- Colorful Glaze: Use food coloring to make your glaze vibrant and festive, perfect for holiday gatherings!
Serving Suggestions for GLAZED LEMON SHORTBREAD TREE COOKIES
- Pair these cookies with a cup of hot tea or aromatic coffee for a delightful afternoon treat.
- Serve on a festive platter, arranged with seasonal fruits like berries or citrus slices for a colorful display.
- Gift them in a decorated tin for a thoughtful holiday present that friends and family will cherish.
- Add a sprinkle of edible glitter before serving for an extra touch of holiday magic!
Frequently Asked Questions (FAQs)
Q: Can I make these GLAZED LEMON SHORTBREAD TREE COOKIES ahead of time?
A: Absolutely! You can prepare the dough a day in advance and refrigerate it. Just remember to chill it for at least an hour before rolling out. You can also bake the cookies ahead and glaze them just before serving to keep them fresh.
Q: How should I store leftover lemon shortbread Christmas cookies?
A: Store your cookies in an airtight tin at room temperature. They’ll stay fresh for up to a week. If you want to keep them longer, you can freeze the baked cookies without glaze for up to three months!
Q: Can I use other flavors instead of lemon for these cookies?
A: Certainly! You can swap lemon for other citrus like orange or lime. Just adjust the zest and juice in the glaze accordingly. It’s a fun way to create your own version of lemon glazed cookies!
Q: What’s the best way to apply the glaze on the cookies?
A: You can use a spoon to drizzle the glaze or pipe it on for more control. If you want a more artistic look, try using a squeeze bottle! Just make sure the cookies are fully cooled before glazing to prevent melting.
Q: Are these holiday shortbread cookies suitable for kids?
A: Yes! These buttery lemon cookies are perfect for kids. They can help with cutting the shapes and decorating with glaze. Just keep an eye on the sugar sprinkles if you have little ones helping out!
Final Thoughts on GLAZED LEMON SHORTBREAD TREE COOKIES
There’s something truly magical about baking GLAZED LEMON SHORTBREAD TREE COOKIES during the holiday season. The combination of buttery goodness and zesty lemon creates a delightful experience that warms the heart and home. Watching loved ones gather around, reaching for these festive treats, fills me with joy. Each bite transports you to a cozy moment, making memories sweeter. So, whether you’re sharing them at a gathering or enjoying them with a cup of tea, these cookies are sure to bring smiles and laughter to your holiday celebrations. Happy baking, and may your kitchen be filled with love!
PrintGLAZED LEMON SHORTBREAD TREE COOKIES are a must-try!

GLAZED LEMON SHORTBREAD TREE COOKIES are a must-try! Buttery, zesty, and beautifully festive, these cookies are perfect for the holiday season.
- Prep Time: 20 min
- Cook Time: 12 min
- Total Time: 1 hr 32 min
- Yield: 24 cookies 1x
- Category: Dessert
- Method: Baking
- Cuisine: American
- Diet: Vegetarian
Ingredients
- 1 cup unsalted butter, softened
- ½ cup powdered sugar
- 2 cups all-purpose flour
- ¼ tsp salt
- 1 tsp vanilla extract
- Zest of 1 lemon
- 1 cup powdered sugar (for glaze)
- 2–3 tbsp lemon juice (for glaze)
- Zest of 1 lemon (for glaze)
- Optional: sparkling sugar or crushed candy for topping
Instructions
- Cream butter and sugar until fluffy. Mix in zest, vanilla, salt, and flour. Chill dough 1 hour.
- Preheat oven to 350°F (175°C). Roll dough ¼” thick. Cut into tree shapes.
- Bake 10–12 min until edges are pale gold. Cool fully.
- Whisk glaze ingredients until smooth. Spoon or pipe over cookies.
- Sprinkle with toppings before glaze sets.
Notes
- Glaze while cookies are cool to avoid melting.
- Add food coloring to glaze for a fun holiday twist.
- Store in airtight tin up to 1 week.
Nutrition
- Serving Size: 1 cookie
- Calories: 120 kcal
- Sugar: 7g
- Fat: 7g
- Carbohydrates: 12g
- Protein: 1g