
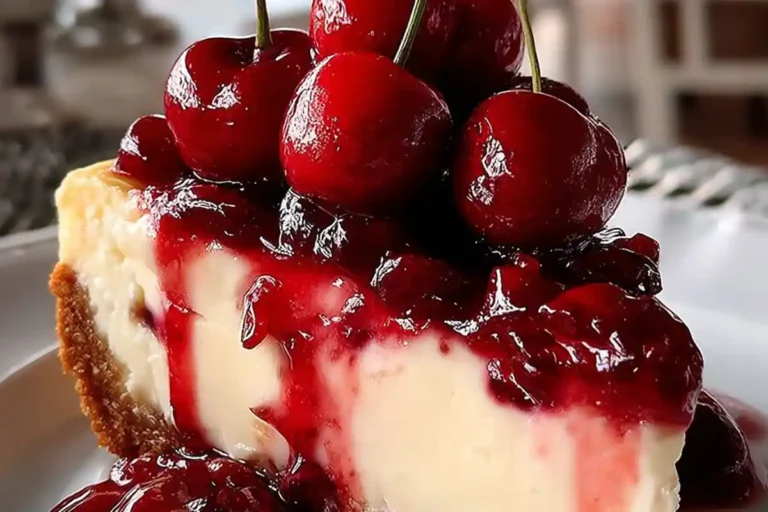
Classic Cherry Cheesecake Slice
Ah, the Classic Cherry Cheesecake Slice—a dessert that whispers sweet nothings to your taste buds! I can’t help but smile when I think of this silky, fruity delight. Whether it’s a busy weeknight or a special gathering, this cheesecake is your go-to dessert. It’s quick to whip up and sure to impress your loved ones. Imagine serving a slice of this creamy goodness topped with vibrant cherries—pure bliss! Plus, with just a handful of ingredients, you can create a show-stopping treat that brings warmth and joy to any occasion.
Why You’ll Love This Classic Cherry Cheesecake Slice
This Classic Cherry Cheesecake Slice is a true game-changer for your dessert repertoire! It’s easy to make, requiring minimal prep time, which is perfect for busy days. The rich, creamy filling pairs beautifully with the tart cherry topping, making every bite a reminder of why we love dessert. Plus, it’s a fantastic option for gatherings, ensuring you’ll be the star of any occasion with this delightful treat!
Ingredients for Classic Cherry Cheesecake Slice
To create this indulgent Classic Cherry Cheesecake Slice, you’ll need a mix of simple ingredients that come together to create magic. Here’s what you’ll gather:
- Graham cracker crumbs: These form the foundation of your cheesecake crust, adding a delightful crunch.
- Granulated sugar: Sweetens both the crust and the filling, balancing the flavors perfectly.
- Melted butter: This binds the graham cracker crumbs, giving the crust its rich, buttery flavor.
- Cream cheese: The star of the show! It creates that creamy texture we all crave in a cheesecake.
- Eggs: These help to set the filling, ensuring a smooth and stable cheesecake when baked.
- Vanilla extract: A splash of this adds depth and enhances the sweetness of the cheesecake.
- Sour cream: This ingredient adds a tangy richness that complements the cream cheese beautifully.
- Lemon juice: Just a bit brightens the flavor, cutting through the richness of the cheesecake.
- Fresh or frozen cherries: These are essential for that luscious cherry topping, bringing a burst of fruity flavor.
- More sugar: You’ll need this to sweeten the cherry topping, balancing its tartness.
- Cornstarch: This helps thicken the cherry topping, giving it a glossy finish.
- Water: Used to simmer the cherries, creating a lovely sauce.
- Extra lemon juice: A touch in the cherry topping enhances its flavor even more.
For those looking to tweak the recipe, consider swapping the graham cracker crust for an almond flour crust for a gluten-free option. You could also use plant-based cream cheese and an egg substitute for a vegan version. Check the bottom of the article for exact quantities and a handy print option!
How to Make Classic Cherry Cheesecake Slice
Step 1: Preheat and Prepare the Crust
First things first, preheat your oven to 325°F (160°C). This step is crucial, as it ensures even baking. Meanwhile, grab a mixing bowl and combine your graham cracker crumbs, sugar, and melted butter. Mix until the crumbs are fully coated and the mixture resembles wet sand. Next, press this mixture firmly into the bottom of a 9-inch pan. A flat-bottomed measuring cup works wonders for this! Bake the crust for about 10 minutes until it’s golden brown. Allow it to cool completely before moving on to the next step. Trust me, you want a solid base for your cherry cheesecake slice.
Step 2: Make the Cheesecake Filling
Now it’s time to create that creamy filling we all adore! In a large mixing bowl, use an electric mixer to beat the softened cream cheese until it’s perfectly smooth. This is where the magic begins! Gradually add in the sugar, mixing until well combined. Next, crack in your eggs, one at a time, making sure each is fully incorporated before adding the next. Add in the vanilla extract, sour cream, and lemon juice, blending until everything is silky smooth. The combination of cream cheese and sour cream gives this classic cheesecake with cherries its rich texture. Pour the luscious filling over the cooled graham cracker crust, spreading it evenly with a spatula. You’re already halfway to dessert heaven!
Step 3: Bake the Cheesecake
It’s baking time! To ensure your cheesecake bakes evenly, we’re going to use the water bath technique. Place your cheesecake pan inside a larger baking dish, then carefully fill the outer pan with hot water until it reaches halfway up the sides of your cheesecake pan. This creates a steamy environment, preventing cracks. Bake for 55-65 minutes, or until the edges are set but the center is still slightly jiggly. Once done, turn off the oven and crack the door open, allowing the cheesecake to cool slowly for about an hour. This helps avoid sudden temperature changes that could cause it to crack. After that, refrigerate it for at least 4 hours or overnight for the best results!
Step 4: Prepare the Cherry Topping
Now, let’s make that beautiful cherry topping! In a saucepan over medium heat, combine your cherries, sugar, and a splash of lemon juice with water. Bring this mixture to a gentle simmer. The cherries will start to release their juices, creating a delicious syrup. After about 5 minutes, mix a tablespoon of cornstarch with a little water to create a slurry, then add it to the saucepan. Stir continuously until the mixture thickens and becomes glossy, about 3-5 minutes. Remove from heat and let it cool. This cherry topping is the crowning glory of your baked cherry cheesecake!
Step 5: Assemble and Chill
Finally, it’s time to put it all together! Once your cheesecake has chilled, take it out of the fridge. Gently pour your cooled cherry topping over the cheesecake, spreading it evenly to cover every inch. This is where the magic happens, as the vibrant cherries add a pop of color and flavor. Pop it back in the refrigerator for another hour to allow the flavors to meld. When you’re ready to serve, slice it up and enjoy the delightful combination of creamy cheesecake and luscious cherries. Your guests will be raving about this cherry dessert slice!
Tips for Success
- Use room temperature cream cheese for a smoother filling—no lumps allowed!
- Don’t skip the water bath; it’s key for a creamy texture and prevents cracks.
- Cool your cheesecake slowly in the oven to avoid temperature shock.
- For a pretty finish, garnish with fresh cherries or a sprig of mint.
- Make it ahead of time; it tastes even better the next day!
Equipment Needed
- 9-inch springform pan (or a regular cake pan with parchment paper)
- Mixing bowls (a large bowl and a medium bowl will do)
- Electric mixer (a whisk can work if you’re feeling ambitious)
- Rubber spatula (to scrape every last bit of that creamy filling)
- Oven-safe dish for the water bath (any large baking dish will suffice)
Variations
- For a chocolate twist, swirl in some melted dark chocolate into the cheesecake filling before baking.
- Try a berry medley topping by mixing fresh strawberries, blueberries, and raspberries with the cherries for a colorful burst.
- For a tropical vibe, substitute cherries with pineapple or mango and add a splash of coconut extract.
- Make a no-bake version using whipped cream cheese and gelatin for a lighter alternative on hot days.
- For a nutty flavor, add chopped pecans or walnuts to the graham cracker crust for extra crunch.
Serving Suggestions
- Pair your Classic Cherry Cheesecake Slice with a dollop of whipped cream for extra creaminess.
- Serve alongside a scoop of vanilla ice cream to balance the tartness of the cherries.
- For a refreshing drink, consider iced tea or a sparkling lemonade.
- Garnish with fresh mint leaves for a pop of color and a touch of elegance.
- Present on a beautiful cake stand to elevate your dessert display!
Frequently Asked Questions (FAQs)
Q: Can I use a store-bought crust for the Classic Cherry Cheesecake Slice?
A: Absolutely! A pre-made graham cracker crust can save you time, making it even easier to create this cherry cheesecake slice. Just skip the first step and pour the filling directly into the crust.
Q: How can I prevent my cheesecake from cracking?
A: The water bath technique is key! It provides a moist baking environment. Also, remember to cool your cheesecake gradually in the oven with the door cracked to avoid sudden temperature changes.
Q: Can I make a vegan version of this cheesecake?
A: Yes! You can use plant-based cream cheese and an egg substitute like flaxseed meal or silken tofu. This way, you still get a creamy cheesecake without any animal products!
Q: What’s the best way to store leftover cheesecake?
A: Store any leftover baked cherry cheesecake in an airtight container in the refrigerator for up to five days. You can also freeze it for longer storage—just wrap it tightly in plastic wrap and foil.
Q: Can I use frozen cherries for the cherry topping?
A: Yes, frozen cherries work perfectly! Just thaw them first and drain any excess liquid before cooking them down for your cherry topping cheesecake.
Final Thoughts
Creating a Classic Cherry Cheesecake Slice is more than just whipping up a dessert; it’s about crafting moments of joy and connection. Each slice is a celebration, where the creamy filling meets the sweet-tart cherries, bringing smiles to faces. Whether it’s a family gathering or a quiet evening treat, this cheesecake embodies comfort and indulgence. So go ahead, embrace the joy of baking, and let this delightful dessert take center stage at your next occasion. Trust me, the satisfaction you’ll feel when serving it will be just as sweet as the cheesecake itself!
PrintClassic Cherry Cheesecake Slice: Indulge in Decadence!
Indulge in a silky, fruity, and rich classic cherry cheesecake slice, a true dessert icon!
- Prep Time: 30 minutes
- Cook Time: 1 hour
- Total Time: 5.5 hours
- Yield: 10–12 servings 1x
- Category: Dessert
- Method: Baking
- Cuisine: American
- Diet: Vegetarian
Ingredients
- 1 1/2 cups graham cracker crumbs
- 1/4 cup granulated sugar
- 1/2 cup melted butter
- 24 oz cream cheese, softened
- 1 cup granulated sugar
- 3 large eggs
- 1 tsp vanilla extract
- 1/2 cup sour cream
- 1 tbsp lemon juice
- 2 cups fresh or frozen cherries, pitted
- 1/3 cup sugar
- 1 tbsp cornstarch
- 1/2 cup water
- 1/2 tsp lemon juice
Instructions
- Preheat oven to 325°F (160°C).
- Mix graham cracker crumbs, sugar, and melted butter. Press into a 9-inch pan and bake for 10 minutes. Allow to cool.
- Beat cream cheese until smooth, then add sugar, eggs one at a time, vanilla extract, lemon juice, and sour cream. Pour over the cooled crust.
- Place the cheesecake in a water bath and bake for 55–65 minutes until just set. Cool in the oven with the door cracked for 1 hour.
- Refrigerate for 4 hours or overnight.
- For the cherry topping, simmer the cherries, sugar, and lemon juice with water. Add the cornstarch slurry and cook until glossy. Allow to cool.
- Top the chilled cheesecake with the cherry topping.
Notes
- For a vegan version, use plant-based cream cheese and an egg substitute.
- For a gluten-free option, swap the graham cracker crust with an almond flour crust.
- Add a dark chocolate drizzle for extra depth of flavor.
Nutrition
- Serving Size: 1 slice
- Calories: 350
- Sugar: 25g
- Sodium: 200mg
- Fat: 22g
- Saturated Fat: 12g
- Unsaturated Fat: 7g
- Trans Fat: 0g
- Carbohydrates: 35g
- Fiber: 1g
- Protein: 5g
- Cholesterol: 80mg