
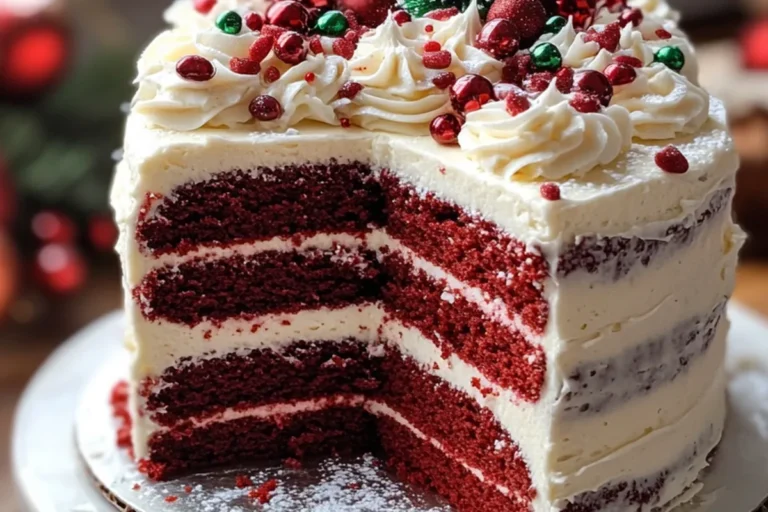
Christmas Red Velvet Layer Cake
There’s something magical about the holiday season, isn’t there? The twinkling lights, the scent of pine, and, of course, the delicious treats like this Christmas Red Velvet Layer Cake! As a busy mom, I know how precious time can be, especially during the holidays. This cake is not only a showstopper but also surprisingly simple to whip up. It’s perfect for impressing friends and family at holiday gatherings or just indulging in a cozy night at home. Trust me, this festive delight will make your celebrations even sweeter!
Why You’ll Love This Christmas Red Velvet Layer Cake
This Christmas Red Velvet Layer Cake is a delightful blend of flavors that will leave your taste buds dancing with joy. It’s incredibly easy to make, even for the busiest of moms. The vibrant red layers paired with creamy frosting create a beautiful centerpiece for any holiday table. Plus, the rich flavor is sure to impress your guests, making it the perfect dessert for festive gatherings or cozy family nights.
Ingredients for Christmas Red Velvet Layer Cake
Creating this stunning Christmas Red Velvet Layer Cake starts with gathering the right ingredients. Each one plays a crucial role in bringing this festive dessert to life. Below, I’ve listed everything you’ll need, along with some tips and substitutions to make your baking experience as smooth as possible.
- All-purpose flour: The backbone of your cake, providing structure and texture. You can substitute with a gluten-free blend if needed.
- Unsalted butter: Adds richness and moisture. Make sure it’s softened to room temperature for easy creaming.
- Cream cheese: Essential for that luscious frosting. Use full-fat for the best flavor and texture.
- Granulated sugar: Sweetens your cake and helps create a fluffy texture. Brown sugar can add a hint of caramel flavor.
- Large eggs: Bind the ingredients together and provide moisture. For a vegan alternative, you can use flax eggs.
- Vanilla extract: Enhances the flavors of the cake. Pure vanilla is best, but imitation works too!
- Red food coloring: Gives that iconic red hue. Gel coloring is recommended for vibrant results without adding too much liquid.
- Cocoa powder: Adds a subtle chocolate flavor that complements the red velvet beautifully.
- Salt: Balances the sweetness. Don’t skip this; it’s essential for flavor!
- Buttermilk: Keeps the cake moist and tender. If you don’t have buttermilk, you can make a quick substitute by adding vinegar to regular milk.
- Powdered sugar: Used for the frosting, providing that sweet, creamy texture. Sift it for a smoother consistency.
- Whipped cream: Perfect for decorating the top. You can use store-bought or homemade.
- Red-green sprinkles: These festive decorations add a cheerful touch to your cake. Feel free to get creative with toppings!
For exact measurements, you’ll find everything listed at the bottom of the article, ready for printing. Happy baking!
How to Make Christmas Red Velvet Layer Cake
Now comes the fun part—making this stunning Christmas Red Velvet Layer Cake! Follow my step-by-step guide, and don’t worry if things get a little messy; that’s part of the joy of baking! Trust me, the delicious outcome will be worth every minute spent in the kitchen.
Step 1: Prepare Your Pans
First things first, let’s get the oven ready! Preheat it to 350°F (175°C). While that’s heating up, grease and line four 8-inch round cake pans with parchment paper. This makes it easy to remove the cakes once they’re baked. A light dusting of flour over the greased pans will help as well. Trust me, nobody wants their beautiful layers to stick!
Step 2: Mix the Dry Ingredients
In a large mixing bowl, whisk together your all-purpose flour, cocoa powder, and salt. This simple step is key for a perfectly blended batter. Be sure to break up any lumps in the cocoa powder—nobody wants a surprise chocolate chunk in their cake! Once mixed, set this bowl aside while you work on the wet ingredients.
Step 3: Cream the Butter and Sugar
In another bowl, beat the softened unsalted butter and granulated sugar together until fluffy and light. This usually takes about 3-5 minutes. The texture should be airy, almost like a cloud! Then, add in your eggs, vanilla extract, and red food coloring. Mix until everything is well combined. The vibrant color will start shining through, and your kitchen will smell divine!
Step 4: Combine Ingredients
Now it’s time to bring it all together! Gradually mix in the dry ingredients from Step 2 and the buttermilk alternately. Start with the dry ingredients and end with them. This is a classic technique that ensures a smooth batter. Be careful not to overmix; just stir until everything is combined. Your layered red velvet dessert is almost ready!
Step 5: Bake the Layers
Pour the batter evenly into the prepared pans. Bake for 22-25 minutes, or until a toothpick inserted into the center comes out clean. Once baked, let the layers cool in the pans for about 10 minutes. Then, gently transfer them to a wire rack to cool completely. Patience is key here—cool layers make for a beautiful, elegant Christmas dessert!
Step 6: Make the Cream Cheese Frosting
While your cakes are cooling, let’s whip up that dreamy cream cheese frosting! Beat together the softened cream cheese and butter until smooth and creamy. Gradually add in the powdered sugar and mix until it reaches a fluffy consistency. The frosting should be sweet, tangy, and perfect for spreading between layers of your festive red velvet cake!
Step 7: Frost the Cake
Once your cake layers are cool, it’s time to assemble! Place one layer on a serving plate and spread a generous amount of cream cheese frosting on top. Repeat this for each layer, stacking them carefully. Once all layers are frosted, coat the outside of the cake with the remaining frosting. For a festive touch, decorate with whipped cream and sprinkle red-green sprinkles on top. Voilà! Your holiday velvet layer cake is ready to shine!
Tips for Success
- Don’t overmix the batter; it can make your cake dense.
- Use gel food coloring for a vibrant red without extra liquid.
- Chill your cake before slicing for clean, beautiful cuts.
- Allow your layers to cool completely for the best frosting results.
- Experiment with different sprinkles or toppings for a unique look!
Equipment Needed
- Four 8-inch round cake pans (You can also use two pans and cut layers in half.)
- Mixing bowls (A large and a medium will do just fine.)
- Whisk (A hand whisk works, but an electric mixer saves time.)
- Spatula (A rubber spatula is perfect for scraping down the sides.)
- Wire rack (If you don’t have one, a plate works in a pinch.)
Variations of Christmas Red Velvet Layer Cake
- Chocolate Chip Surprise: Fold in some semi-sweet chocolate chips into the batter for an extra layer of indulgence.
- Nutty Twist: Add chopped walnuts or pecans for a delightful crunch and added flavor.
- Spiced Velvet: Incorporate a pinch of cinnamon or nutmeg to give your cake a warm, holiday-inspired twist.
- Gluten-Free Option: Use a gluten-free all-purpose flour blend to make this cake suitable for those with dietary restrictions.
- Vegan Delight: Substitute eggs with flax eggs and use plant-based butter and cream cheese to create a vegan version of this festive treat.
- Fruit-Filled Layers: Add layers of raspberry or strawberry filling between the cake layers for a delicious fruity contrast.
- Cheesecake Layer: Incorporate a cheesecake layer between the red velvet layers for a decadent, creamy surprise.
Serving Suggestions for Christmas Red Velvet Layer Cake
- Pair with a scoop of vanilla ice cream for a delightful contrast.
- Serve alongside a cup of rich hot cocoa or spiced eggnog for a festive touch.
- Present on a beautiful cake stand, garnished with fresh berries for added color.
- Slice and serve with a dollop of whipped cream for extra indulgence.
- Consider adding festive holiday-themed plates for a cheerful presentation.
Frequently Asked Questions (FAQs)
Q: Can I make this Christmas Red Velvet Layer Cake ahead of time?
A: Absolutely! You can bake the layers a day in advance. Just wrap them tightly in plastic wrap and store them in the fridge. Frost the cake on the day you plan to serve it for the best texture.
Q: What’s the best way to store leftover cake?
A: Store your holiday velvet layer cake in an airtight container in the fridge. It will stay fresh for up to 3-4 days. Just make sure to let it sit at room temperature for about 30 minutes before serving for the best flavor.
Q: Can I use a different frosting for my layered red velvet dessert?
A: Of course! While cream cheese frosting is a classic pairing, you can use buttercream, whipped cream, or even a ganache if you prefer. Each will add a unique twist to your festive red velvet cake.
Q: Is there a substitute for buttermilk in this recipe?
A: Yes! If you don’t have buttermilk, mix 1 cup of milk with 1 tablespoon of vinegar or lemon juice. Let it sit for about 5 minutes. This will create a quick and easy buttermilk substitute for your Christmas layer cake recipe.
Q: How can I make my red and white holiday cake more festive?
A: Get creative with decorations! Use fresh berries, edible glitter, or themed sprinkles. You can even add candy canes or festive ribbons for a charming holiday touch!
Final Thoughts
Baking this Christmas Red Velvet Layer Cake is more than just a recipe; it’s a delightful experience that brings joy to both the cook and those lucky enough to indulge. The vibrant layers, luscious cream cheese frosting, and festive decorations make it a centerpiece for any holiday gathering. Each slice is a celebration, a moment shared with loved ones, filled with laughter and memories. So, roll up your sleeves and let the spirit of the season inspire your baking. Trust me, this cake will become a cherished tradition in your home, spreading happiness one slice at a time!
PrintChristmas Red Velvet Layer Cake: A Festive Delight!
A festive and rich Christmas Red Velvet Layer Cake, perfect for holiday celebrations.
- Prep Time: 30 mins
- Cook Time: 25 mins
- Total Time: 55 mins
- Yield: 12 servings 1x
- Category: Dessert
- Method: Baking
- Cuisine: American
- Diet: Vegetarian
Ingredients
- 310g all-purpose flour
- 230g unsalted butter, softened
- 500g cream cheese, softened
- 200g granulated sugar
- 3 large eggs
- 2 tsp vanilla extract
- 2 tbsp red food coloring
- 60g cocoa powder
- 1 tsp salt
- 240ml buttermilk
- 250g powdered sugar
- Whipped cream for decoration
- Red-green sprinkles for decoration
Instructions
- Preheat oven to 175°C (350°F). Grease and line four 8-inch pans.
- Whisk flour, cocoa, and salt. Beat butter and sugar until fluffy; add eggs, vanilla, and red coloring. Mix in dry ingredients and buttermilk alternately.
- Bake for 22–25 minutes. Cool layers completely.
- Beat butter and cream cheese until smooth. Add powdered sugar and vanilla.
- Frost between layers, then coat the outside. Decorate with whipped cream and red-green sprinkles.
Notes
- Don’t overmix the batter.
- Use gel coloring for vibrant red.
- Chill cake before slicing for clean cuts.
Nutrition
- Serving Size: 1 slice
- Calories: 450
- Sugar: 30g
- Sodium: 300mg
- Fat: 22g
- Saturated Fat: 14g
- Unsaturated Fat: 6g
- Trans Fat: 0g
- Carbohydrates: 58g
- Fiber: 2g
- Protein: 6g
- Cholesterol: 75mg