
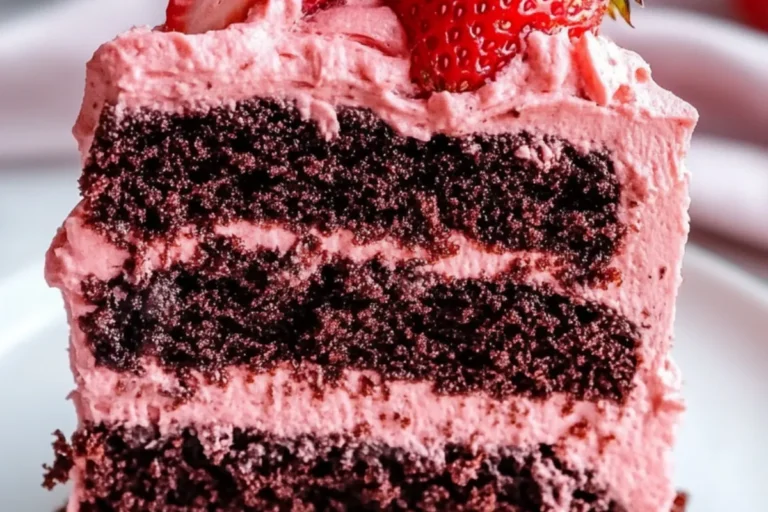
Chocolate Strawberry Layer Cake
As a busy mom, I know how precious time can be. That’s why I’m excited to share my Chocolate Strawberry Layer Cake recipe with you! This delightful dessert is not just a treat for the taste buds; it’s a beautiful way to celebrate special moments in life. Imagine layers of moist chocolate cake embraced by strawberry frosting, topped with fresh strawberries. It’s the perfect blend of chocolatey goodness and fruity freshness, making it a hit for birthday parties or a romantic dinner. Plus, it’s surprisingly simple to whip up, even on a hectic day!
Why You’ll Love This Chocolate Strawberry Layer Cake
This Chocolate Strawberry Layer Cake is a true crowd-pleaser that combines ease with incredible flavor. It’s quick to prepare, making it perfect for busy weeknights or last-minute celebrations. The moist, fluffy cake layers paired with the sweet, creamy strawberry frosting create a harmony of taste that will leave everyone wanting more. It’s not just dessert; it’s an experience that brings joy to any gathering!
Ingredients for Chocolate Strawberry Layer Cake
Let’s gather our ingredients for this heavenly Chocolate Strawberry Layer Cake! Each component plays a vital role in creating that moist, fluffy texture and delightful flavor. Here’s a quick rundown:
- All-purpose flour: The backbone of our cake, providing structure and a light texture.
- Unsweetened cocoa powder: This rich cocoa adds deep chocolate flavor without extra sweetness.
- Sugar: Sweetness is key! It balances the cocoa and keeps the cake moist.
- Baking powder: This leavening agent helps our cake rise to fluffy perfection.
- Baking soda: Another leavening hero that boosts the cake’s height and lightness.
- Salt: A pinch enhances all the flavors, making the chocolate sing.
- Eggs: They provide moisture and richness while binding the ingredients together.
- Milk: Adds moisture and creates a tender crumb; you can use whole or low-fat.
- Vegetable oil: Keeps the cake moist and adds a delicate crumb; feel free to substitute with melted butter for a richer taste.
- Vanilla extract: A splash of vanilla elevates the flavor, pairing beautifully with chocolate.
- Hot water: This may sound odd, but it helps bloom the cocoa for a deeper flavor.
- Unsalted butter: For the frosting, it gives a creamy base and a rich mouthfeel.
- Powdered sugar: This sweetener gives the frosting its fluffy texture and sweetness.
- Freeze-dried strawberries: Ground to a powder, they pack a punch of strawberry flavor without adding moisture.
- Fresh strawberry puree: Adds a fresh, fruity element to the frosting; be sure to strain it for a smooth texture.
- Fresh strawberries: Halved for garnish, they add a pop of color and a juicy bite!
For exact measurements, check the bottom of the article where you can find them available for printing. Happy baking!
How to Make Chocolate Strawberry Layer Cake
Prepare the Cake Batter
Let’s dive into creating that dreamy Chocolate Strawberry Layer Cake batter! First, grab a large mixing bowl and sift together the all-purpose flour, unsweetened cocoa powder, sugar, baking powder, baking soda, and salt. This step ensures even distribution of the dry ingredients, which is key for a uniform cake.
Next, add in the eggs, milk, vegetable oil, and vanilla extract. Mix everything until smooth. Now comes the fun part—slowly stir in the hot water. Don’t worry if the batter seems thinner than usual; that’s how it’s meant to be! This thin consistency helps create a moist, fluffy chocolate cake. Trust me; it’s worth it!
Bake the Cakes
Time to bake! Preheat your oven to 350°F (175°C) while you prep your pans. Grease and line three 8-inch round cake pans with parchment paper for easy removal. Divide the batter evenly among the pans. Then, pop them into the oven!
Bake for about 25–30 minutes, or until a toothpick inserted in the center comes out clean. Keep an eye on them! Ovens can vary, and nobody wants a dry cake. Once done, let them cool in the pans for a few minutes before transferring them to a wire rack to cool completely. This is where the aroma starts to fill your kitchen!
Cool the Cakes
Patience is key as we cool our cakes! After baking, let them cool in the pans for about 10 minutes. This helps them set and makes it easier to remove them without breaking.
Then, gently turn them out onto a wire rack. Allow the cakes to cool completely before frosting. This step is crucial! If they’re warm, the frosting will melt and slide off, turning your beautiful creation into a puddle.
Make the Strawberry Frosting
Now, let’s whip up that luscious strawberry frosting! In a mixing bowl, beat the unsalted butter until it’s creamy and smooth. Gradually add in the powdered sugar, mixing well after each addition. This helps prevent a sugar cloud!
Next, add the ground freeze-dried strawberries, strawberry puree, vanilla extract, and a pinch of salt. Beat until fluffy and pink, adjusting the consistency with more powdered sugar or a splash of milk if needed. The frosting should be thick enough to hold its shape but spreadable. This strawberry cream chocolate cake frosting brings everything together!
Assemble the Cake
It’s finally time to assemble your masterpiece! Start with one cake layer on a serving plate. Generously spread a layer of strawberry frosting on top. Repeat this for the second layer. For the final layer, place the top cake upside down. This gives you a flat surface to work with!
Cover the entire cake with the remaining frosting, smoothing it out as you go. Now, for the grand finale—decorate with halved fresh strawberries on top. They add a lovely touch and a burst of flavor. Your beautiful chocolate berry cake is ready to impress!
Tips for Success
- Use room temperature ingredients for a smoother batter.
- Measure flour correctly by spooning it into the measuring cup and leveling it off.
- Let the cakes cool completely before frosting to prevent melting.
- Experiment with toppings like chocolate shavings or whipped cream for extra flair.
- Store leftovers in an airtight container in the fridge for up to four days.
Equipment Needed
- Three 8-inch round cake pans (you can use two if you prefer to bake in batches).
- Mixing bowls (a large one for batter and a smaller one for frosting).
- Electric mixer or whisk (mixing by hand works too, but it takes longer).
- Measuring cups and spoons for accuracy.
- Wire rack for cooling (you can use a baking sheet if you don’t have one).
Variations of Chocolate Strawberry Layer Cake
- Gluten-Free Option: Substitute all-purpose flour with a 1:1 gluten-free blend for a delicious gluten-free chocolate strawberry cake.
- Vegan Twist: Replace eggs with flaxseed meal mixed with water, use almond milk instead of regular milk, and opt for a plant-based butter for the frosting.
- Chocolate Ganache Layer: Add a rich layer of chocolate ganache between the cake layers for an extra decadent treat.
- Minty Fresh Flavor: Incorporate a few drops of peppermint extract in the frosting for a refreshing twist on your chocolate cake with strawberries.
- Nutty Addition: Add chopped walnuts or almonds to the batter for a delightful crunch and extra flavor.
- Different Fruit Layers: Swap out strawberries with raspberries or blueberries for a mixed berry chocolate layer cake.
Serving Suggestions for Chocolate Strawberry Layer Cake
- Pair with a scoop of vanilla ice cream for a delightful contrast to the rich cake.
- Serve with a dollop of whipped cream for added creaminess and elegance.
- Complement with fresh mint leaves for a pop of color and freshness.
- Enjoy with a cup of steaming coffee or a glass of chilled sparkling wine.
- Present on a decorative cake stand to elevate its bakery-style appearance.
Frequently Asked Questions (FAQs)
Q: Can I make this Chocolate Strawberry Layer Cake ahead of time?
A: Absolutely! You can bake the cake layers a day in advance. Just wrap them tightly in plastic wrap and store them at room temperature. Frost the cake on the day you plan to serve it for the best freshness!
Q: How do I store leftovers of the strawberry chocolate layer cake?
A: Store any leftover chocolate cake with strawberries in an airtight container in the fridge. It will stay fresh for up to four days. If you’d like, you can also freeze individual slices for a quick treat later!
Q: Can I use frozen strawberries instead of fresh?
A: While fresh strawberries are ideal for topping, you can use frozen strawberries in the frosting. Just make sure to thaw and drain them well to avoid excess moisture in your strawberry cream chocolate cake.
Q: What can I pair with this elegant chocolate dessert?
A: This cake pairs wonderfully with a scoop of vanilla ice cream or a rich cup of coffee. For a special touch, serve it with a glass of sparkling wine for that romantic dessert cake vibe!
Q: Is this a good birthday cake option?
A: Definitely! This chocolate cake with fruit is not only stunning but also a crowd-pleaser. It’s perfect for birthdays, anniversaries, or any celebration where you want to impress your loved ones.
Final Thoughts on Chocolate Strawberry Layer Cake
Creating this Chocolate Strawberry Layer Cake is more than just baking; it’s about making memories. The combination of rich chocolate and the freshness of strawberries provides a delightful contrast that’s simply irresistible. Whether you’re celebrating a special occasion or just indulging yourself, this cake brings joy to the table.
As the layers come together, so do the smiles of those who enjoy it. I can’t help but feel a sense of accomplishment when I see my family and friends savoring each bite. So, roll up your sleeves and enjoy the sweet journey of baking this dreamy dessert!
PrintChocolate Strawberry Layer Cake: Indulge in a Fruity Delight!
Moist, fluffy, fruity and absolutely dreamy Chocolate Strawberry Layer Cake topped with strawberry frosting and fresh strawberries.
- Prep Time: 30 minutes
- Cook Time: 30 minutes
- Total Time: 1 hour
- Yield: 10 servings 1x
- Category: Dessert
- Method: Baking
- Cuisine: American
- Diet: Vegetarian
Ingredients
- 1 3/4 cups all-purpose flour
- 3/4 cup unsweetened cocoa powder
- 2 cups sugar
- 2 tsp baking powder
- 1/2 tsp baking soda
- 1/2 tsp salt
- 2 large eggs
- 1 cup milk
- 1/2 cup vegetable oil
- 2 tsp vanilla extract
- 1 cup hot water
- 1 cup unsalted butter, softened
- 3 cups powdered sugar
- 1/4 cup freeze-dried strawberries, ground to a powder
- 1/4 cup fresh strawberry puree (strained)
- 1 tsp vanilla extract
- Pinch of salt
- Fresh strawberries, halved for garnish
Instructions
- Preheat oven to 350°F (175°C). Grease and line three 8-inch round cake pans.
- In a large bowl, sift together flour, cocoa powder, sugar, baking powder, baking soda, and salt.
- Add eggs, milk, oil, and vanilla. Mix until smooth. Slowly stir in hot water. Batter will be thin.
- Divide batter evenly into pans and bake for 25–30 minutes or until a toothpick comes out clean.
- Cool cakes in pans for 10 minutes, then turn out onto wire racks to cool completely.
- For frosting, beat butter until creamy. Add powdered sugar, strawberry powder, puree, vanilla, and salt. Beat until fluffy and pink.
- Layer cake with generous swirls of strawberry frosting between each layer and all over the top.
- Decorate with fresh strawberries.
Notes
- Serve chilled for a firmer texture or at room temp for a softer bite.
- Perfect for birthdays, Valentine’s, or any celebration.
- Pairs beautifully with a cup of black tea or espresso.
- Use freeze-dried strawberries for strong flavor without watering down the frosting.
- Level cake layers with a serrated knife for an even stack.
- Store leftovers covered in the fridge for up to 4 days.
Nutrition
- Serving Size: 1 slice
- Calories: 420 kcal
- Sugar: 39g
- Sodium: 200mg
- Fat: 22g
- Saturated Fat: 9g
- Carbohydrates: 55g
- Fiber: 2g
- Protein: 4g