
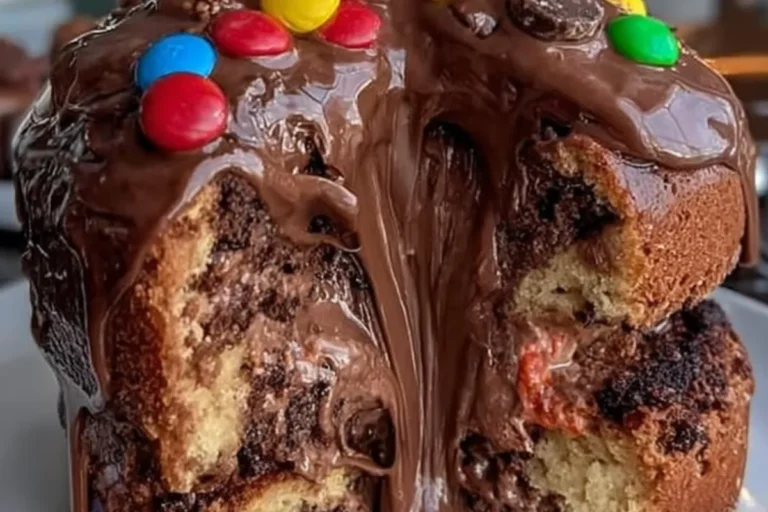
Chocolate Marble Lava Cake
There’s something truly magical about a chocolate marble lava cake. Just imagine cutting into a slice, and a rich, gooey chocolate center flows out like a sweet surprise! As a busy mom, I know how important it is to whip up something impressive yet easy. This delightful dessert is your go-to solution for impressing guests or simply treating your family after a long day. With a combination of tender vanilla and chocolate batters, this cake is not just a treat but an experience that brings smiles and joy to the dinner table. Let’s dive into this indulgent recipe!
Why You’ll Love This Chocolate Marble Lava Cake
This chocolate marble lava cake is a dream come true for busy cooks! It’s quick to prepare, taking only an hour from start to finish, which is a lifesaver on hectic days. The blend of flavors is simply divine, pleasing both chocolate lovers and those who enjoy something a little lighter. Plus, the gooey chocolate center adds that wow factor, making it perfect for gatherings or cozy family nights. Who wouldn’t love that?
Ingredients for Chocolate Marble Lava Cake
Creating a chocolate marble lava cake is a delightful adventure in your kitchen. Here’s what you’ll need to make this scrumptious dessert:
- All-purpose flour: This forms the cake’s base, providing structure and softness.
- Baking powder: A vital leavening agent that helps the cake rise, ensuring a light texture.
- Salt: Just a pinch enhances the sweetness, balancing the flavors beautifully.
- Unsalted butter: Softened for easy mixing, it adds richness and moisture to the cake.
- Granulated sugar: Sweetness is key! It sweetens the batter and helps with browning.
- Large eggs: These are essential for binding the ingredients together, creating that perfect texture.
- Vanilla extract: This brings warmth and depth to the flavor profile, making every bite delightful.
- Whole milk: Adds moisture and contributes to the cake’s tender crumb.
- Cocoa powder: This is what transforms part of the batter into a rich chocolate mix.
- Chocolate chips: These add bursts of chocolate goodness throughout the cake.
- Chocolate spread: A luscious filling that creates that gooey center we all love!
- Heavy cream: Used for making a silky ganache that adds an extra layer of indulgence.
- Colorful chocolate candies (like M&M’s): They’re perfect for decoration and add a fun touch to the presentation.
- Fresh strawberries (optional): These add a lovely contrast in both flavor and color, elevating your dessert.
For exact measurements, you can find all the details at the bottom of the article, ready for printing. Happy baking!
How to Make Chocolate Marble Lava Cake
Step 1: Preheat and Prepare
First things first—let’s get that oven preheated to 340°F (170°C). While it warms up, grab a small round cake pan, about 6 to 7 inches, and grease it well. I like to line the bottom with parchment paper for easy removal later. This small step ensures that your chocolate marble lava cake will come out perfectly without any sticking. Trust me, you’ll thank yourself later!
Step 2: Mix Dry Ingredients
In a mixing bowl, whisk together the all-purpose flour, baking powder, and salt. This little mix is crucial, as it helps the cake rise beautifully. I like to do this step first to ensure that the baking powder is evenly distributed. Plus, it gives you a moment to enjoy the scents of flour and salt mixing together. Simple and satisfying!
Step 3: Cream Butter and Sugar
Now, let’s move on to the star players: the butter and sugar. In a separate bowl, beat the softened unsalted butter and granulated sugar until the mixture is light and fluffy. This step usually takes about 3 to 5 minutes. Next, add the eggs one at a time, making sure to mix well after each addition. Finally, stir in the vanilla extract, and let the sweetness fill your kitchen!
Step 4: Combine Ingredients
It’s time to bring everything together! Gradually alternate adding the dry ingredients and whole milk to your butter mixture. Start with the flour mix, followed by milk, and repeat until everything is combined. This method keeps the batter smooth and avoids overmixing. You want that perfect, creamy texture for your molten chocolate marble cake!
Step 5: Create Chocolate Batter
Here comes the fun part! Divide your batter in half and take one portion. Mix in the cocoa powder and a splash of milk to create that rich chocolate batter. The contrast between the vanilla and chocolate batters is what makes the cake so visually appealing. Plus, it adds layers of flavor that your family will love!
Step 6: Layer and Swirl Batters
Now, let’s get artistic! Spoon the vanilla and chocolate batters into your prepared pan alternately. Don’t worry about being perfect; you want it to look a bit rustic. Once you’ve added the batters, take a knife and swirl them gently. This creates those stunning marbled patterns that look gorgeous when sliced. Remember to sprinkle in some chocolate chips for that extra gooeyness!
Step 7: Bake the Cake
Pop your masterpiece into the preheated oven and bake for about 35 to 40 minutes. You want the edges to be set but the center to remain soft and slightly gooey. To check for doneness, insert a toothpick—if it comes out with a few moist crumbs, you’re good to go! Remember, the secret to a perfect chocolate lava cake is not to overbake it!
Step 8: Prepare the Ganache
While your cake is baking, let’s whip up a simple ganache. Heat the heavy cream until it’s steaming but not boiling. Pour it over a bowl of chocolate chips and stir until smooth and glossy. This luscious ganache is the icing on the cake. Once your chocolate marble lava cake is out of the oven, drape the ganache over the top, letting it drip down the sides for that bakery-style look!
Tips for Success
- Serve your chocolate marble lava cake slightly warm for the ultimate gooeyness.
- Pair it with a scoop of vanilla ice cream to elevate flavors.
- Drizzle extra chocolate sauce on top for added indulgence.
- Be careful not to overbake; a soft center is key!
- Use high-quality chocolate for a richer taste.
- Chill the cake briefly before slicing for cleaner cuts.
Equipment Needed
- Small round cake pan (6–7 inches) – A springform pan works too!
- Mixing bowls – Grab a couple of different sizes to make your life easier.
- Whisk and spatula – Essential for mixing and folding the batters.
- Measuring cups and spoons – Accurate measurements lead to delicious results!
- Oven mitts – Safety first when handling hot pans!
Variations
- For a fruity twist, add fresh raspberries or chopped strawberries to the batter for a burst of flavor.
- Try substituting half of the all-purpose flour with almond flour for a nutty flavor and gluten-free option.
- Make it a chocolate fudge lava cake by adding a little more cocoa powder and chocolate spread for an even richer center.
- For a minty surprise, incorporate peppermint extract into the batter for a refreshing touch.
- Use dark chocolate instead of milk chocolate for a more intense flavor.
- Switch up the candies on top with chopped nuts or coconut flakes for a different texture and taste.
Serving Suggestions
- Serve warm slices of chocolate marble lava cake with a scoop of vanilla ice cream for a delightful contrast.
- Top with fresh strawberries or raspberries for a burst of color and flavor.
- Drizzle with additional chocolate sauce for an indulgent presentation.
- Pair with a cup of coffee or a glass of cold milk to enhance the experience.
Frequently Asked Questions (FAQs)
Q: Can I make this chocolate marble lava cake ahead of time?
A: Absolutely! You can prepare the cake a day in advance and store it in the fridge. Just warm it slightly before serving to enjoy that gooey chocolate center.
Q: What’s the best way to store leftovers?
A: Store any leftover chocolate marble lava cake in an airtight container in the fridge. To reheat, pop it in the microwave for about 10-15 seconds for that fresh-baked feel!
Q: Can I use other types of chocolate for this recipe?
A: Yes! You can use dark chocolate for a richer taste or white chocolate for a unique twist. Just remember to adjust the sweetness as needed.
Q: How can I ensure my lava cake has a gooey center?
A: The key is to avoid overbaking. Keep an eye on it as it bakes, and check for doneness with a toothpick. If it comes out with moist crumbs, you’re good to go!
Q: What can I serve with my chocolate lava cake?
A: Pair it with a scoop of vanilla ice cream, fresh berries, or a drizzle of chocolate sauce. These additions take this already indulgent dessert to the next level!
Final Thoughts
Making a chocolate marble lava cake is more than just baking; it’s about creating moments of joy and indulgence. Every gooey bite brings smiles, laughter, and a chance to connect with loved ones around the table. This recipe is perfect for those busy evenings when you want to treat your family or impress guests with minimal effort. The combination of flavors and textures creates a delightful experience that’s hard to resist. So, go ahead and embrace this sweet adventure in your kitchen. Trust me, your taste buds will thank you, and your family will be asking for seconds!
PrintChocolate marble lava cake: Indulge in gooey goodness!
Indulge in the decadent gooeyness of a chocolate marble lava cake filled with a rich chocolate center, perfect for any dessert lover.
- Prep Time: 20 minutes
- Cook Time: 40 minutes
- Total Time: 1 hour
- Yield: 6 servings 1x
- Category: Dessert
- Method: Baking
- Cuisine: American
- Diet: Vegetarian
Ingredients
- 2 cups all-purpose flour
- 1 1/2 teaspoons baking powder
- 1/2 teaspoon salt
- 1 cup unsalted butter, softened
- 1 1/2 cups granulated sugar
- 4 large eggs
- 1 tablespoon vanilla extract
- 1 cup whole milk
- 1/2 cup cocoa powder
- 1/3 cup milk (for chocolate swirl)
- 1 cup chocolate chips
- 1 cup chocolate spread (Nutella-style)
- 1/2 cup heavy cream (for ganache topping)
- 1/2 cup chocolate chips (for ganache)
- 1/2 cup colorful chocolate candies (M&M’s)
- Fresh strawberries (optional)
Instructions
- Preheat oven to 170°C (340°F). Grease and line a small round cake pan (6–7 inch).
- In a bowl, whisk flour, baking powder, and salt.
- In another bowl, beat butter and sugar until light and fluffy. Add eggs one at a time, then vanilla.
- Alternate adding dry ingredients and milk, mixing just until combined.
- Divide batter in half. In one half, mix cocoa powder and 1/3 cup milk to create chocolate batter.
- Spoon vanilla and chocolate batters alternately into pan. Swirl gently with a knife. Sprinkle chocolate chips inside.
- Bake 35–40 minutes until set but still slightly soft in the center. Cool slightly, then cut a small well in the middle and fill generously with chocolate spread.
- For ganache, heat heavy cream until steaming and pour over chocolate chips. Stir until smooth. Pour over cake, letting it drip dramatically down the sides.
- Decorate with colorful chocolate candies and strawberries. Slice and watch the chocolate lava flow!
Notes
- Serve slightly warm for maximum gooeyness.
- Add a scoop of vanilla ice cream.
- Drizzle with extra chocolate sauce.
- Do not overbake if you want a soft molten center.
- Use high-quality chocolate for the best flavor.
- Chill briefly before slicing for cleaner cuts.
Nutrition
- Serving Size: 1 slice
- Calories: 620 kcal
- Sodium: 260 mg
- Fat: 38 g
- Saturated Fat: 22 g
- Carbohydrates: 65 g
- Fiber: 3 g
- Protein: 8 g