
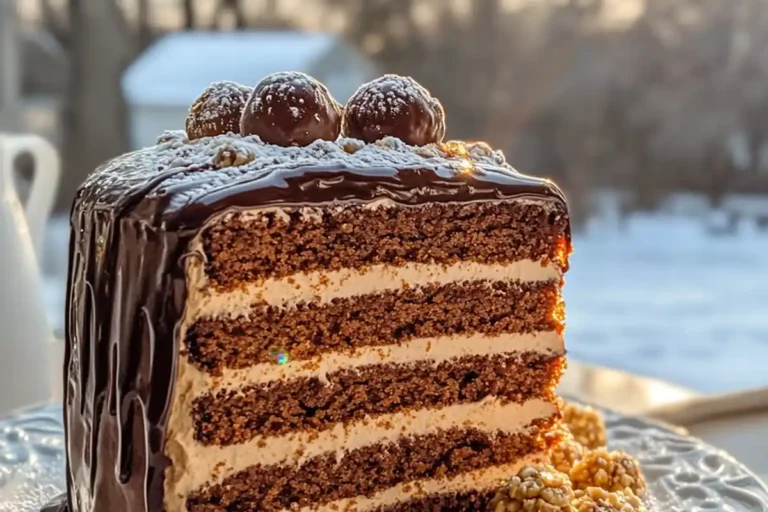
Chocolate Hazelnut Layer Cake
There’s something magical about a Chocolate Hazelnut Layer Cake that just calls to the soul, isn’t there? As a busy mom, I know how hard it can be to carve out time for baking, but trust me, this cake is worth every second. It’s rich, decadent, and oh-so-indulgent—a delightful treat perfect for birthdays or any celebration. Picture the joy on your family’s faces as they dive into layers of fluffy chocolate cake with creamy hazelnut filling. This recipe is not just about making a cake; it’s about creating sweet memories together.
Why You’ll Love This Chocolate Hazelnut Layer Cake
This Chocolate Hazelnut Layer Cake is a true showstopper, and you’ll adore how easy it is to whip up! With a prep time of just 35 minutes, you can have this beauty ready to impress in no time. The layers of chocolate and hazelnut blend perfectly, creating a taste that will have everyone begging for seconds. Plus, it’s so versatile; whether it’s a birthday cake or a simple dessert, it’s sure to delight any crowd!
Ingredients for Chocolate Hazelnut Layer Cake
Gathering the right ingredients is the first step towards baking this luscious Chocolate Hazelnut Layer Cake. Each component plays a vital role in crafting that rich, delightful flavor. Here’s what you’ll need:
- Flour: All-purpose flour serves as the foundation, providing structure to the cake.
- Sugar: Granulated sugar adds sweetness and helps with moisture retention.
- Cocoa Powder: Unsweetened cocoa powder is essential for that deep chocolate flavor.
- Baking Soda: This leavening agent gives the cake a lovely rise and light texture.
- Baking Powder: Working alongside baking soda, it helps create lift for a fluffy cake.
- Salt: A pinch of salt enhances all the other flavors, balancing sweetness beautifully.
- Eggs: Eggs provide moisture and act as a binder to hold everything together.
- Yogurt or Buttermilk: Either one adds moisture and a slight tanginess, enriching the flavor.
- Oil: Vegetable oil keeps the cake moist and tender, making each bite heavenly.
- Vanilla: Pure vanilla extract adds a warm, aromatic note that complements the chocolate.
- Hot Water: Mixing in hot water helps bloom the cocoa, intensifying the chocolate flavor.
- Heavy Cream: This is for whipping up a luscious filling and creating a silky ganache.
- Powdered Sugar: Used in the cream filling, it sweetens without adding graininess.
- Hazelnut Spread: Rich and creamy, this is the star of the filling, bringing in that nutty flavor.
- Chocolate Chips: High-quality chocolate chips are essential for making the ganache rich and smooth.
- Crushed Hazelnuts: Perfect for topping, they add crunch and enhance the hazelnut experience.
- Chocolate Truffles: Optional, but they make for an indulgent garnish that wows everyone.
- Powdered Sugar: A light dusting on top gives a beautiful finish and a touch of sweetness.
For exact quantities, check the bottom of the article where you’ll find a handy printable version!
How to Make Chocolate Hazelnut Layer Cake
Step 1: Prepare Your Baking Pans
First, preheat your oven to 350°F. This step is crucial since it ensures even baking. While the oven warms up, grab three 8-inch cake pans. Line the bottoms with parchment paper and lightly grease the sides with oil or butter. This will help the cakes release easily after baking. Trust me, you don’t want a cake stuck in the pan! By preparing your pans right, you’re setting yourself up for success, and your Chocolate Hazelnut Layer Cake will come out perfectly.
Step 2: Mix the Dry Ingredients
In a large mixing bowl, combine flour, sugar, cocoa powder, baking soda, baking powder, and salt. Whisk them together until they’re well blended. This step is essential because it evenly distributes the leavening agents, giving your cake that perfect rise. The aroma of cocoa wafting through your kitchen is already a treat! Remember, a good mix of dry ingredients is the foundation of a great hazelnut layer cake recipe, so don’t rush through this step.
Step 3: Combine Wet Ingredients
In another bowl, crack in your eggs and add yogurt or buttermilk, oil, and vanilla extract. Whisk them until smooth. Then, here comes the magic touch—pour in the hot water. This helps bloom the cocoa powder, intensifying that deep chocolate flavor we all adore. The combination of wet ingredients adds moisture and richness to the cake, making every bite a delightful experience. Pour this mixture into your dry ingredients and stir until just combined, avoiding over-mixing.
Step 4: Bake the Cakes
Now that your batter is ready, divide it evenly among the prepared pans. Slide them into the preheated oven and bake for 20 to 25 minutes. To test for doneness, gently press the center; it should spring back. Once baked, let the cakes cool in their pans for about 10 minutes. This cooling time is key before transferring them to a wire rack, allowing them to cool completely. Rushing this step could lead to a crumbled cake, and we definitely want to avoid that!
Step 5: Make the Hazelnut Cream Filling
While your cakes are cooling, it’s time to whip up that luscious hazelnut cream filling! In a mixing bowl, pour in the heavy cream and beat it until soft peaks form. Then, add the powdered sugar and hazelnut spread, mixing until you reach stiff peaks. This creamy filling is what brings the chocolate hazelnut cake to life! The rich hazelnut flavor pairs beautifully with the chocolate layers. Set this aside until you’re ready to layer the cakes.
Step 6: Layer the Cakes
Once your cakes are completely cool, it’s time to assemble! Place one layer on a serving plate. Spread a generous amount of hazelnut cream filling on top. Repeat this process with the second layer. Finally, crown it all with the third layer. This layering technique creates a delightful contrast of textures, making every slice a heavenly experience. Don’t forget to smooth out the cream filling as you go for a beautiful finish!
Step 7: Prepare the Ganache
Now for the pièce de résistance—the chocolate ganache! In a small saucepan, heat the heavy cream until it’s just about to simmer. Remove it from heat and pour it over the chocolate chips in a bowl. Stir until the mixture is smooth and glossy. This decadent ganache will pour over the top of the cake, creating that rich chocolate coating we all love. Let it cool for a bit until it thickens slightly, making it easier to drizzle over your cake.
Step 8: Finish and Decorate
Once your ganache is ready, pour it over the top layer of the cake, letting it drip down the sides for that dramatic effect. Then, sprinkle crushed hazelnuts on top and add chocolate truffles if you’re feeling fancy. A light dusting of powdered sugar adds an elegant finish. The visual allure of your Chocolate Hazelnut Layer Cake will have everyone swooning before they’ve even taken a bite. Now grab a slice and enjoy the fruits of your labor!
Tips for Success
- Always use room temperature ingredients for a smoother batter.
- Don’t skip the cooling step; it prevents crumbling when layering.
- For a richer flavor, opt for high-quality cocoa powder and chocolate chips.
- When whipping cream, ensure your bowl and beaters are cold for better volume.
- Feel free to customize with different nuts or additional fillings!
Equipment Needed
- 8-inch cake pans (You can use round or square pans, just adjust baking time.)
- Mixing bowls (A large and medium bowl will do the trick.)
- Whisk or electric mixer (A handheld mixer speeds up cream whipping.)
- Measuring cups and spoons (Essential for accuracy in baking.)
- Cooling rack (If you don’t have one, a plate works too!)
Variations of Chocolate Hazelnut Layer Cake
- Gluten-Free Option: Substitute all-purpose flour with a gluten-free flour blend to accommodate dietary restrictions.
- Nut-Free Version: Replace hazelnut spread with sunflower seed butter for a nut-free alternative.
- Vegan Delight: Use flax eggs instead of regular eggs, coconut yogurt, and plant-based cream for a vegan twist.
- Mocha Hazelnut: Add a tablespoon of instant coffee granules to the dry mix for a mocha flavor boost.
- Fruit Layering: Incorporate layers of fresh raspberries or strawberries between the cake layers for a fruity surprise.
Serving Suggestions for Chocolate Hazelnut Layer Cake
- Pair with fresh berries for a burst of color and tartness.
- Serve with a scoop of vanilla ice cream for a delightful contrast.
- Enjoy with a rich cup of coffee or espresso to enhance the chocolate flavor.
- Present on a beautiful cake stand for an eye-catching display.
- Garnish with whipped cream for an extra touch of indulgence.
Frequently Asked Questions (FAQs)
Q: Can I make this cake ahead of time?
Absolutely! You can bake the Chocolate Hazelnut Layer Cake a day or two in advance. Just wrap the cooled layers tightly in plastic wrap and store them in the fridge. Assemble the cake with the hazelnut cream filling right before serving to maintain freshness and flavor.
Q: How should I store leftover cake?
To keep your leftover Chocolate Hazelnut Layer Cake fresh, cover it with plastic wrap or place it in an airtight container. Store it in the refrigerator for up to five days. Just remember to let it sit at room temperature for a few minutes before serving for the best taste!
Q: Can I substitute the hazelnut spread?
Yes! If you’re looking for alternatives, almond butter or peanut butter can work well. For a non-nut option, try using sunbutter, made from sunflower seeds. Just keep in mind that these substitutions will slightly alter the flavor of your Chocolate Hazelnut Layer Cake.
Final Thoughts
Creating a Chocolate Hazelnut Layer Cake is more than just baking; it’s about making memories and indulging in sweet moments with loved ones. This cake brings joy to any occasion, whether it’s a birthday celebration or a simple family dinner. Each slice is a delightful mix of rich chocolate and creamy hazelnut, sure to bring smiles to everyone’s faces. Plus, the process of making it can be a fun adventure in the kitchen, allowing you to share your love for baking. So, gather your ingredients and let this cake be a delicious centerpiece for your next gathering!
PrintChocolate Hazelnut Layer Cake: Indulge in Decadence!
Indulge in the decadence of this rich Chocolate Hazelnut Layer Cake, featuring layers of chocolate cake and creamy hazelnut filling, topped with luscious ganache.
- Prep Time: 35 minutes
- Cook Time: 25 minutes
- Total Time: 1 hour 30 minutes
- Yield: 10–12 servings 1x
- Category: Dessert
- Method: Baking
- Cuisine: American
- Diet: Vegetarian
Ingredients
- 1 1/2 cups flour
- 1 cup sugar
- 1/3 cup cocoa powder
- 1 tsp baking soda
- 1/2 tsp baking powder
- 1/2 tsp salt
- 2 eggs
- 1 cup yogurt or buttermilk
- 1/2 cup oil
- 2 tsp vanilla
- 1/2 cup hot water
- 2 cups heavy cream
- 1/4 cup powdered sugar
- 1/2 cup hazelnut spread
- 1 tsp vanilla
- 1 cup cream (for ganache)
- 1 cup chocolate chips
- Crushed hazelnuts (for topping)
- Chocolate truffles (for topping)
- Powdered sugar (for topping)
Instructions
- Preheat oven to 350°F. Line three 8-inch pans. Mix dry ingredients. Add wet ingredients. Stir in hot water. Divide into pans. Bake for 20–25 mins. Cool completely.
- Whip cream until thick. Add sugar, hazelnut spread, and vanilla. Beat to stiff peaks.
- Layer cakes with hazelnut cream.
- Heat cream, pour over chocolate. Stir until smooth. Cool.
- Pour ganache over cake. Top with hazelnuts, truffles, and powdered sugar.
Notes
- Ensure cakes are completely cooled before assembling.
- You can substitute yogurt with buttermilk for a different flavor.
- For a richer ganache, use high-quality chocolate chips.
Nutrition
- Serving Size: 1 slice
- Calories: Approximately 450-500 calories per slice
- Sugar: 30g
- Sodium: 200mg
- Fat: 25g
- Saturated Fat: 10g
- Unsaturated Fat: 15g
- Trans Fat: 0g
- Carbohydrates: 50g
- Fiber: 2g
- Protein: 6g
- Cholesterol: 70mg