
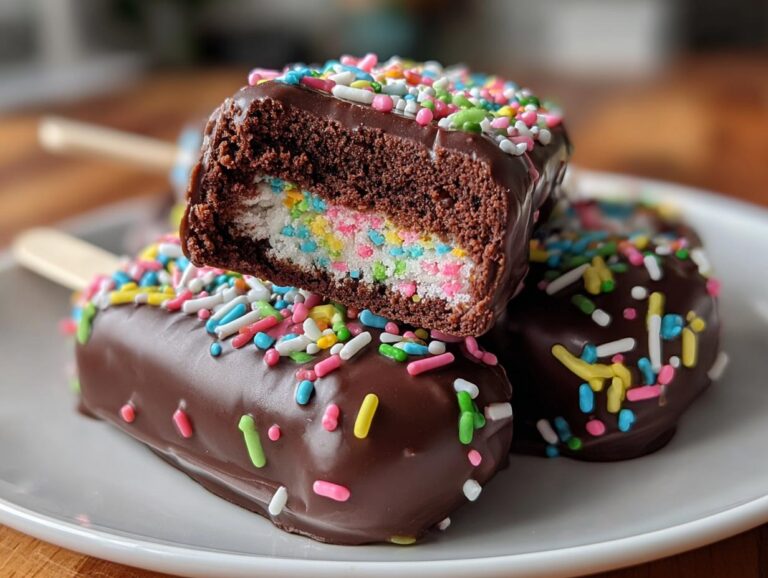
Oh my goodness, let me tell you about the time I first made these chocolate cakesicles for my daughter’s birthday party. The kids went wild for them—like, full-on squealing-and-jumping-up-and-down wild. That’s when I knew I’d struck gold with this recipe. After 15 years of baking everything from fussy French pastries to towering layer cakes, sometimes it’s the simplest treats that steal the show.
These festive little gems are my go-to for any celebration now—New Year’s Eve, birthdays, baby showers, you name it. The magic? They look fancy but couldn’t be easier to make. Just crumbled chocolate cake mixed with frosting, dipped in melted chocolate, and covered in cheerful sprinkles. The hardest part is not eating them all yourself while decorating!
Ingredients for Chocolate Cakesicles
Here’s what you’ll need to make these festive treats – and trust me, every ingredient plays a crucial role! First, grab a box of chocolate cake mix (plus whatever eggs, oil, and water it calls for). The real magic happens when you mix it with 1 cup of vanilla frosting – homemade or store-bought both work beautifully. You’ll want 16 oz of milk or dark chocolate melting wafers or chips (this is key for that perfect smooth coating). Don’t forget the rainbow sprinkles – I always use the New Year’s Eve style for extra sparkle! And of course, popsicle sticks for holding these cute little treats.
Oh! One secret weapon I sometimes add: a handful of white cake crumbs pressed into the center of each cakesicle before freezing. It creates a fun surprise when you bite in!
How to Make Chocolate Cakesicles
Okay, let’s get to the fun part – making these adorable chocolate cakesicles! I promise, even if you’ve never worked with cake pops or molds before, you’ll nail these on your first try. Just follow these simple steps, and you’ll have party-ready treats in no time.
Baking and Preparing the Cake Base
First things first – bake your chocolate cake according to the package directions. I know, I know, using a box mix feels like cheating, but trust me, it works perfectly for this recipe. Let that cake cool completely – seriously, no cheating here with warm cake! Once cooled, crumble it into fine crumbs with your hands. You want it to look like chocolate sand – no big chunks!
Now, here’s where the magic happens. Mix those crumbs with your vanilla frosting until it comes together like a soft dough. Warning: don’t go overboard with mixing! Just stir until combined, or your cakesicles might turn out too dense. The perfect texture should hold together when squeezed but still feel light.
Assembling and Freezing the Cakesicles
Grab your cakesicle molds (or popsicle molds in a pinch) and firmly press the cake mixture in there. I mean really pack it in – use your fingers or the back of a spoon to eliminate any air pockets. This ensures your cakesicles won’t crumble when you dip them later.
Now for the popsicle sticks! Insert them about halfway into each mold. Pop everything in the freezer for a solid 30 minutes – no less! This chilling step is crucial for that perfect dip later. While they freeze, clean up (or sneak a taste of leftover cake mixture – I won’t tell!).
Dipping and Decorating
Time for the best part – the chocolate dip! Melt your chocolate wafers or chips slowly, stirring frequently. Pro tip: a splash of coconut oil makes the chocolate extra smooth for dipping. Working quickly, dip each frozen cakesicle into the chocolate, letting the excess drip off. Now comes the fun part – immediately cover them with sprinkles before the chocolate sets!
If you’re doing the optional white cake surprise, here’s when to add it: before freezing, press a small ball of white cake mixture into the center of each mold before adding the chocolate cake. When your guests bite in – surprise! A fun little contrast inside their chocolatey treat.
Tips for Perfect Chocolate Cakesicles
Listen, I’ve made enough of these to know the little tricks that take them from “good” to “OH MY GOSH, how did you make these?!” Here are my hard-earned secrets:
- Quality chocolate matters – Skip the cheap stuff and get melting wafers or high-quality chocolate chips. They melt smoother and set with that perfect snap.
- Freeze your molds first – A quick 10-minute chill in the freezer before filling helps the cakesicles release cleanly later.
- Tap off excess chocolate like a pro – After dipping, gently tap your wrist to shake off extra chocolate. This prevents those annoying drips at the base.
- Work in batches – Keep undipped cakesicles in the freezer until ready – they hold their shape better when ice-cold.
- Sprinkle immediately – Like, the second the chocolate dip is done. The sprinkles won’t stick once the chocolate starts to set.
One last thing – don’t stress if your first few don’t look perfect! Even my “ugly” ones taste amazing, and they all disappear just as fast.
Ingredient Substitutions and Variations
Listen, I’m all about making recipes work for everyone! Got dietary restrictions? No problem. Swap in a gluten-free chocolate cake mix – I’ve done it dozens of times with perfect results. Vegan friends coming over? Use dairy-free frosting and dark chocolate. The sprinkles are where you can really have fun – red and green for Christmas, pastels for Easter, or gold stars for Fourth of July. Honestly, these cakesicles are like a blank canvas for any occasion!
One of my favorite twists? Adding a teaspoon of peppermint extract to the cake mixture for holiday versions. The minty-chocolate combo makes people go crazy for them!
Serving and Storing Chocolate Cakesicles
Here’s the best way to enjoy these little beauties – serve them chilled! The chocolate coating stays perfectly crisp when they’re cool. Just pull them out of the fridge about 5 minutes before serving so they’re not too firm. If you’re planning ahead (which I rarely do!), they keep beautifully in an airtight container for 3 days in the fridge. For longer storage, freeze them up to a month – just thaw in the fridge overnight before serving. Trust me, they’ll still taste fresh as the day you made them!
Nutritional Information
Just so you know what you’re biting into, here’s the scoop on these chocolate cakesicles! Keep in mind these are estimates – actual values might vary slightly depending on your exact ingredients. Each delightful cakesicle clocks in at about 280 calories, with 20g of sugar (hey, it’s a celebration treat!). You’re looking at 12g of fat per pop, with 6g being saturated fat from that luscious chocolate coating. Not too bad for something this fun and festive, right? Everything in moderation, I always say!
FAQs About Chocolate Cakesicles
Can I use homemade cake instead of box mix?
Absolutely! My grandma’s chocolate cake recipe works beautifully here. Just make sure it’s moist enough – dense pound cakes don’t crumble as well. The key is getting that perfect sand-like texture when you break it up.
How do I prevent the chocolate coating from cracking?
Two secrets: First, make sure your cakesicles are frozen solid before dipping. Second, don’t let them warm up too fast after dipping – I put them right back in the fridge. The temperature shock is what causes most cracks.
What are the best sprinkles for New Year’s Eve?
Oh, I go all out with metallic gold and silver jimmies or those fun star-shaped sprinkles! The shimmer really makes them feel like festive party desserts. Regular rainbow sprinkles work great too if that’s what you’ve got.
Can kids help decorate these?
Are you kidding? Decorating is half the fun! Just melt the chocolate yourself, then let the little ones go wild with sprinkles. I lay down parchment paper first – makes cleanup a breeze.
Why You’ll Love This Recipe
Let me count the ways these chocolate cakesicles will become your new favorite party trick:
- Party-perfect every time – These festive little treats look fancy but couldn’t be easier to make
- Kid-approved magic – Children go absolutely wild for them (and adults too, let’s be honest)
- Endless customization – Switch up sprinkles or cake flavors for any holiday or theme
- No special equipment needed – Just basic molds and ingredients you probably already have
- Make-ahead dream – They freeze beautifully so you can prep days before your event
Seriously, once you see how quickly these disappear at parties, you’ll understand why they’re my most-requested treat!
Let’s See Your Chocolate Cakesicle Creations!
I’d love to see how your chocolate cakesicles turn out—tag me on Instagram or leave a rating below! Nothing makes me happier than seeing these festive treats at your celebrations. Happy baking!
PrintIrresistible Chocolate Cakesicles That Wow Every Time
Fun and festive chocolate sprinkle cakesicles, perfect for New Year’s Eve or any celebration. Easy to make and irresistible.
- Prep Time: 25 minutes
- Cook Time: 30 minutes (chill time)
- Total Time: 55 minutes
- Yield: 12–15 cakesicles 1x
- Category: Dessert
- Method: Baking, Dipping
- Cuisine: American
- Diet: Vegetarian
Ingredients
- 1 box chocolate cake mix (plus ingredients listed on the box)
- 1 cup vanilla frosting
- Rainbow sprinkles (New Year’s style)
- 12–15 popsicle sticks
- 16 oz milk or dark chocolate (melting wafers or chocolate chips)
- Optional: white cake crumbs for the center surprise
Instructions
- Bake the chocolate cake according to package directions. Let cool completely, then crumble into fine crumbs.
- Mix cake crumbs with frosting until it forms a dough-like texture.
- Press cake mixture firmly into cakesicle molds, add a popsicle stick, and freeze for 30 minutes.
- Melt chocolate until smooth, then dip each frozen cakesicle.
- Immediately decorate with rainbow sprinkles.
Notes
- Use high-quality chocolate for best results.
- Freezing the cakesicles ensures a smooth chocolate dip.
- Customize with different sprinkles for different occasions.
Nutrition
- Serving Size: 1 cakesicle
- Calories: 280
- Sugar: 20g
- Sodium: 180mg
- Fat: 12g
- Saturated Fat: 6g
- Unsaturated Fat: 4g
- Trans Fat: 0g
- Carbohydrates: 38g
- Fiber: 2g
- Protein: 4g
- Cholesterol: 10mg