
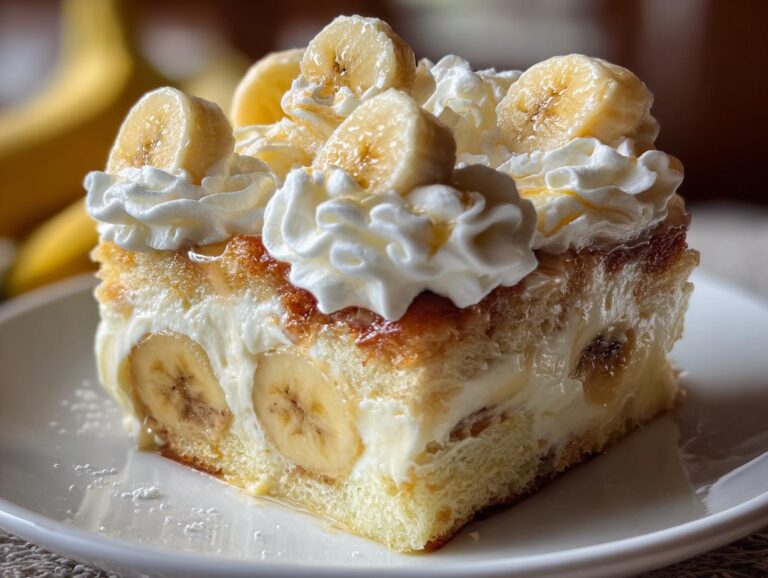
Let me tell you about the dessert that saved my sanity last summer – this incredible Banana Pudding Cake. Picture this: my cousin’s surprise engagement party, 30 people showing up at my tiny apartment, and me realizing I forgot to make dessert. Cue panic! Then I remembered this no-fuss, creamy miracle that comes together faster than you can say “congratulations.”
This isn’t just any cake – it’s layers of vanilla cake soaked with luscious banana pudding, fresh slices of ripe bananas, and clouds of whipped cream. The magic happens when you poke holes in the warm cake and let that pudding mixture seep into every nook. Three hours in the fridge transforms it into something spectacular – cool, creamy, and packed with that nostalgic banana pudding flavor we all love. Trust me, by the time my guests were scooping seconds, no one cared I’d nearly burned the appetizers!
Why You’ll Love This Banana Pudding Cake
This cake checks all the boxes for that perfect dessert you’ll make again and again. Let me count the ways:
- Creamy dreaminess: The pudding seeps into every bite, creating this melt-in-your-mouth texture that’ll have you closing your eyes in bliss
- Easy-peasy prep: Starts with a box mix, so even my baking-challenged brother can’t mess it up
- Crowd magnet: I’ve yet to meet someone who doesn’t go back for seconds (or thirds – no judgment!)
- Party superstar: Feeds a crowd without breaking a sweat – perfect for potlucks and family reunions
- Taste of childhood: That nostalgic banana pudding flavor takes me right back to Grandma’s kitchen
Honestly? The hardest part is waiting those few hours while it chills. But oh, is it worth it!
Ingredients for Banana Pudding Cake
This beauty comes together with simple ingredients you probably already have. Here’s what you’ll need for that perfect creamy texture and banana bliss:
- 1 box vanilla cake mix (plus whatever ingredients it calls for – usually eggs, oil, and water)
- 2 cups cold milk (whole milk makes it extra creamy, but 2% works too)
- 1 box (3.4 oz) instant vanilla pudding mix
- 1 can (14 oz) sweetened condensed milk – don’t confuse this with evaporated milk!
- 1 teaspoon pure vanilla extract
- 1 1/2 cups whipped topping (like Cool Whip), thawed
- 3-4 ripe bananas, sliced (about 1/4-inch thick)
- Extra whipped cream & banana slices for garnish
- Crushed vanilla wafers (optional but oh-so-good for that classic banana pudding feel)
Ingredient Notes & Substitutions
Here’s where I get a little bossy (with love!) about making this cake shine:
- Bananas must be ripe! Those brown speckles mean sweetness – green bananas will taste bland.
- Swap store-bought whipped topping with homemade whipped cream if you prefer – just whip 1 cup heavy cream with 2 tbsp sugar until stiff peaks form.
- Allergic to gluten? Use a gluten-free vanilla cake mix – the texture works beautifully.
- Feeling fancy? Swap vanilla pudding for banana cream pudding to double down on banana flavor.
- No vanilla wafers? Try crushed graham crackers or omit entirely – still delicious!
Pro tip: Slice bananas just before assembling to prevent browning. A little lemon juice on them helps too!
How to Make Banana Pudding Cake
Now for the fun part – turning these simple ingredients into magic! Follow these steps and you’ll have the creamiest, dreamiest banana pudding cake that’ll disappear faster than you can say “seconds please!”
Step 1: Bake the Cake Base
First things first – let’s get that cake going. Preheat your oven to whatever temperature your box mix calls for (usually 350°F). Grab a 9×13 inch baking dish – this is the perfect size for soaking up all that pudding goodness. Mix up the cake batter exactly as the package directs. No shortcuts here!
Pour the batter into your greased dish and pop it in the oven. Here’s my little trick – I like to bake it for about 5 minutes less than the box says. Why? Because we want it slightly underdone so it’ll soak up that pudding mixture like a sponge. When it’s golden and just set (about 25-28 minutes), pull it out and let it cool for about 10 minutes – just enough so you don’t burn your fingers poking holes!
Step 2: Prepare the Pudding Mixture
While the cake’s baking, let’s make that luscious pudding layer. In a big bowl, whisk together your cold milk and pudding mix until it starts to thicken – about 2 minutes of vigorous whisking. Now pour in that glorious can of sweetened condensed milk and vanilla extract. Keep whisking until it’s silky smooth with no lumps.
Here comes the important part – gently fold in your whipped topping. I mean gently – we want to keep all that airy lightness. Use a big rubber spatula and fold in a figure-eight motion until no white streaks remain. Set this aside while we get our cake ready for its transformation.
Step 3: Assemble & Chill
Now for the magic! Take the handle of a wooden spoon (or a chopstick if you’re fancy) and poke holes all over your slightly warm cake. Lots of holes! I aim for about 1 inch apart – this lets the pudding seep into every delicious corner. Don’t be shy – the more holes, the better the absorption.
Slowly pour your pudding mixture over the cake, using a spatula to spread it evenly into all those holes you made. Now arrange those beautiful banana slices in a single layer over the top. Press them gently into the pudding so they stick. Pop the whole thing in the fridge uncovered for at least 2-3 hours – I know it’s hard, but don’t peek! This chilling time is crucial for everything to set up properly.
Step 4: Add Toppings & Serve
The moment we’ve been waiting for! Right before serving, dollop on some fresh whipped cream (or more thawed topping if that’s what you’re using). Add a few extra banana slices for that gorgeous presentation, and if you’re feeling extra, sprinkle on some crushed vanilla wafers for that classic banana pudding crunch.
Use a big serving spoon to scoop out generous portions – this cake is rich, so smaller slices than you’d think! Watch as everyone’s eyes light up when they taste that perfect combination of moist cake, creamy pudding, and fresh bananas. Just try not to blush when they all ask for your “secret recipe!”
Tips for the Best Banana Pudding Cake
After making this cake more times than I can count, here are my foolproof tips for banana pudding perfection:
- Chill your mixing bowl before making whipped cream – cold bowls make fluffier peaks!
- Room temp eggs for the cake batter help it rise evenly (take them out 30 minutes before baking)
- Slice bananas at the last minute to prevent browning – a quick dip in lemon juice helps too
- Don’t skip the chilling time – those 2-3 hours let the pudding fully soak into every bite
- Use a straw to poke holes if you don’t have a wooden spoon handle – perfect little tunnels!
Follow these and you’ll have the creamiest, dreamiest banana pudding cake every single time!
Banana Pudding Cake Variations
Once you’ve mastered the basic recipe (and trust me, you’ll want to make it weekly), it’s time to play around with some delicious variations! Here are my favorite ways to switch things up when I’m feeling adventurous:
Caramel Banana Bliss
Oh my goodness – this version takes things to another level! After adding the banana slices in Step 3, drizzle about 1/2 cup of warm caramel sauce over everything before chilling. The caramel seeps into the cake alongside the pudding, creating these incredible ribbons of gooey goodness. Top with extra caramel when serving – because more is always better when it comes to caramel!
Butterscotch Banana Dream
Instead of vanilla pudding mix, use instant butterscotch pudding for a rich, buttery twist. The flavor pairs so beautifully with the bananas! I like to add a sprinkle of toasted pecans on top for crunch. This variation reminds me of those old-fashioned banana splits my grandpa used to make.
Chocolate Banana Bonanza
For all my chocolate lovers out there – swap the vanilla cake mix for chocolate! The contrast between the dark cake and creamy banana pudding is absolutely divine. Sometimes I’ll even mix a tablespoon of cocoa powder into the pudding mixture for extra chocolatey goodness. Top with chocolate shavings if you’re feeling fancy.
The fun part about this recipe is how adaptable it is – I’ve even tried adding a layer of crushed pineapple between the cake and pudding (hello, tropical vibes!). Whatever variation you choose, just remember the golden rule: always use ripe bananas for maximum flavor!
Serving & Storing Banana Pudding Cake
Now let me tell you how to keep this beauty tasting its absolute best! This cake lives in the fridge – no exceptions. The moment it’s assembled, it goes straight into chilling mode. I like to serve it right from the baking dish because who needs extra dishes to wash?
When storing leftovers (if you’re lucky enough to have any!), press plastic wrap directly onto the surface of the cake before covering with a lid or foil. This helps prevent that pesky pudding skin from forming. Honestly though? It’s best eaten within 2 days – the bananas start to darken and the texture changes a bit after that.
Don’t panic if your banana slices turn brown – they’re still perfectly safe to eat! The oxidation doesn’t affect the flavor one bit. If you’re serving this for company and want picture-perfect bananas, you can always add fresh slices right before serving.
Pro tip: For individual servings, try scooping portions into mason jars with lids – they make adorable single-serve desserts that travel well to picnics or potlucks!
Banana Pudding Cake FAQs
I get asked these questions ALL the time when I bring this cake to gatherings, so let me share all the answers I’ve discovered through trial and error (and plenty of tasting sessions!).
Can I make Banana Pudding Cake ahead of time?
Absolutely! The cake actually improves with a little time in the fridge. Assemble everything except the final whipped cream topping and garnish up to 24 hours ahead. Just cover tightly and refrigerate, then add your fancy toppings right before serving so they stay fresh-looking.
Can I use homemade pudding instead of instant?
You sure can – but here’s the trick! Cooked pudding needs to be cooled completely and thickened enough to hold its shape when sliced. I’d recommend making it a bit stiffer than usual since we’re pouring it over cake. If it seems too runny, pop it in the fridge for 30 minutes before assembling.
How do I prevent a soggy cake?
The magic is in the hole-poking! Don’t go wild – space your holes about 1 inch apart. Too many holes and the cake loses its structure. Also, make sure your cake isn’t piping hot when adding the pudding – warm is perfect, hot will make the pudding too thin.
Can I freeze Banana Pudding Cake?
Honestly? I wouldn’t recommend it. The pudding texture changes when frozen and thawed, and the bananas get mushy. This dessert is best enjoyed fresh from the fridge within a couple days. Consider halving the recipe if you won’t finish it all!
Why did my bananas turn brown?
Totally normal! Bananas oxidize when exposed to air. It doesn’t affect the taste one bit. If it bothers you, toss your banana slices in a little lemon juice before arranging them on the cake, or just add fresh slices right before serving.
Nutritional Information
Now, I’m no nutritionist – I’m just a home cook who believes dessert should be enjoyed without guilt! Here’s the estimated nutritional breakdown per serving (based on cutting the cake into 8 generous portions):
- Calories: 340
- Total Fat: 12g (6g saturated)
- Cholesterol: 40mg
- Sodium: 300mg
- Total Carbohydrates: 50g
- Dietary Fiber: 2g
- Sugars: 25g
- Protein: 5g
Remember, these numbers are rough estimates – your actual counts might vary depending on the exact brands you use and any substitutions you make. Going gluten-free? Using sugar-free pudding? Adding extra whipped cream? (No judgment!) All these tweaks will change the numbers slightly.
The important thing is that this cake brings people together and puts smiles on faces – and that’s priceless! Now go grab your ingredients and make some memories. I’d love to hear how your Banana Pudding Cake turns out – tag me if you share photos!
PrintIrresistible 3-Layer Banana Pudding Cake Bliss

A creamy and easy banana pudding cake that’s a crowd-pleaser and perfect for any occasion.
- Prep Time: 15 minutes
- Cook Time: 30 minutes
- Total Time: 3 hours
- Yield: 8 servings 1x
- Category: Dessert
- Method: Baking
- Cuisine: American
- Diet: Vegetarian
Ingredients
- 1 box vanilla cake mix
- Ingredients listed on the box (eggs, oil, water)
- 2 cups cold milk
- 1 box instant vanilla pudding mix
- 1 can sweetened condensed milk
- 1 teaspoon vanilla extract
- 1 1/2 cups whipped topping
- 3–4 ripe bananas, sliced
- Whipped cream
- Banana slices
- Crushed vanilla wafers (optional)
Instructions
- Prepare and bake the vanilla cake according to package directions in a baking dish. Let it cool slightly.
- Whisk together milk, pudding mix, condensed milk, and vanilla until smooth. Fold in whipped topping.
- Poke holes all over the warm cake, then pour the pudding mixture over it, letting it soak in. Add banana slices on top.
- Refrigerate for at least 2–3 hours so everything sets.
- Add whipped cream, banana slices, and crushed wafers before serving.
Notes
- Use ripe bananas for the best flavor.
- Chilling time is essential for the cake to set properly.
- Customize toppings as desired.
Nutrition
- Serving Size: 1 slice
- Calories: 340
- Sugar: 25g
- Sodium: 300mg
- Fat: 12g
- Saturated Fat: 6g
- Unsaturated Fat: 4g
- Trans Fat: 0g
- Carbohydrates: 50g
- Fiber: 2g
- Protein: 5g
- Cholesterol: 40mg