
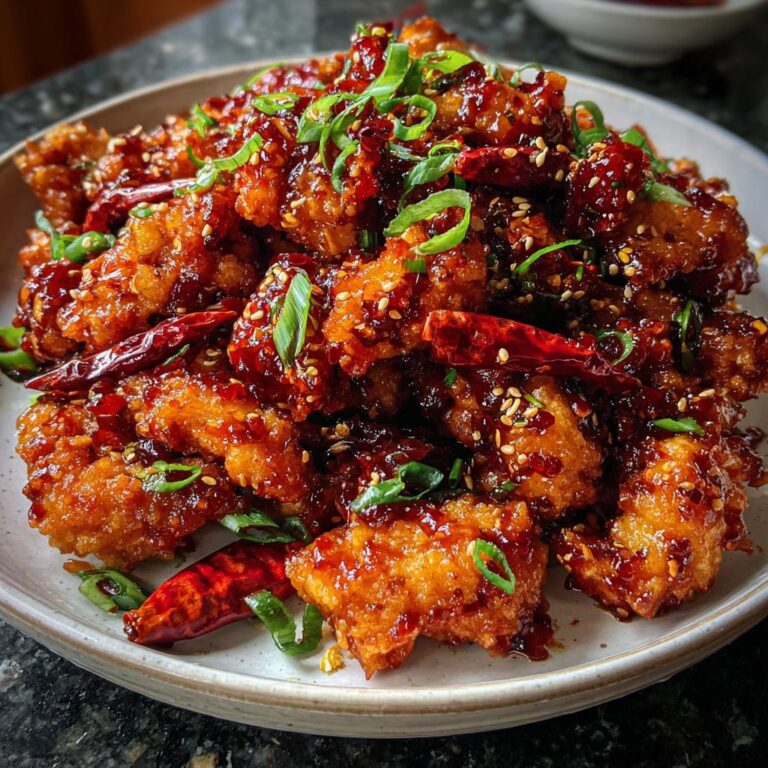
Oh my gosh, do you remember that first bite of takeout dragon chicken? I sure do – it was at this tiny Indo-Chinese spot in my neighborhood, and wow, the crispy-spicy-sweet explosion made me an instant addict! I begged the owner for hints, then spent months perfecting my version of this dragon chicken recipe at home. It’s got that perfect crunch from double-fried chicken strips, kissed by a sticky glaze that’ll make your taste buds dance. Even better? You can whip it up faster than delivery would arrive! Trust me, once you try making this at home, you’ll never look at takeout menus the same way again.
Why You’ll Love This Dragon Chicken Recipe
Listen, this isn’t just another chicken stir-fry—it’s the crispy, fiery, sweet-glazed masterpiece of your takeout dreams. Here’s why it’s about to become your weeknight hero:
- Faster than delivery: 35 minutes start-to-finish (yes, even with frying!)
- That crunch: Cornstarch coating fries up shatteringly crisp
- Sweet heat magic: Chili sauce + honey glaze sticks to every nook
- Restaurant vibes at home: Sesame seeds and green onions make it pretty
Pro tip: Make extra sauce for drizzling—you’ll want it on everything!
Ingredients for Dragon Chicken Recipe
Gather these pantry staples and fresh ingredients – trust me, the magic happens when these simple things come together just right!
- 2 boneless chicken breasts, cut into ½-inch strips (skinless thighs work too)
- ½ cup cornstarch (lightly spooned in, not packed – this is key for crispiness!)
- ¼ cup all-purpose flour (the combo with cornstarch gives that perfect crunch)
- 1 large egg, beaten (acts as the glue for our crispy coating)
- Salt & black pepper to taste (don’t skip seasoning the batter!)
- Neutral oil for frying (vegetable, canola, or peanut oil work best)
The Glorious Sauce Ingredients
- 2 tbsp soy sauce (regular or light – but not dark soy sauce)
- 2 tbsp chili sauce (Sriracha, sambal oelek, or your favorite – adjust for heat!)
- 1 tbsp ketchup (sounds weird, but it balances the spice perfectly)
- 1 tbsp honey (or maple syrup for vegans)
- 1 tbsp fresh garlic, minced (please, please use fresh – it makes all the difference)
- 1 tsp fresh ginger, minced (same as garlic – fresh is best)
Finishing Touches
- 1-2 red chilies, thinly sliced (optional but pretty and adds extra kick)
- 2 tbsp green onions, chopped (scallions work too – use both green and white parts)
- 1 tsp sesame seeds (toasted if you’re feeling fancy)
Ingredient Substitutions & Notes
No stress if you’re missing something – here’s how to adapt:
- Chicken: Thighs stay juicier but breasts get crispier. Your call!
- Gluten-free? Use tamari instead of soy sauce and swap flour for rice flour.
- Cornstarch hack: Arrowroot or potato starch work in a pinch, but cornstarch gives the best crunch.
- Heat control: Start with 1 tbsp chili sauce if you’re spice-shy – you can always add more.
- No honey? Brown sugar (1 tbsp) or maple syrup work too – just dissolve it well.
Fun fact: That cornstarch coating? It creates tiny bubbles when fried that make each bite insanely crispy – way better than regular flour!
How to Make Dragon Chicken Recipe
Okay, let’s get cooking! I promise this dragon chicken recipe is way easier than it looks. Just follow these steps, and you’ll have takeout-worthy crispy chicken in no time. The secret? Doing things in the right order – first we fry, then we sauce, then we devour!
Step 1: Coat & Fry the Chicken
First, grab a big bowl and whisk together your cornstarch, flour, beaten egg, and a good pinch of salt and pepper. The batter should look like thick pancake batter – if it’s too runny, sprinkle in a bit more cornstarch. Toss your chicken strips in this magical mixture until every piece is thoroughly coated. No naked spots allowed!
Now, heat about 1 inch of oil in a wok or deep skillet over medium-high heat. You’ll know it’s ready (about 350°F if you’re using a thermometer) when a tiny drop of batter sizzles immediately. Carefully add your chicken pieces in a single layer – don’t crowd them! I do batches of about 6-8 pieces at a time. Fry for 3-4 minutes until golden brown and crispy, turning occasionally with tongs. Drain on a wire rack or paper towels. (Pro tip: The rack keeps them crispier than paper towels!)
Step 2: Prepare the Sweet-Spicy Sauce
Pour out all but 1 tablespoon of oil from your pan (keep that heat going!). Toss in your minced garlic and ginger – within seconds your kitchen will smell AMAZING. When they’re fragrant and just starting to turn golden (about 30 seconds), add the chili sauce, soy sauce, ketchup, and honey. Stir constantly as it bubbles away for 1-2 minutes until the sauce thickens slightly and turns glossy. You’ll see it transform from separate ingredients into this gorgeous, sticky glaze. That’s when you know it’s perfect!
Step 3: Toss & Serve
Time for the magic! Return all your crispy chicken to the pan with the sauce and toss vigorously until every piece is evenly coated. I mean REALLY toss it – flip that pan if you’re feeling fancy (just not over your white shirt!). The sauce should cling to every nook and cranny of that crispy chicken. Immediately transfer to a serving plate and shower with green onions, chili slices, and sesame seeds while everything’s still piping hot. Serve right away with steamed rice – that first crunchy-saucy bite is pure heaven!
Expert Tips for Perfect Dragon Chicken Recipe
After making this dragon chicken recipe countless times (and yes, burning a batch or two!), here are my hard-won secrets for absolute perfection:
- Double-fry for ultimate crunch: After the first fry, let chicken rest 5 minutes, then fry again 1-2 minutes. This makes the coating stay crispy even after saucing!
- Oil temperature is everything: Too hot and the coating burns before chicken cooks; too cool and it gets greasy. A candy thermometer helps, but the “sizzle test” works too – a breadcrumb should bubble vigorously when dropped in.
- Taste your sauce like a chef: Before adding chicken, dip a spoon in the glaze. Want more heat? Add chili flakes. Too sweet? A splash of rice vinegar balances it perfectly.
- Prep everything first: This cooks FAST once you start. Have all ingredients measured, chopped, and within arm’s reach – I call it my “wok ballet” setup!
- Don’t skip the sesame seeds: Toast them lightly in a dry pan first – it takes 30 seconds but makes their nutty flavor pop against the spicy sauce.
Bonus tip from my messy experience: Wear an apron! That glossy red sauce stains like crazy when you’re tossing the chicken with abandon.
Serving Suggestions for Dragon Chicken
Okay, let’s talk about how to turn this dragon chicken into a full-on feast! The sauce is so good, you’ll want to pair it with something that soaks up every last drop. Here are my absolute favorite ways to serve it:
- Steamed jasmine rice – The classic! The floral notes in jasmine rice balance the heat perfectly. Pro tip: Rinse your rice until the water runs clear for that perfect fluffy texture.
- Egg noodles or lo mein – Toss some cooked noodles right into the pan at the end to coat them in that glorious sauce. Instant noodle bowl magic!
- Quick-pickled cucumber salad – Just slice cucumbers thin, toss with rice vinegar, sugar, and sesame seeds. The cool crunch cuts through the spice beautifully.
- Stir-fried baby bok choy – Garlicky greens add freshness and make you feel virtuous about eating fried chicken (wink).
- Extra sauce on the side – Because someone (me) will inevitably want to drown their rice in more of that sweet-spicy goodness.
For parties, I love making dragon chicken sliders – pile the crispy pieces onto mini brioche buns with a dab of mayo and extra scallions. Watch them disappear faster than you can say “second batch!”
Storage & Reheating
Okay, let’s be real – this dragon chicken is so delicious, leftovers are rare in my house! But if you do manage to save some (or if you’re smart and make a double batch), here’s how to keep that crispy magic alive:
Storing: Let the chicken cool completely (but don’t leave it out more than 2 hours – food safety first!). Pack it in an airtight container with parchment paper between layers to prevent sogginess. It’ll keep in the fridge for 2 days max – any longer and the coating starts to weep.
Reheating like a pro: Forget the microwave unless you want rubbery chicken! To bring back that crunch:
- Air fryer method (my favorite!): 350°F for 3-4 minutes. The circulating air works miracles on reviving crispiness.
- Oven method: Spread on a rack over a baking sheet at 375°F for 5-7 minutes. The rack keeps the bottom from getting soggy.
Little trick I learned the hard way: If the sauce seems dry after reheating, drizzle with 1 tsp of warm water mixed with ¼ tsp honey – it reactivates the glaze perfectly. And whatever you do, don’t re-coat with fresh sauce until after reheating, or you’ll end up with mush!
P.S. This actually makes amazing next-day lunch at room temperature too – just pack the crispy pieces separately from any rice or noodles and assemble when ready to eat. The sauce soaks in differently when cold, creating almost a new texture experience that’s totally delicious in its own way!
Dragon Chicken Recipe FAQs
Over the years, I’ve gotten so many questions about this dragon chicken recipe – and yes, I’ve made every mistake possible so you don’t have to! Here are the answers to the big ones:
Can I bake instead of fry?
Oh honey, I’ve tried! For a slightly healthier version, bake at 425°F on a wire rack for 20 minutes, flipping halfway. It won’t be quite as insanely crispy, but spraying the coated chicken with oil helps. Honestly? Worth the splurge to fry – it’s the soul of this dish!
How do I reduce the spiciness?
Start with just 1 tablespoon chili sauce in the glaze, and skip the fresh chilies. My secret? A tablespoon of orange juice in the sauce balances heat beautifully. Taste as you go – you can always add more spice, but you can’t take it out!
Can I make it ahead?
Sort of! Prep the sauce and chop veggies ahead, but fry the chicken right before serving. That glorious crunch fades fast. If you must, fry chicken in advance and re-crisp in the air fryer for 2 minutes before saucing.
Why is my chicken coating falling off?
Two culprits: 1) Oil wasn’t hot enough (do the sizzle test!), or 2) You moved the chicken too soon after adding to oil. Let it fry undisturbed for 1 minute before poking. Also – pat chicken SUPER dry before coating; moisture is the enemy of crispiness!
Can I use frozen chicken?
Only if you thaw it completely first and dry it thoroughly. Frozen-to-fry = oily disaster (learned that one the hard way). Pro tip: If in a rush, thaw sealed breasts in cold water for 30 minutes.
Nutritional Information
Okay, let’s talk numbers—but remember, these are estimates since ingredient brands and sizes vary. (And let’s be honest, who actually measures that extra drizzle of honey perfectly?) Here’s the nutritional breakdown per serving if you divide this dragon chicken recipe into 3 generous portions:
- Calories: About 400 kcal (that crispy coating does its job!)
- Protein: 28g (thank you, chicken!)
- Carbohydrates: 35g (mostly from that magical cornstarch coating and sweet sauce)
- Sugar: 10g (blame the honey—but it’s so worth it)
- Fat: 15g (hey, frying gives us that crunch we crave)
- Sodium: 800mg (easy does it if you’re watching salt—you can use low-sodium soy sauce)
Fun fact: That protein count rivals many grilled chicken dishes—so really, we’re just adding joy in crispy, saucy form! For lighter versions, try baking (see FAQ) or swapping half the chicken for stir-fried veggies. But sometimes? The soul needs that golden-fried goodness, and that’s okay too.
Note: Values calculated using generic ingredients—your favorite chili sauce or local honey might tweak these slightly. Not a substitute for professional dietary advice, just a home cook’s best estimate!
Your Turn to Make Dragon Chicken Magic!
Alright, my fellow crispy chicken lovers – now it’s your turn to work that wok magic! I want to hear all about your dragon chicken adventures. Did you go extra spicy? Try the double-fry trick? Maybe you discovered an amazing new sauce twist? Drop a comment below and let me know how it turned out – your tips might help the next home cook perfect their batch!
If this recipe brought some fiery joy to your kitchen (and maybe a few happy sauce splatters on your stove), I’d be so grateful if you’d give it a star rating. Those little stars help other spice-seekers find this recipe too. And hey – snap a photo of your glossy, crunchy masterpiece! Tag me on social media so I can cheer you on. Nothing makes me happier than seeing your takeout-style successes!
Now grab those chopsticks (or just dig in with your hands – no judgment here) and enjoy every saucy, crispy bite. Remember what I always say: good food tastes even better when shared… unless it’s the last piece of dragon chicken. Then all bets are off!
Print5-Star Dragon Chicken Recipe: Spicy Crispy Perfection

Spicy, crispy takeout-style dragon chicken with a sweet-spicy glaze.
- Prep Time: 15 minutes
- Cook Time: 20 minutes
- Total Time: 35 minutes
- Yield: 3 servings 1x
- Category: Main Course
- Method: Frying
- Cuisine: Indo-Chinese
- Diet: Low Lactose
Ingredients
- 2 boneless chicken breasts, cut into strips
- 1/2 cup cornstarch
- 1/4 cup all-purpose flour
- 1 egg
- Salt & pepper to taste
- Oil for frying
- 2 tbsp soy sauce
- 2 tbsp chili sauce
- 1 tbsp ketchup
- 1 tbsp honey
- 1 tbsp garlic, minced
- 1 tsp ginger, minced
- 1–2 red chilies, sliced
- 2 tbsp green onions, chopped
- 1 tsp sesame seeds
Instructions
- Mix cornstarch, flour, egg, salt, and pepper. Coat chicken strips evenly.
- Heat oil and fry chicken until golden brown and crunchy.
- Sauté garlic, ginger, and red chilies. Add soy sauce, chili sauce, ketchup, and honey. Simmer into a glossy sauce.
- Add fried chicken to the sauce and toss until fully coated.
- Sprinkle green onions and sesame seeds on top. Serve hot with rice.
Notes
- Adjust chili sauce for desired spice level.
- Serve immediately for best crispiness.
Nutrition
- Serving Size: 1 serving
- Calories: 400
- Sugar: 10g
- Sodium: 800mg
- Fat: 15g
- Saturated Fat: 3g
- Unsaturated Fat: 10g
- Trans Fat: 0g
- Carbohydrates: 35g
- Fiber: 2g
- Protein: 28g
- Cholesterol: 120mg