
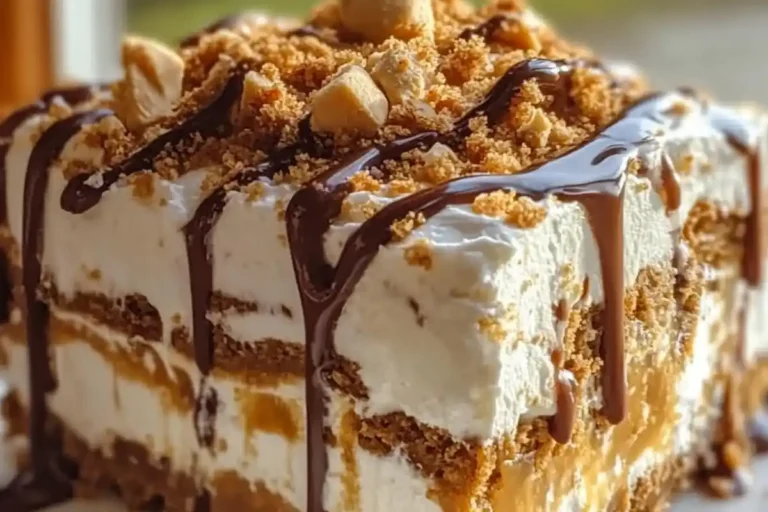
Biscoff Cookie Ice Cream Cake
As a busy mom, I know how precious time can be. That’s why I love the Biscoff Cookie Ice Cream Cake! It’s a quick and delightful way to indulge in something sweet without turning your kitchen upside down. Imagine a creamy, chilled masterpiece that combines the rich flavors of cookie butter and chocolate biscuits. It’s like a hug on a plate! Perfect for impressing guests or simply treating yourself after a long day, this no-bake dessert is a real lifesaver. Trust me, once you take that first bite, you’ll understand why everyone raves about this Biscoff ice cream cake!
Why You’ll Love This Biscoff Cookie Ice Cream Cake
This Biscoff Cookie Ice Cream Cake is everything you dream of in a dessert. It’s super easy to whip up, making it perfect for busy days when you need a sweet treat fast. The combination of creamy cookie butter and crunchy biscuits creates a taste sensation that’s hard to resist. Plus, it’s a no-bake recipe, so you can enjoy the deliciousness without the fuss. Trust me, your family will be asking for seconds!
Ingredients for Biscoff Cookie Ice Cream Cake
Gathering the right ingredients is crucial for this Biscoff Cookie Ice Cream Cake. Here’s what you’ll need:
- Crushed chocolate biscuits: These form the base of your cake, offering a chocolatey crunch. You can use any chocolate cookies you love!
- Melted butter: This binds the cookie crust together, making it sturdy. Feel free to swap for coconut oil for a dairy-free option.
- Vanilla ice cream: The star of the show! Use your favorite brand or even homemade ice cream for a personal touch.
- Cookie butter spread: This gives the cake its signature flavor. You can find it in most grocery stores, but feel free to make your own if you’re feeling adventurous!
- Whipped topping or whipped cream: Adds a light and airy layer. Use store-bought for convenience or whip up your own for a fresh taste.
- Vanilla extract: A splash of this enhances the flavor, making it even more delightful.
- Crushed Biscoff cookies: Perfect for topping! They add an extra crunch and burst of flavor.
- Chocolate sauce or melted dark chocolate: This is optional, but it brings the whole dessert together with a sweet drizzle.
For those who prefer alternatives, consider using gluten-free cookies and certified gluten-free cookie butter to make this a safe treat for everyone. Remember, the exact measurements are available at the bottom of the article for easy printing!
How to Make Biscoff Cookie Ice Cream Cake
Step 1: Prepare the Cookie Crust
To start your Biscoff Cookie Ice Cream Cake, combine the crushed chocolate biscuits with melted butter in a bowl. Mix them until the crumbs are fully coated. This step is crucial for a sturdy base, so don’t skip it! Next, press the mixture firmly into the bottom of your lined 9×9 inch pan. I like to use the bottom of a measuring cup for even pressure. Once you have a nice, even layer, pop it into the freezer for about 15 minutes. This will help the crust set, making sure it holds up when you slice into that delicious cake!
Step 2: Mix the Ice Cream and Cookie Butter
Once your crust is firm, it’s time to blend the vanilla ice cream with creamy cookie butter. Take the slightly softened ice cream and scoop it into a large mixing bowl. Add the cookie butter, and mix until smooth and well combined. You want a lovely, creamy consistency that’s easy to spread. If the ice cream is too hard, let it sit at room temperature for a few minutes to soften. Once blended, gently spread this dreamy mixture over your crust, smoothing it out with a spatula. Then, return it to the freezer for at least one hour to firm up before adding the next layer!
Step 3: Add the Whipped Topping
Now, let’s make that cake light and fluffy! In a separate bowl, combine the whipped topping with vanilla extract. This adds a touch of extra flavor that elevates the cake. Gently fold the vanilla into the whipped topping until it’s well mixed. Then, take your chilled ice cream layer out of the freezer and spread the whipped topping mixture over it. Don’t rush this step; take your time to create an even layer. It’ll give your Biscoff ice cream cake a beautiful, cloud-like finish that’s just irresistible!
Step 4: Final Touches
It’s time for the fun part! Sprinkle crushed Biscoff cookies generously over the whipped topping. This adds a delightful crunch and enhances that signature Biscoff flavor. Next, drizzle some chocolate sauce or melted dark chocolate over the top for a sweet finish. This is also where you can get creative! Use a piping bag for a fancy drizzle or simply pour it on. It’s all about presentation, and trust me, everyone will be impressed when they see this gorgeous layered Biscoff dessert. Once decorated, pop it back into the freezer for a few hours to set completely.
Step 5: Freezing and Serving
After a good freeze, your Biscoff Cookie Ice Cream Cake is nearly ready to shine! Let it sit at room temperature for about 5-10 minutes before slicing. This short wait makes cutting easier and gives you clean slices. Use a sharp knife, and make sure to wipe it clean between cuts for neat slices. Serve this frozen delight on its own or with a scoop of extra vanilla ice cream. I promise, your friends and family will be raving about this dessert long after the last slice is gone!
Tips for Success
- Make sure your ice cream is slightly softened for easy mixing.
- Press the cookie crust firmly for a sturdy base that holds together.
- Use a spatula to create smooth, even layers for a professional look.
- Feel free to customize toppings—try nuts or caramel drizzle!
- Let the cake sit at room temperature for a few minutes before slicing for cleaner cuts.
Equipment Needed
- 9×9 inch square pan: A simple baking dish works too!
- Mixing bowls: Any sizes will do for mixing ingredients.
- Spatula: Use a rubber or silicone spatula for easy spreading.
- Measuring cups: Essential for accurate ingredient portions.
- Whisk or electric mixer: A whisk is great for small batches, while an electric mixer saves time.
Variations for Biscoff Cookie Ice Cream Cake
- For a fruity twist, add layers of fresh berries or sliced bananas between the ice cream and whipped topping.
- Try a chocolate cookie crust instead of chocolate biscuits for an extra chocolatey flavor in your Biscoff cookie crust cake.
- Swap vanilla ice cream for caramel or coffee-flavored ice cream for a unique taste experience.
- Make it a no-bake Biscoff dessert by adding a layer of cheesecake filling made with cream cheese, sugar, and cookie butter.
- For a nutty crunch, incorporate crushed nuts like almonds or pecans into the topping or crust.
- Use dairy-free ice cream and coconut whipped cream for a delicious vegan version.
- Add a swirl of chocolate fudge or caramel sauce between layers for a decadent treat.
Serving Suggestions for Biscoff Cookie Ice Cream Cake
- Pair with fresh strawberries or raspberries for a fruity contrast.
- Serve with a dollop of whipped cream on top for extra indulgence.
- A drizzle of caramel sauce enhances the dessert’s sweetness.
- For drinks, try a cold glass of milk or iced coffee.
- Present slices on elegant dessert plates for a touch of class!
Frequently Asked Questions (FAQs)
As a passionate home cook, I often get asked a variety of questions about the Biscoff Cookie Ice Cream Cake. Here are some of the most common queries, along with my helpful answers!
Q: Can I make a gluten-free version of Biscoff Cookie Ice Cream Cake?
A: Yes! Use gluten-free cookies and certified gluten-free cookie butter to ensure a deliciously safe treat.
Q: How long can I store the Biscoff Cookie Ice Cream Cake?
A: The cake can be stored in the freezer for up to 2 weeks when properly covered. This makes it perfect for meal prep!
Q: Can I use homemade whipped cream instead of whipped topping?
A: Absolutely! Homemade whipped cream adds a delightful freshness to the cake. It’s a great way to elevate this already amazing dessert!
Q: What can I do if I don’t have cookie butter?
A: If you can’t find cookie butter, try using a blend of peanut butter and crushed cookies for a similar taste and texture!
Q: Can I add more layers to my Biscoff Cookie Ice Cream Cake?
A: Definitely! Feel free to add layers of fruit, chocolate fudge, or other flavors to customize it to your liking.
Final Thoughts
Making this Biscoff Cookie Ice Cream Cake is not just about the delicious layers; it’s about creating joyful moments. Picture that first slice, the looks of delight on your loved ones’ faces, and the laughter that fills your kitchen. This dessert is a true crowd-pleaser, perfect for family gatherings or simply a night in. It’s easy, fun, and oh-so-satisfying! Plus, you can customize it to fit your family’s tastes. So, roll up your sleeves and dive into this sweet adventure. Trust me, every bite will remind you why you love being a home cook!
PrintBiscoff Cookie Ice Cream Cake: A Must-Try Delight!

A chilled and creamy Biscoff Cookie Ice Cream Cake that is crunchy and dangerously crave-worthy!
- Prep Time: 25 minutes
- Total Time: 3 hours 25 minutes
- Yield: 9 servings 1x
- Category: Dessert
- Method: No Bake
- Cuisine: American
- Diet: Vegetarian
Ingredients
- 2 cups crushed chocolate biscuits
- 1/2 cup melted butter
- 1 1/2 cups vanilla ice cream, slightly softened
- 3/4 cup creamy cookie butter spread
- 2 cups whipped topping or whipped cream
- 1 tsp vanilla extract
- Crushed Biscoff cookies (for topping)
- Chocolate sauce or melted dark chocolate (for drizzling)
Instructions
- Mix crushed chocolate biscuits and melted butter. Press into a 9×9 inch lined pan. Freeze for 15 minutes.
- Blend softened ice cream with cookie butter. Spread over the base and freeze for 1 hour.
- Mix whipped topping with vanilla. Spread over the ice cream layer.
- Sprinkle crushed cookies and drizzle with chocolate. Freeze for 2–3 more hours until set.
- Let sit for 5–10 minutes before slicing. Store covered in freezer.
Notes
- For a lighter version, use coconut whip and dairy-free ice cream.
- Garnish with nuts or caramel drizzle.
- For a gluten-free option, use GF cookies and certified cookie spread.
Nutrition
- Serving Size: 1 slice